

Okay guys, let’s talk DIY skincare for men. Although times are changing and many guys are starting to take proper care of their skin, there are still so many men who don’t use a single skincare product!
I think skincare can be a bit daunting for some guys, especially if you’re not using anything at all, to begin with. So I thought to myself if a guy is going to use only one moisturizer, what should they use?
While a man could absolutely use my popular homemade face moisturizer, I love that recipe! But wouldn’t it be great to have something a little more masculine? I think so, and here’s what we came up with, it really is amazing!

An Amazing Face Moisturizer For Men
While you could happily use this at any time of the day, after washing your face. You should try to use it as more of a night cream. This is because the formulation is great for caring for skin that’s spent time in the sun, or for detoxing skin after a long day out at work or playing sports.
Dan says “So I’ll brush my teeth, wash my face and then chuck on some of this on before I head to bed. Once you make it part of a routine, you’ll never forget to do it. After all, it’s not like it’s hard to do. I’ll also use this liberally after coming back from a weekend camping with the guys.”
This is a great DIY gift idea
For the ladies reading this, my face moisturizer for men would be a great gift for any guy in your life (boyfriend, dad, brother or even grampa!). If you know your guy doesn’t take great care of their skin, this could be a good kick up the backside to keep them pimple, wrinkle, and flake-free.
Just tell them that you spent a lot of time making this for them (even though it’s pretty easy really) and that you’d appreciate it if they’d try it out. I’m sure they’ll notice the effects and keep on using it. Besides, you want the guy on your arm to be looking as good as he possibly can, right?
If you’d like to explore more creams and moisturizers, I cover this in much more depth inside my Fabulous Face Creams & Moisturizers Course.
Inside the course I share a wide range of tested recipes for creams, gels, oils, and balms, along with clear guidance on how these products are built and how ingredients work together. This makes it much easier to adapt recipes or start creating your own when you’re ready.
It’s 25% off this week. 👉 Explore the course here
Supplies For The Men’s Face Moisturizer
- 15g Rosehip Seed Oil
- 10g Sweet Almond Oil
- 15g Emulsifying Wax
- 5g Aloe Vera Gel
- 55g Lavender Water/Hydrosol (Store-bought or hand made)
- 1g Vitamin E Oil
- 1 drop Tea Tree Essential Oil
- 3 drops Cypress Essential Oil
- 3 drops Sandalwood Essential Oil
- 0.5-1g Broad Spectrum Preservative
- Cosmetic jar
If Making Lavender Water/Hydrosol
- 100g Distilled Water
- A handful of Lavender Buds
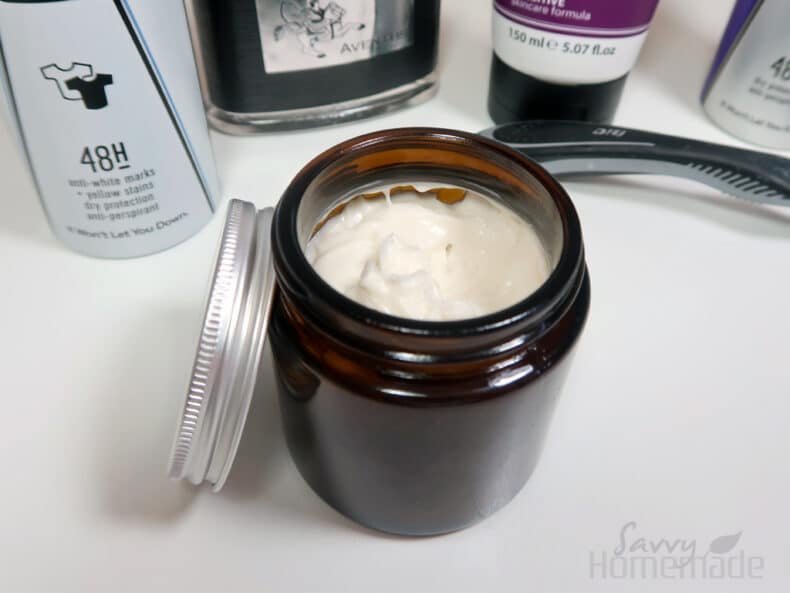
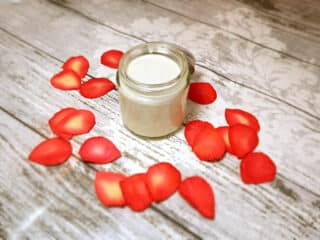
This should produce roughly 100g of moisturizer, so you’ll want a container/jar that can hold this much.
Advice For Substitutions
- The ingredients chosen for this moisturizer for men are specially chosen to synergize with men’s skin, although you are free to substitute things as you see fit. Rosehip can easily be substituted for Avocado oil, Melon Seed oil, Kukui Nut oil, Hemp Seed oil, and Evening Primrose oil.
- Sweet Almond oil is one of those ‘one size fits all’ type oils as it’s suitable for all skin types, but can be substituted for Apricot or Peach Kernel oils if you have a nut allergy.
- Take a look at our guide to the best carrier oils and their uses to find oils that fit your skin type.
- Aloe Vera gel doesn’t have a great substitute here but is an amazing additive for anyone who spends any amount of time in the sun. Even if you don’t, the vitamins and minerals in aloe vera are so good for your skin! I know a lot of guys who are required to work outside for their jobs, so I thought this would be a great ingredient to care for their skin. However, if you really wanna drop this ingredient you can either increase the amount of lavender hydrosol or replace it with ordinary spring water.
- As for the essential oils, I’ve chosen these for both their amazing properties, but also for their particularly masculine scents. Sandalwood is a key ingredient in many men’s cosmetics, as is cypress. Sandalwood essential oil is intensely hydrating, caring for chapped or particularly dry skin.
- Cypress essential oil, however, is great at detoxing pours as well as helping to tone skin, making it appear smoother and younger. While I love these essential oils for this formulation, you can totally substitute these for whatever you like. As I’ve already said, this product is great to use at night so you wouldn’t have to worry about smelling girly in front of your buddies if you want to use some floral essential oils.
- Take a look at our guide to essential oils and their uses for a better idea of how different essential oils can benefit your skin.
- I strongly recommend not to substitute the Tea Tree essential oil, even if it does smell strange! It’s such a good essential oil for guys as it kills off microbes and keeps skin fresher for longer. I don’t want to offend anyone, but let’s face it guys, we’re not always as hygienic as our fairer counterparts. This essential oil should help with this, as well as keeping us free from zits and pimples!
- Lavender hydrosol can be either store-bought or you can make it yourself to save a bit of money. In this recipe, I will show you how to make it, but you can totally skip this if you don’t intend to make it as well. You could also substitute this for various different hydrosols. Rose is amazing for hydrating and keeping skin looking young, calendula is quite soothing and orange is also great for rejuvenating skin.
- I strongly recommend not to omit the preservative here, as it’s important to ensure your face moisturizer doesn’t have microbial growth going on. While vitamin e can help with this as well, it’s certainly not a preservative and will never be able to replace one. Essentially, without the preservative, you expose yourself to a whole host of different skin infections. Just be safe and use one. Any liquid, broad-spectrum preservative will work just fine. Ensure you read the manufacturer guidelines thoroughly before trying a new preservative, and use it in the quantities they specify (usually 1% of the total weight of your product).
How To Make This
Step 1: First up, we need to make the hydrosol. If you’re planning on buying one, you can skip to step 2. Otherwise, let’s get started.
Weigh out roughly 100g of bottled spring water into a heatproof/pyrex beaker and then add a handful of the lavender buds. It doesn’t matter how many buds you use, but just be aware that these buds will soak up some of the water, and we need exactly 55g of the lavender water later on.
Now, place the beaker into a water bath and turn on the heat. Allow to reach a simmering temperature and then turn off the heat. Allow the lavender buds to infuse with the water for a minimum of 1 hour. Then, remove from the water bath.

You’ll want to weigh out 55g of the lavender water, sieving out any lavender buds as we go. Make sure to measure out into another beaker that is heatproof, as we’ll be heating this again very soon.

Step 2: Now that we have the 55g of lavender hydrosol in one heatproof pyrex beaker, it’s time to prepare the rest of our ingredients for the heated phase. Add the 5g of aloe vera gel to the hydrosol, and then set aside. This is what we’ll refer to as our ‘water part’.

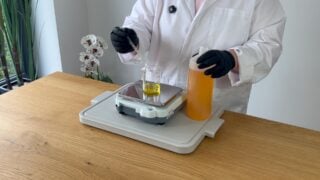
Next, weigh out your oils (excluding essential oil and vitamin e oil) into another pyrex beaker (I just reuse the one I used to make the hydrosol, but clean it out nice a good first). Then, weigh out and add the emulsifying wax to this beaker as well. This is what we refer to as our ‘oil part’.


You should now have 2 beakers, one filled without water part (lavender hydrosol and aloe vera gel), and the other with oil part (rosehip seed oil, sweet almond oil, and the emulsifying wax).
You’ll now want to put both beakers into a water bath, allowing the wax to fully melt. If you made your hydrosol, you can use the same water bath you set up earlier.

This can take around 20 minutes depending on the wax, and it’s best to leave it on a low heat for the duration of this time. Although be careful not to let the water boil – we want to it to simmer throughout.
Step 3: Once the wax has melted, our heated phase is over and we can remove both beakers from the water bath, taking care not to burn ourselves.

Once removed, I like to give the water part a little stir just to make sure the aloe vera and the hydrosol are fully combined. Then, pour the water part into the oil part. Make sure to do it this way around, as oil is thicker and you will lose way too much on the edges of the beaker trying to pour it into the water. You should immediately notice a change in color as you pour.

Now, using a whisk, give the mixture a quick mix.

Step 4: Now that our water and oil parts have been combined, I like to leave it for about 5 minutes at a time to cool down. As your mixture cools, it will begin to thicken, but because we want the water and oil to fully emulsify, we’ll need to come back to it and whisk from time to time.
I leave it 5 minutes, then whisk, leave it a further 5 and then whisk once more. Usually, it’s fully emulsified by then and much thicker as well, but on hotter days it can take a little more time. Just keep repeating this step until it begins to look like a face moisturizer. Don’t worry too much about it being too thick at this point, as we have a few more ingredients to add.
Step 5: Once it has reached a thicker, fully emersed consistency, it’s time to add our final ingredients. I like to add the vitamin e oil first, as this will give us a better indication of the final thickness of our cream.
You’ll want to add 1g of this, and the easiest way is to place the beaker onto a small measurement digital weighing scale (jewelry scales) and then hit the T button to reset to zero. You can then add vitamin e oil a bit at a time until you reach 1g.

Then, we can add the preservative in the same manner as we did the vitamin e oil. I suggest 0.5-1g, although make sure to follow manufacturer guidelines to ensure you’re using the right amount.

Lastly, it’s time to add the essential oil by the drop. Be careful here, as it’s easy to add too much. Once you’ve done this, give it a thorough mix to ensure all the ingredients are fully combined, and then spoon the mixture into your chosen cosmetic jar.

Ensure your jar is either glass, aluminum or PET plastic to ensure good storage, shelf life and to prevent any leaching of plastic into our product.

With the preservative, this face moisturizer should happily sit for 6 months before you’ll need to replace it. I recommend you use a broad spectrum preservative, but if you want to get by without one be sure to throw your product away after no more than 1 week.
We all want to avoid using ingredients that might be toxic, but at the same time, you can easily expose yourself to various fungal and bacterial skin infections by using poorly preserved skincare products. 0.5-1g preservative is, in my opinion, the much lesser of the two evils here.


Hello, can I add anything for anti-wrinkle properties like retinol or even an SPF if I wanted a day cream?
Hello Jason,
The simple answer is yes. There are some fantastic anti-aging ingredients that can really elevate your cream. Most of these ingredients should be added during the cool-down stage, as they are often heat-sensitive. Always follow the manufacturer’s guidelines for usage rates, and be sure to wear sunscreen when going out, even if you have added your own SPF.
It’s also worth mentioning that I almost never recommend using any form of retinol in a day time product. It’s best used for nightime/overnight skin care.
Hope this helps!
Angela x
if i added simply squalene (the one in your Amazon misc list) to this recipe to help fine lines and to provide extra moisture how much should i add?
Hi Jason,
So squalane doesn’t have a dermal limit. You could technically swap out all of your oil part (save the e-wax). While I wouldn’t do this, I absolutely would consider swapping out one of the carrier oils for it, then and see how you like the formulation. There’s a good chance it’ll sink in faster, which for me is always a bonus.
Hi Angela,
A wonderful site. can i use the liquid type of Aloe Vera?
Thanks
Hi Conny,
I don’t see why not. Aloe Vera distillate is a gorgeous botanical ingredient that I’ve use myself in some of my toner recipes. However, this may change the viscosity of your moisturizer. This probably won’t be a problem, but if it is, try adding a little less than you would if using the gel.
Hi 🙂
First of all I wanted to say I really appreciate your in-depth explanations about every ingredient, I’m learning a lot from it and it’s really nice 🙂
I would really like to try making this cream for my partner – but I don’t have a preservative.. Do you think I can still make it and keep it in the fridge? Could it last a while if I do so?
Thank you very much!
Taniya
Hi Tatiana, glad you are enjoying the recipes!
The short answer to your question is no it won’t keep very long, even in the fridge, perhaps a few days only, sorry.
It really makes sense to use a broad spectrum preservative for this recipe, its really economical, and it will extend the shelf life and keep you healthy.
Take a quick read about why a preservative is necessary and what to buy here.
If you don’t want to use a preservative stick to recipes that do not contain water, things like the face serums or face oil recipes.
Thank you for your recipe. After 1 or 2 days though, the oil part starting to get separate in my jar from the wax/solid part. I’ve replaced the rosehip oil by avocado oil, and replaced the almond oil by jojoba oil. For the rest, I have followed the recipe exactly like suggested. What did I do wrong? Is it because of the ingredient that I have replace? Or not mix long enough?
Thank you ?
Hi Emillie, I’m sure the problem isn’t with your ingredient substitutions, this recipe also has a good amount of emulsifying wax so it shouldn’t be splitting.
Did you make your own lavender water yourself or did you use a hydrosol? And can I check that you are only using the 55g of this in the recipe?
In Step 3: The optimum temperature is 60C, so make sure its somewhere around that temp before you combine the parts.
And finally, be sure that you stir it until its fully combined and cooled.
I love your site. Thank you for everything you taught me. It was fun. I was wondering, would it be prudent to change the Sweet Almond Oil for Argan Oil. Just curious.
Hi Taunia, I’m sure that would be ok, Argan oil is a fantastic choice.