

If you’ve found this post, it’s probably because your lips are chapping, and you’re ready for a new homemade lip balm. Below, I’m going to show you in detail, with videos, how to it at home (with seven unique recipes)!
Making lip balm is not only fun and affordable, but it also gives you complete control over what goes onto your lips. Instead of relying on store-bought balms that may contain petroleum or synthetic fillers, you can choose nourishing natural ingredients. Butters, oils, and waxes that actually protect and heal.
Plus, once you know the basics of how to make lip balm, it’s easy to customize the recipe with different scents, flavors, or skin-loving additives.

Homemade Lip Balms That Seal In Moisture
Lip balms are little pots of magic. They seal in moisture, protect your lips from cold winter air, and keep flakes away before they even get started. But the best part is how versatile they are. Because they are all oil and zero water, they’re incredibly hydrating and help soothe and nourish our skin wherever its needed.
If your lips get dry easily or you love a good all-over balm, you’ll definitely enjoy making your own. My natural DIY lip balm recipe is so simple, fun, and so handy to keep around. In fact, you might want two jars, one for your lips and another for those dry elbows or heels that always need a little love.
I’m sure you will love the recipe below and want to explore even more ideas? So, don’t forget to check out all my other lip balm recipes too.

Balm Magic 101: The Formula Behind Every Perfect Balm
So, you’ve already learned the golden rule of making a balm – no water is required! This is a great thing because it means we don’t need to worry about a preservative, and can focus on our lovely oil-soluble ingredients.
But before we can dive into all those lovely oils, let’s break down exactly what a basic balm formula looks like in percentages:
Basic Balm Formula
- 33% Beeswax
- 33% Cosmetic Butter
- 33% Carrier Oils
- 0.5% Vitamin E (Antioxidant)
- 0.5 Aromatic oil (Essential & Flavoring Oils)
The general rule of thumb for a balm is 1-1-1 of wax, butter, and oil. Of course, this is not set in stone, as all ingredients have different densities and consistencies. One butter might be a little harder and may not need as much as 33%.
Nevertheless, this is a good starting point. Also, notice that we’re not including a preservative in this formula because it’s not needed! Although, to keep our oils fresher for longer, a bit of Vitamin E has been included.

But this formula is a bit vague. What kinds of butter might you need, and what oils are we even talking about? I’ll talk more about the best ingredients for a lip balm after this tutorial.
Todays Lip Balm Formula
Now, we come to the formula for the lip balm we are making today.
- We’ve opted for beeswax, because as you know it’s the easiest wax to find, and generally the easiest to use.
- We’ve paired this with some lovely carrier oils, to include castor and sunflower oils. Castor oil provides us with a lovely slip and glossy shine to our homemade lip balm, and the sunflower oil will help to protect our lips even in the coldest of climates.
- We want to use these balms in a tube, so we’ll be using cocoa butter. But we’re pairing this with some lovely mango butter, just to ensure we have some good slip and no drag. Both of these butters are intensely moisturising, and should keep our lips feeling soft and smooth.
- And because we wanted to keep this natural, we’ve selected Sweet Orange as our lip safe essential oil. You’ll notice that at 0.5%, this product won’t smell or taste strongly of oranges. However, swap this out for an orange flavor oil and up the percentage to around 3% for a balm that smells like you’re in an orange tree orchard! You will need to adapt the recipe to make this happen, of course. Lower some of the carrier oils to compensate.
If you’d like to explore more creams and moisturizers, I cover this in much more depth inside my Fabulous Face Creams & Moisturizers Course.
Inside the course I share a wide range of tested recipes for creams, gels, oils, and balms, along with clear guidance on how these products are built and how ingredients work together. This makes it much easier to adapt recipes or start creating your own when you’re ready.
It’s 25% off this week. 👉 Explore the course here

As an Amazon Associate, I earn from qualifying purchases. If you buy via the links here I may earn a small affiliate commission at no cost to you, please read my affiliate disclosure.
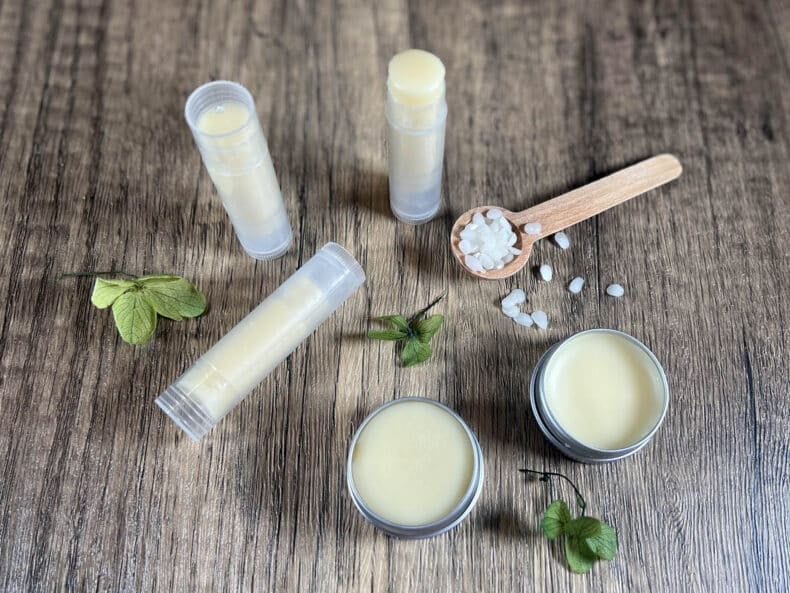
Ingredients
Equipment
Method
- 16 grams Beeswax, 10 grams Cocoa Butter, 7 grams Mango Butter, 6.25 grams Castor OilPlace the beeswax, cocoa butter, mango butter, and castor oil into a heat-proof beaker

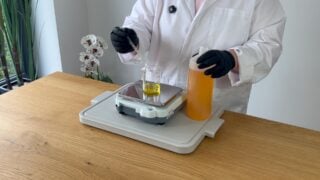
- To melt the oils, place the beaker into a water bath or bain marie. You can create a water bath by filling a saucepan with a couple of inches of water and bringing it up to a gentle simmer. Let the beaker sit in the simmering water until the wax and butter have just melted.
- 10 grams Sunflower OilOnce fully melted remove the beaker from the saucepan, but keep the water bath close by as you may need it again. Now it's time to add the sunflower oil. The reason we are adding sunflower oil at this point is to protect it from too much heat and to lower the temperature of the molten oils ready for the vitamin E and essential oil. This can, however, shock the waxes. If they do start to become hard again you can pop the beaker back into the water to gently re-melt them. This is the best way to protect your oils from being stripped of their skin-loving benefits.
- 0.5 grams Vitamin E Oil, 0.25 grams Orange Essential OilWhen the oils are cooled slightly but are still liquid, We can add the vitamin E and essential oil, stirring until fully combined. Once again, pop it back into the water bath to gently re-melt if it starts to solidify.
- 5 Lip Balm TubesMake sure any tubes that you are using are fully twisted down. Pour the oils into lip balm tubes or containers. Lip balm containers can be fully filled, but tubes are best left with a little space at the top ready for topping up later. For this, you will need to hang on to a small amount of the balm mix. When filled Leave the lids off, and put them into a cold place to solidify. A fridge is a perfect place for cooling them quickly, they shouldn't take much more than 30 minutes.
- Re-melt the leftover balm mix and top the tubes up, then set them aside to solidify. When they are solid and cool pop the lids on and leave them to sit for 24 hours before using. This gives the lip balm time to thicken and bond with the lip balm screw at the bottom of the tube.


Notes
New to DIY skincare?
If you’re enjoying making your own products, you might like Radiance, my free email course where I teach the foundations of DIY skincare step by step!Best Waxes (Including Vegan)
You’ll notice we only mention beeswax in the formula above. That’s because it’s perhaps your best choice. Beeswax is intensely nourishing and also very versatile. You can learn more about beeswax here at NCBI.
It helps to seal in moisture against the skin, including the moisture that sits alongside it in our formula (our butters and carrier oils). Beeswax is also readily available worldwide. It’s much easier to get hold of than other waxes.
It’s also worth noting that beeswax comes in two varieties, yellow and white (although yellow is the standard). This is important if you plan to add dye or a tint to your balms, as white beeswax is much easier to dye than its yellow cousin.

However, one thing beeswax isn’t is vegan. You might think ‘this isn’t a problem for me’ if you aren’t yourself vegan, but if you plan to gift or sell your products at any point, it might be.
And if you are vegan, don’t worry, we have you covered! You make vegan lip balm by substituting beeswax for candelilla wax. It has many of the same properties, but also provides some excellent shine and gloss to your balms (something beeswax doesn’t do).
However, it cannot be substituted like for like. Candelilla has about double the stiffening power of beeswax, so you’ll need to half the amount and up your oils and butters to compensate.
The Best Carrier Oils
Selecting the right oils is daunting, as there are hundreds of carrier oils to choose from. However, the best advice you could follow when selecting oils for any skin care product, is to go for ones that your skin loves.
If you’ve used coconut oil before and it works great for you, then consider that. If jojoba oil makes your skin feel amazing, then that’s a no-brainer too!
If you’ve never made a DIY skincare product before, do some research and see what you like the sound of. All carrier oils have their own unique therapeutic benefit. But keep in mind, not all oils are suitable for all skin types.
When making a body lotion, selecting the right oil is very important. But you have a lot of wiggle room when making a balm, as it’s a semi-solid skin care product. You don’t have to worry about your oils being too heavy, because balms, by and large, are already heavy.
Of course, we would recommend the choices of oils we’ve selected in our recipe below, but you might want to substitute these for oils that you prefer, or find easier to get hold of. So, what are some good substitutes? Below is a list of a few suggestions we would offer.
My recommended brands for these oils can be found online in the carrier oil section of my Amazon ingredients list.
- Argan Oil: Softens lips and restores moisture to the skin
- Avocado Oil: Deeply nourishing, gives slip and slide and adds a mild green color to your balms
- Calendula Oil: Healing and nourishing, perfect for super chapped skin!
- Castor Oil: Another healing oil that adds lovely shine and glide, but don’t use more than 15% as it can become a laxative
- Coconut Oil (solid): Fantastic for sensitive and chapped lips
- Jojoba Oil: Wonderfully nourishing oil that forms a protective barrier on the skin to further prevent moisture loss
- Olive Oil: Softens the lips, hydrates the skin, and prevents damage from the elements (wind, rain, and cold weather)
- Sunflower Oil: Very high in the antioxidant vitamin E and forms a protective barrier on the lips.
- Sweet Almond Oil: Deeply soothing and helps to prevent chapped lips from reoccurring
Cosmetic Butters
Butters provide both functional and therapeutic benefits for our homemade lip balms. Firstly, they provide some stiffening power. Without it, we’d need to use more wax, and it would end in a balm that has far too much drag.
Not only do we get some slip and slide from our butters, but we also get lovely skin benefits too. Cosmetic butters are deeply moisturizing and conditioning, helping to restore moisture radiance to skin.
While there are a variety of butters available to use, keep in mind that they may not be easy to source. Shea butter, cocoa butter and mango butter are readily available online, but the more obscure butters might be more difficult to hunt down. They’re also likely much more expensive.

So there are a few considerations you might want to take before selecting the right one for you. You can, of course, begin with our recipe below, which is tried and tested. But here’s some inspiration if you need to substitute. It’s worth noting that all the options below are vegan.
- Cocoa Butter: Provides excellent slip and slide, and makes a good solid balm that works great in a wind-up or push-up lip balm tube.
- Kokum Butter: Deeply nourishing, but a little drier and can cause some dragging on the skin. Use it alongside another butter that provides good slip and glide.
- Mango Butter: Excellent glide, very moisturising, more lightweight than some of the other butters but still deeply conditioning.
- Shea Butter: Perhaps the most readily available cosmetic butter, with excellent skin softening benefit. However, if used without a harder butter, it will make a soft balm that may not be suitable in a wind-up or push-up tube. Consider a pot, or partnering with a harder butter, such as Cocoa.
What About Essential Oils?
Ordinarily, essential oils are a very important part of skin care. They carry the beautiful aromas of the plants they are derived from, as well as their therapeutic benefits too.
However, they become a little problematic when it comes to products that are applied to the lips. Because essential oils are powerful extracts, many of them are toxic and should never be ingested.
However, they are a few lip safe essential oils. Of course, you don’t want to consume a lot of this, so we limit our lip safe essential oils to no more than 0.5% in a leave on product intended for the lips.
Your lip safe essential oils are as follows:
- Benzoin: A beautiful vanilla scent. Provides protection for the skin and soothes dry chapped lips
- Chamomile: Intensely soothing and cooling, as well as moisturizing. Has a mild, sweet fragrance that smells just like chamomile tea.
- Grapefruit: Prevents dryness and has a sweet, citrusy aroma that is very uplifting.
- Lavender: Fantastic moisturizing properties, great for dry chapped skin with a floral yet herbaceous fragrance that is instantly recognizable.
- Lemon (Distilled): Beautifully uplifting aroma of lemons with some great antibacterial properties
- Peppermint: Cooling and plumping for the lips, with a fresh sweet aroma
- Sweet Orange: Helps heal dry chapped lips and is amazingly anti-inflammatory. Beautiful aroma of oranges.
This guidance extends also to lip-safe Co2 extracts. But it’s best to check with the manufacturer to ensure that they are lip safe, and never use more than 0.5%. My favourites are Vanilla, Chamomile and Calendula Co2 Extracts for my homemade lip balms.
However, if essential oils aren’t for you, you do have another option. While synthetic fragrance oils are entirely unsuitable for the lips and should never be used in a lip balm, you absolutely can make use of good old fashioned flavoring oils!
These cool oils allow you to not only impart a fragrance to your products, but also a flavor too! Perfect for your next DIY lip balm recipe. We recommend using around 3% flavoring oils in a lip balm formula.
The variety of different flavoring oils is massive. Cola, root beer, fruits, chocolate, candies and so many more are available to use. You just need to find the right one for you.
The only downside to flavoring oils is that they are largely synthetic and do not have any therapeutic benefits for our skin. They just smell and taste nice – but that might be all you need or want out of your lip balm.
How To Use Your Lip Balm
Using lip balm is really easy. Just apply a little to the lips, and spread evenly across the skin. Don’t use too much, or you’ll end up with sticky, greasy lips.
You can apply this as little or as often as needed. However, it is recommended to apply every 3-4 hours if you’re experiencing some nasty chapping on the lips.
But remember, your lip balms can be used in more places than just the lips. For those with seriously dry skin on the face, you can apply a pea-sized amount like you would a normal facial moisturizer. This is not recommended for anyone who doesn’t have very dry skin.
You can also apply it to very dry patches of skin on the body. An extra balm for use on the elbows, knees, feet, and anywhere else that is prone to dryness or chapping, can be a godsend!
How To Store Your Balm
Lip balms are thick skin care products, so you’ll need a method of storage that allows you direct access to the product in order to apply it.
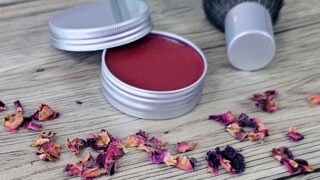
The most basic and easy to use is a small cosmetic pot, with a screw top lid. These are ideal for balms that are a little soft, but equally good for a harder balm too.
However, lip balm tubes, like the ones you find chapsticks in, are actually really easy to use. Although, they’re only suitable for balms that are a little stiffer (no shea butter lip balms, I’m afraid).
If you do decide to go for a tube, don’t forget that it’s best to hold back some mixture in order to top up. When our balms solidify in their tubes, large holes and sinking appearing at the top is very common. By topping them with a little more mixture, you’ll not have to worry about this.
Providing you’re using a good quality antioxidant like vitamin e, and you don’t expose your DIY lip balms to a significant amount of water they should be good for at least 12 months
Final Thoughts
So there you have it, how to make a good quality lip balm at home, formulated with gorgeous natural ingredients. This is your first line of defense against dry and chapped skin. So keep your lips looking gorgeous year-long with this easy-to-follow, tried, and tested lip balm recipe.
You’ll have loads of fun making these, and we know because we had a lot of fun too! If you have any problems, don’t hesitate to let me know in the comments below, and we can troubleshoot together.
I also love to hear about your successes, if you find an amazing substitution we haven’t mentioned, do let us know. I always enjoy reading your comments.


Hello Angela. I was wondering if the mango butter could be replaced with tallow? Thank you
What percent of the ingredients did you use for the recipe above?
Hello Julia, The recipe in percentages is as follows:
32 % Beeswax
20 %s Cocoa Butter
14 % Mango Butter
20 % Sunflower Oil
12.5 % Castor Oil
1 % Vitamin E Oil
0.5 % Orange Essential Oil
hope this helps Angela x
I would like o try using elderberry power to make a lip balm. Is this possible? If so what do you think would be the best combinations?
Hi Ted, we have only ever used elderberry extracts in ours, so I am not sure how it will turn out. That being said, I don’t see any reason why it wouldn’t be a good addition, as it’s great for chapped lips. I would start at around 2% to 3% and see how it feels.
It would be great to hear how it turns out,
best wishes Angela x
Hi Angela, thanks for sharing this recipe. Can you provide some information on how it feels – is it sticky, tacky, glossy, creamy?
Hi Del,
I found this one very creamy, although not that sticky or tacky at all. I think this is due to the addition of two different cosmetic butters. Leaves the skin feeling very supple! I wouldn’t say it’s that glossy, though. If you were looking for something more glossy, I would include something like bisabol. This would also add some great skin soothing properties too!