
So we’re back with another soap recipe, hot on the heels of our first go at hot process soap not that long ago. Because practice is the key to mastering just about everything, we thought it would be a good idea to post my favorite lavender soap recipe.
If you remember from our last post, hot process soap is a bit different from my usual soaps that are made with cold process. Hot process makes use of direct heat to expedite saponification, and so there’s no need to leave your soap to cure afterward. Nevertheless, this can make HP soap a little tricky to master as you’ve got to keep your eye on it.
Update: How to Make Lavender Soap At Home is a more recent post using the cold process method.

Introduction
I have found this soap to be a little on the soft side, but it is possible to harden your soap if you wish. You have two options if you’re really not into soft soap. Either give it a bit longer to dry out (around a week), or use the optional ingredient Sodium Lactate which will produce a harder soap immediately. The choice is yours, and I discuss how to use this cool ingredient in the method.
I’ve decided to make use of gorgeous Lavender essential oil for this recipe, simply because it’s one of the best essential oils you can buy (and not that expensive, either). Lavender has a beautiful, fresh and floral scent that is so distinct you wouldn’t mistake it for anything else. It’s perfect for virtually every skin type, and has wonderful soothing qualities for both body and mind.
But the carrier oils are hand chosen as well. Castor, Olive, Coconut and Rice Bran oils are great for lots of different skin types, but particularly dry, sensitive and mature skin. They really make the difference for this hot process soap recipe. Castor oil is great for soothing and cleansing skin, whereas Olive and Coconut oil are fabulous at helping to protect your skin by forming a barrier against the elements. If you haven’t used Rice Bran oil before, it’s absolutely fantastic. It nourishes and conditions the skin to help fight off pesky facial lines and wrinkles! It’s a wonderful mix of properties that will keep you looking fresher for longer.
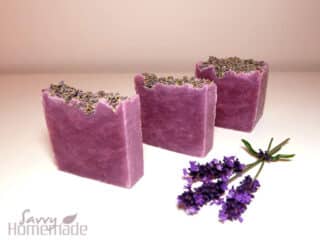
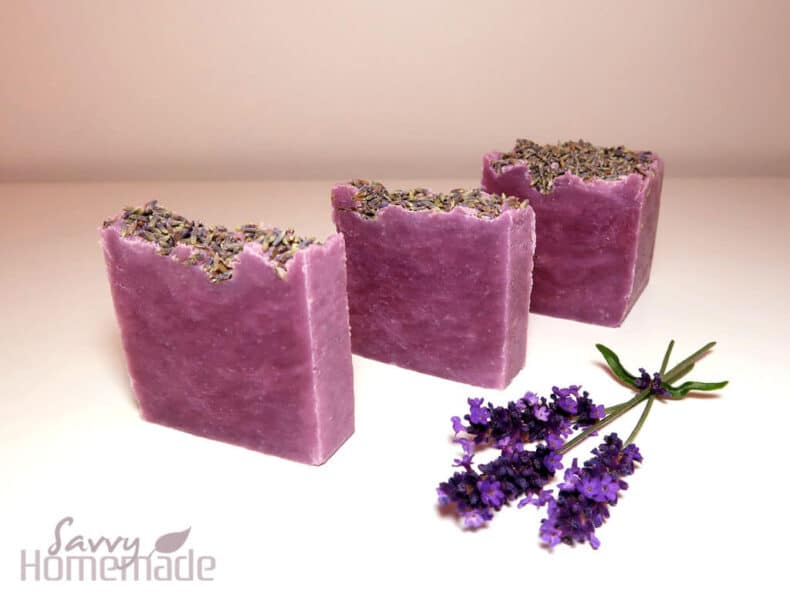
And just to add a sense of drama, I’ve dyed this soap a lovely shade of lilac with a bit of purple mica, as well as scattered some dried lavender buds on top to give it an interesting flair. Trust me, it’ll help it stand out among other, more simple looking lavender soaps.
Ingredients
So let’s take a look at the exact measurement of these oils, as well as any other ingredients and equipment you may need to pull off this heavenly lavender soap recipe!
- 400g Olive Oil
- 200g Castor Oil
- 200g Rice Bran Oil
- 100g Coconut Oil
- 40ml Lavender Essential Oil
- 2 tsp Purple Mica (although you can use between 1-3, depending on how rich you want the color)
- Large handful of Dried Lavender Buds
- 118g Sodium Hydroxide
- 295g Distilled Water
- 3tsp Sodium Lactate (Optional)

Equipment
- Crock-Pot
- Measuring Jug
- Assortment of Spatulas and Spoons
- Stick Blender
- Soap Mold
- Personal protective equipment (Glasses and Gloves as a minimum)

How To Make It
Step 1
Prepare all of your ingredients by weighing them out now. I often weigh my sodium hydroxide in a disposable plastic cup.
Try to be as a exact as possible with weighing your ingredients. A few grams is fine, but soap recipes are notoriously unforgiving so try your best to get it right.
Step 2
Pop your crock-pot onto a low setting, and put your oils in so that the coconut can start to melt. Alternatively, I sometimes pop my coconut oil in the microwave first so it’s nice and melted, and all we’re doing here is warming the rest of the oils.

Make sure to exclude the lavender essential oil, we’ll use that later.
Step 3
As soon as you put your oils on to warm, add your 118g sodium hydroxide to a 295g jug of water. Always pour the lye into the water to reduce splashing and possible burns. Give it a quick stir so that it dissolves.
You’ll now need to set this aside for the chemical reactions to cease, which can take up to 10 minutes. Leave it outside or next to an open window for good ventilation.
Make sure you don’t put it somewhere your kids can get hold of it, as it can cause severe burns in a matter of seconds. I always say set your little ones up in another room, far away from your workspace.
Step 4
You’ll want to get your oils and your lye to a similar temperature before you go any further. I find a hot process recipe requires less precise temperatures. Wait until your oils and lye are between 110-130F.
If you’re planning to use Sodium Lactate to harden your soap immediately, wait until your lye is below 130F and then stir 3 tsp into your lye solution. This is the best way to incorporate Sodium Lactate into your soap, and I definitely recommend giving a try and seeing how you like it.
Step 5

Once your lye and oils are roughly balanced, turn your crock-pot off. Then, working carefully, pour your lye into your soap and give it a stir. If you’re worried about it seizing, you can add a little first to see how it’ll react.

Step 6
Now bring the batter up to a nice trace. You can make use of a hand whisk to do this, but stick blenders are relatively affordable kit now days. I strongly recommend purchasing one if you don’t want to be whisking your soap batter all day.
Using your stick blender, whiz your batter in short bursts. Follow each burst with a stir. You want to keep blending and stirring until we reach ‘trace’. This is when the consistency changes, becoming noticeably thicker.

When you’re at trace, you’ll be able to pick some of the batter up with a spatula, then drop it back down onto the surface without it sinking back in straight away. You can also test trace by running your spoon through your batter. If this leaves a ‘ghost’ (a trail that is left behind by the spoon), you should be good to go.

This process can take less than a minute or as long as 5, it all depends on the temperature of your oils. But nevertheless, I wouldn’t use a timer. Just look out for the signs of trace and even if you struggle to begin with, it should get easier with more experience.
Step 7
Now that we’re at trace, it’s time for the tricky part. You’ll want to switch the crock pot back on to a low setting and then pop the lid on. We’ll want to ‘cook’ your batter for about 20 minutes followed immediately by a stir. Then keep repeating until your soap is properly cooked.
You’ll have to keep going for anywhere from 40 minutes to 1 hour (2-3 20 minutes rounds), but sometimes longer. Your soap batter will change in consistency a few times during this process, but don’t worry that’s totally normal. Eventually, you’ll be left with a glossy, translucent mixture that resembles Vaseline.

For a more in depth look at the different phases your soap goes through during this step, or for more detailed guide on how to know when to stop cooking your soap batter, take a look at step 7 of our first hot process soap recipe.
While your soap batter cooks, use this time to prepare your mold with a bit of baking parchment (if you’re not using silicone) and weigh your mica and fragrance oil. I also like to tidy up or clean any equipment I won’t need again, just to minimise a messy craft area.
Step 8
If, like me, you want to make use of the mica in this recipe, now is the best time to throw it in. I find it best not to add the powder directly to the batter, as this can result in a patchy color.

I like to mix it with 2 tsp olive oil (or any of the oils your using) and then pour this across the surface of the soap before mixing. This should help to maintain a consistent color.
Step 9
Now we’ll want to add that gorgeous smelling lavender essential oil. Pour the whole 40mls in and give it a good stir. Like with the mica, we want to ensure even distribution of the essential oil so that each slice smells as good as the last. This is particularly important if you plan on selling or gifting your soap.

Step 10
Once your dye and your essential oils are mixed in properly, waste no time in getting it into the mold. The longer your leave it, the harder your soap will become, so work quickly but carefully to pour, spoon or dollop your batter into that mold. As you fill your mold, after every few spoonfools pick it up and bash it down onto your work surface. This should help even it out.

You might also want to use your spatula to even out the surface a bit. You’re not looking for it to be completely smooth, just even so that one side of your soap is not noticably higher than the other.

You can try to use a spatula or the back of a spoon to get a smoother finish on top, but I have mixed results for this. Sometime I use a fork to make peaks for a nice, rustic finish. This time, I’ve opted to use dried lavender buds!

Dried lavender buds look great on your finished soap, and even have quite a strong fragrance themselves. Using your hands, sprinkle enough buds on top of the soap so that you can no longer see the purple soap below. You may want to press some gently on top, just so that you get good ‘stickidge’.

Some of the buds are bound to fall off, so don’t be conservative with your portion size here. Add enough so that even if half fall off when you take the damn thing out of the mold, it still looks quite nice.
Step 11
You’ll now want to leave your soap for a minimum of 24 hours. This gives the soap time to dry out enough so that you can get it out of the mold and cut your slices. You can either use a regular knife that you’re prepared to devote to soap making (don’t use it for food afterwards), or you can buy purpose made soap cutters that can give the sides an interesting texture.

You should be able to get a minimum of 8 slices from this, but I sometimes get as many as 11. It all depends on how thin or thick you like to slice it. I’d say 10 is ideal.
Final Thoughts
This lavender soap is absolutely gorgeous on the skin, and I just love how it smells. We’ve used 40ml of lavender essential oil, so the aroma is lovevly and strong. You could easily add a little less if you find it too overpowering. I also just love how it looks, with the fabulous purple color and those cute lavender buds on top. It’s a perfect gift for anyone who loves hand crafted soaps!
Remember that this recipe will produce a softer soap. For some this is fine, and I usually cut slices into quarters while the soap is still quite soft. It will inevitably harden up as your soap slices begin to dry up. You could also experiment with 3 tsp of sodium lactate, which I strongly recommend trying if you don’t like soft soap and are looking to gift, sell or use this soap almost immediately.
I found this soap pretty easy to make, which is probably because I’ve had a go at a few hot process soaps recipes now. Practice always makes perfect, which is great because now I don’t have to make it 2 or 3 times before I get the recipe right. Soap making is all about mastering a craft, so don’t feel bad if your first batch doesn’t come out the way you planned. Just get back up on the horse and try again.
Anyway, I hope you’ve enjoyed reading this lavender soap recipe today, and that you’ve been enjoying learning the basics of hot process soap even more! Let me know how you get on in the comments section below. I’m always happy to try and answer any questions you guys may have. Also, share on your social media pages, so you can spread the word about how good hot process soap recipes can be.

Hi Angela,
thank you for your nice recipes. I have tried the HP Lavender Soap. it is very nice.
although I have added the sodium lactate, it is soft and melts quickly. I have started using it after a month from unmolding.
can we adjust the recipe slightly to be more harder but with the same nice properties?
Hi there,
Honestly, I would just leave your bars to cure for another few weeks. The longer you leave your soaps the harder they will be. Some castile soaps, for instance, can benefit from many months of curing. Otherwise, like you said, they can melt so quickly in the bath or shower.
This soap looks so good. I’ll definitely try it out.
Can Rice bran oil be substituted with something else? I haven’t got it at home and I’d love to make this soap.
Hi Maggie,
Yes the rice bran oil can be substituted for something else but you would need to run it through the soap calculator to check how much lye to use.
Just a note to thank you for a lovely recipe, I used a bar for first time today and despite having extremely dry skin it left my skin smooth and comfortable, not tight or itchy at all. As expected, the lather is just a few gentle bubbles, I’m ok with that because I like the moisturising properties, but am curious as to whether you (or anyone reading) has attempted adding sugar, as I’ve read this can improve lather.
As a side-note, I didn’t heat the soap batter, but proceeded as usual for CP, as I personally don’t like the gnarly look of HP. Just in case anyone asks, it worked perfectly.
Thanks again, all the best
Thanks a lot, How I make this soap creamy??
Hi Emaa,
I often find it more difficult to make a hot process soap creamy. I would say play around with the oils and butters you’re using, or perhaps try a cold process soap recipe. Make sure to run everything through a sap calculator when making substitutions.
Hope this helps!
Thank you for this tutorial! Love this color! I have only made cold process soap but am interested in trying hot process.
I see the link for amazon for the purple mica but am wondering which mica you used as there are so many different shades of purple at amazon,..do you remember by chance? thanks!!
Hi Claudia,
Unfortunately, I can’t. However, I would look for a deep, rich purple. If you have a few micas already, you can try combining different colors to get the shade or hue you’re looking for. I do this myself from time to time.
Hope this helps!
This recipe looks amazing I am going to give it a try. I usually make cold process soap and have been making our soap for about five years and I will never go back to factory made soaps.
Hi Katheleen!
That’s great! Let me know how you get on.
Regards,
Angela