The most complicated and confusing aspect of making soap is undoubtedly the saponification process.
But what is saponification, exactly? More importantly, how do we know that saponification has taken place? I made it my mission this week to put together a detailed post for you that details exactly that.
This is your guide to the saponification reaction. Definitely worth a read if you need or want to know more about the intricate science behind soap making.

What Exactly Is This Saponification Reaction?
In most jargon free-way possible? Saponification, or ‘SAP’ as it is sometimes known, is the conversion of fat (either solid or liquid oils) into soap with the use of a liquid alkali. SAP requires 3 main ingredients for this to happen, our oils (fat), lye (alkali), and water.
If you’ve done much cooking, you’ll know that water and oil really do not like to mix. Saponification forces these two compounds to come together, which also produces your soap.
When you get a bar of soap wet, little molecules known as ‘micelles’ break off from the main bar and end up on your hands. This is how you can get your hands ‘sudsy’ when washing them. But these ‘soap molecules’ are the secret to how soap actually cleans things!
So what’s the point? How does saponification give us a product that can actually clean something? What are these micelles actually doing for us? Let’s take a look.
How Does Soap Clean Things?

The secret to the power of soap is that these micelles have the ability to latch onto both water and oil. Usually, a molecule is either lipophilic (oil-loving) or hydrophilic (water-loving), and will ordinarily repel the opposite of what they don’t like.
However, these micelles have two ends which are contrasting. One end is lipophillic and the other is hydrophilic. This is what allows the soap to be so good at cutting through fat and grease. Let’s use an example.
Say you’ve been cooking and need to wash some grease off your hands. As you get them nice and soapy, the lipophillic end of the micelles in your soap are attaching to the oily molecules in the grease on your hands. The motion of rubbing soap into your hands actively disperses the oily molecules and encapsulates them so that they cannot stick back together.
When you rinse your hands, the hydrophilic end attaches to the water molecules that rush over your hands from the tap. The greasy oil molecules then slip from your hands and down the plug hole, leaving your skin sparkly clean.
This is, essentially, how soap cleans things. But the thing is, without saponification, these micelles would not exist unless we use some kind of surfactant, synthetic or otherwise.
How Do I Know If The Saponification Process Has Taken Place?
Knowing what the definition of saponification is is all well and good, but it’s just as important (if not more so) to know and be sure whether or not it has actually taken place in your soap. If SAP doesn’t happen at all, you’ll be left with a beige batter that will burn your skin. We really don’t want that!
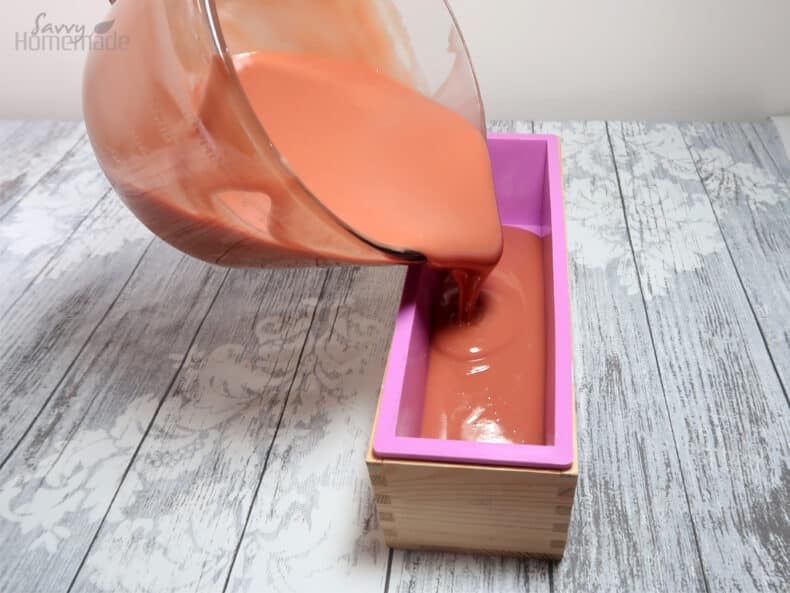
So, the first thing to look out for is whether or not your soap batter has hardened into a bar. If you’re following a conventional soap recipe, this will be evident quickly.
Soap has a tendency to harden up over a few hours. Nevertheless, I always recommend leaving your soap for at least 24 hours before taking a look. By the next day, you should have a loaf that is relatively hard and can be removed from the mold without much issue. It can then be cut into bars and left to cure.
However, some recipes, particularly castile soap, can remain relatively soft for a while. In this case, I usually recommend to leave it in the mold for a further 24 hours and continue doing this until the soap is easy to work with. Keep in mind that your bars will continue to harden as they cure.

Now, the other way to know whether a soap has passed through saponification is to check its PH. Lye is a strong alkali, but when SAP occurs much of the ‘causticness’ (pretty sure I just made up a word) is used up.
Check your bar with a universal indicator strip or liquid. If using the liquid, just put a few drops onto a thin slice of your soap. If using the strips, you can put a couple of drops of water onto one of your bars, rub it in a little, and then place the universal indicator strip over it. While it is likely to still be a little caustic after 24 hours, it shouldn’t be too high.
This is one of the reasons we cure soap after we remove it from the mold, for as long as 4-6 weeks. This ensures that trace amounts of lye can wane and some of the residual moisture in the bars can evaporate. This gives us a lovely bar of soap that is caustic free, and hard enough so that it doesn’t instantly dissolve when you use it for the first time in the shower.
Do All Oils SAP The Same?
The short answer to this is no, but let’s talk about it. So all oils have a slightly different make up. They can have a variety of different compounds, and because of this, they can SAP slightly differently.
This is why different recipes call for different amounts of lye and different amounts of water. This is what we mean we use saponification values. The ‘SAP value’ denotes how much lye would be necessary to fully saponify an oil into a nice, consistent bar of soap.
If we use too much lye, we end up with a bar that has residual, free-floating lye within the soap. Some people refer to this as a ‘lye-heavy’ soap. This a problem because it can cause some nasty irritation on the skin.

If you are following good soap making practice, you will be checking the PH of your soaps before and after the curing process. If your soap is still lye heavy after 4 weeks of curing, it is likely you have used too much lye.
On the opposite end of the spectrum, if we make soap using too little lye, we will be left with large quantities of raw, unsaponified oil. This results in a bar that is much too soft and will not harden, even after 4-6 weeks of curing.
While you may have heard of the term ‘superfatting’, which is intentionally adding extra oil to your recipe to boost your soap’s skin softening properties, it is still very important for the vast majority of your oil to saponify.
A soap that is still unacceptably soft after 4-6 weeks of curing is a sign that you haven’t used enough lye. This is bad, especially if you are looking to sell your soaps, because you’ll find your bars will disintegrate very quickly when exposed to hot water. A bar of soap should last much longer than just one wash.
Castile soaps can be a little wet, but after about 6 weeks they should be ready to use. Don’t confuse this with not having used enough oil. Wait a full 6 weeks of curing if need be for this type of soap. If it is still unacceptably soft after 6 weeks, then you can reconsider your lye ratio.
Designing Your Own Soaps

If you’ve followed my soap recipes for a while, it’s totally understandable that you might want to start designing your own soaps for your own unique skin.
When following a good recipe from a reputable soap blogger, you usually don’t have to worry about how much lye you’ll need because the formulator has done that work for you. As long as the recipe is sound and you measure your ingredients properly, you’re good to go.
However, the problem of getting the right lye ratio and spotting if SAP has or hasn’t taken place becomes evident when you’re designing your own soaps.
Now, the best way to know how much lye to water you’ll need when formulating your own soap is to make use of a SAP calculator. We have one here on my blog, and I swear by it. It’s free and I use it every time I formulate a soap.
While you can work out how much Lye you’ll need the old fashioned way, there’s literally no need. Do yourself a favor and take the easy road. Nobody wants to waste ingredients because we got the math wrong. Beneath the calculator, you’ll also find a guide with some good information and handy tips from yours truly on how to formulate a good quality bar of soap!
Final Thoughts
So there we have it, everything you really need to know about saponification reaction. While I could probably expand further, talking about the more complicated chemistry that is behind this mysterious process. But you really don’t need to know that.
If you are interested in learning more, the web is your oyster, so to speak. There are tons of resources, from Wikipedia or blogs like this to academic research for you to sink your teeth into. Google is your friend, and a gateway to so much knowledge that’s out there, waiting for you to discover it.