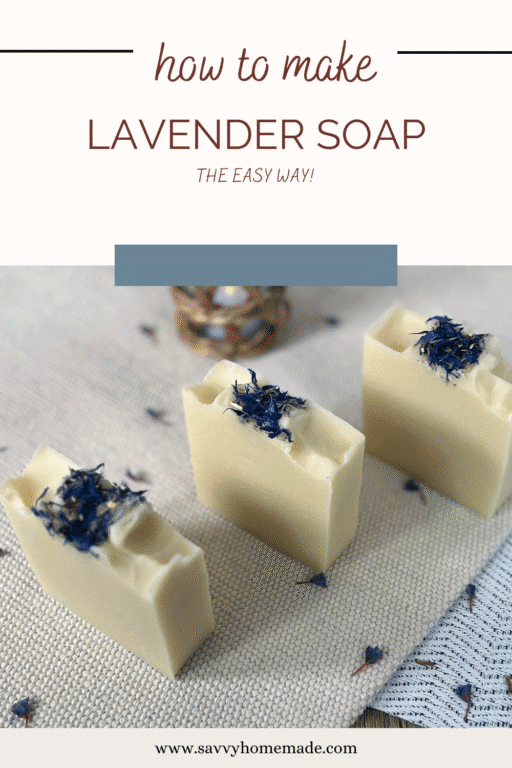
Lavender is the world’s favourite essential oil, so it’s no wonder people are searching how to make their own lavender soap at home. So I thought I’d show you how to throw it into your CP soap recipe. And voila, my easy lavender soap recipe was born.
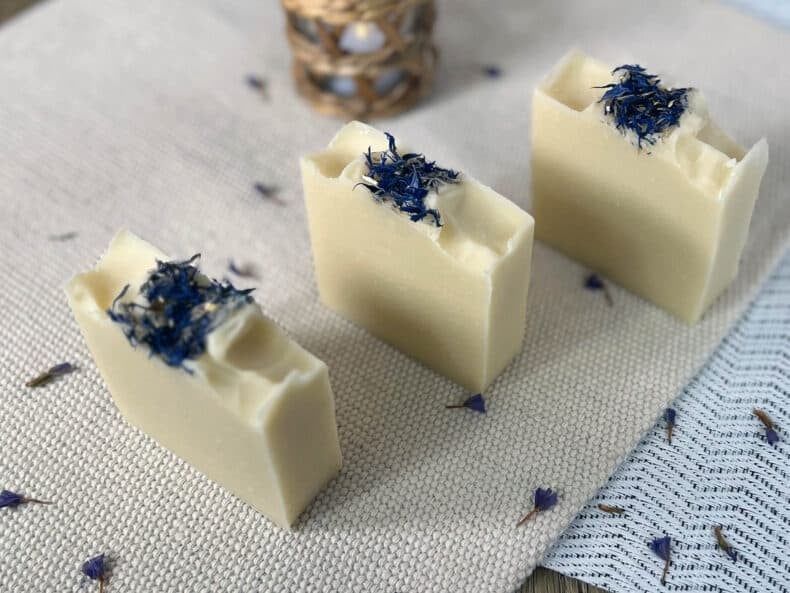
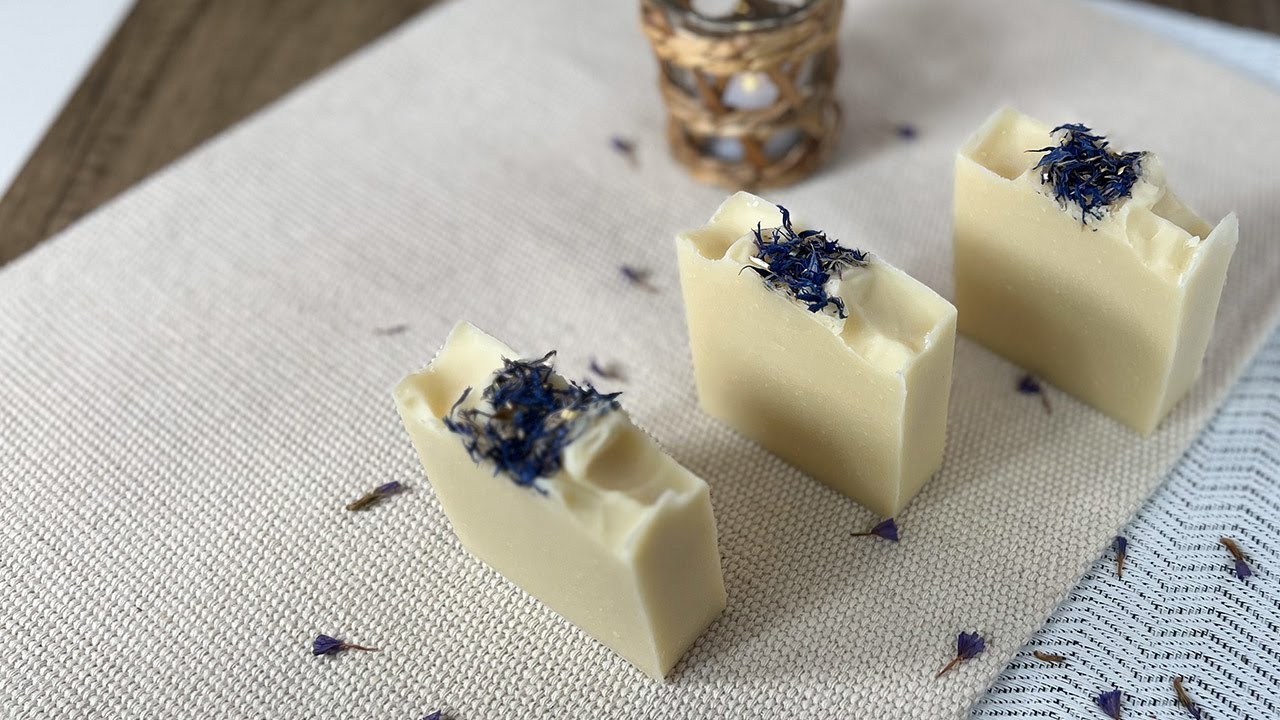
This simple cold process recipe brings out the very best of lavender essential oil. A calming vibe, a gentle lather, and a touch of cornflower petals for a beautiful flourish. This bar is both soothing and beautiful, the perfect soap!
Whether you’re new to soap making or returning after a break, this tutorial walks you through step by step. I’ve tried and tested it many times.
Why You’ll Love This Homemade Lavender Soap
This DIY lavender soap strikes a beautiful balance between simplicity and effectiveness. It’s gentle enough for daily use, yet elegant enough to gift too. It’s the perfect soap to make at home for yourself and your loved ones. But it’s also good enough for the market stall, if I do say so myself. The thing you’ll love most, I think, is the fresh and vibrant scent of lavender. It’s punchy, but beautifully floral, too.
Why else might you love this recipe?:
- Classic lavender scent: Naturally calming and familiar, without being overpowering.
- Balanced oils: A blend of olive, coconut, castor, and cocoa butter for a perfect cleanse and moisturiser combo.
- Great for beginners: A reliable cold process method that’s easy to follow.
- Visually beautiful: Topped with dried cornflowers for a rustic, botanical finish.
- Gentle on skin: Free from synthetic fragrance and suitable for most skin types.
- Gift-worthy: Makes an elegant handmade gift for any occasion.
If you enjoy making cold process soap and want more reliable results, you might also like my Natural Soap Making Course.
Inside the course I share tested recipes along with clear guidance on oils, lye, colors, and additives, so you can make beautiful, dependable, & natural soaps with confidence.
It’s 25% off this week. 👉 Explore the course here
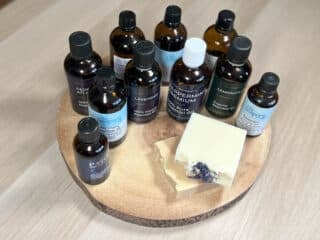
The Best Ingredients For A Lavender Soap

This recipe brings together a blend of rich, skin-loving oils with the gentle, floral scent of lavender. Each ingredient plays a role in creating a well-balanced bar. Cleansing, moisturising, and leaving skin lightly scented and refreshed. Whether you’re making this as a self-care treat or for gifting, you’ll find the ingredients work in harmony to create a soap that’s as kind to the skin as it is to the senses.
At a Glance: Ingredient Highlights
- Olive Oil: Rich in oleic acid, olive oil creates a mild, conditioning bar that’s perfect for sensitive or dry skin.
- Coconut Oil: Adds cleansing power and helps harden the bar. It also contributes to a bubbly lather.
- Castor Oil: Boosts lather and adds a silky finish to the soap. A little goes a long way.
- Cocoa Butter: Adds firmness to the final bar and provides deep nourishment and a creamy feel.
- Lavender Essential Oil: Offers a naturally calming, floral aroma that promotes relaxation.
- Cornflower Petals: A beautiful natural decoration that adds a touch of rustic charm.

As an Amazon Associate, I earn from qualifying purchases. If you buy via the links here I may earn a small affiliate commission at no cost to you, please read my affiliate disclosure.
Ingredients
Equipment
Method
- It helps to preweigh all of your ingredients beforehand. I would recommend to at least weigh your essential oils now, to avoid wasting time when your batter reaches trace. Set it aside for later useIMPORTANT: Make sure you are making the soap in a well-ventilated area. Put on your gloves and eye protection, mask, apron, and long rubber gloves.


- 127 g Distilled Water, 63.5 g Soapmaking LyeWeigh the distilled water into a clean container. Never use a glass container as this will be holding the lye water. Lye can weaken glass so it can easily break. In a separate container, weigh your sodium hydroxide/lye crystals.

- When you’re ready, carefully pour your lye crystals into the water, do not pour the water into the lye as this can create a violent reaction.When the lye is in the water, start stirring it. Although you are wearing a mask, we still recommend turning your head and leaning away while stirring, so you do not breathe any of the fumes. As the water and lye mix this will result in a chemical reaction, and the lye water will increase in temperature and release toxic fumes.
- Stir until the lye crystals have dissolved and the water looks fairly clear. Now place to one side, somewhere well-ventilated but safe so that it will not be knocked over. Allow to cool as we get on with our other steps.


- 112 g Coconut Oil, 25 g Cocoa ButterIf you haven't already, weigh the coconut oil and cocoa butter into a good-sized heatproof container. Then, melt in a microwave, using 30-second bursts. Or in a stainless steel saucepan on a low heat.
- 291 g Olive Oil, 22 g Castor OilOnce melted, add the olive oil and castor oil then give it a quick stir. You should now have all your oils in a liquid state all in one good-sized bowl or saucepan.


- Check the temperature of the oils and the lye water. You can do this with a temperature laser gun or a jam thermometer. We want them both to fall between 115-80F (46-27C). If they are still too hot leave them to cool for a while longer. They do not need to be the same temperature, for example, the lye could be 90f and oils 100f, but it is best to keep them within 10 degrees of each other.
- Once you’re satisfied they’re balanced, pour your lye solution into your oils.


- Before turning on the stick blender to mix the oils and lye, gently tap the stick blender against the bottom of your container. Continue tapping until all the air bubbles have been released. Then, turn on the stick blender and blend until the oils are fully emulsified into the lye solution. Then switch off the blender and check for trace. This is when you can drizzle a small amount of soap batter on top and it leaves a visible trail or 'trace' on the surface.

- 14 g Lavender Essential OilNow that we’re at trace, it’s time to add our essential oils. After adding them, stir well so they are fully combined into the soap batter. I always recommend having the mold ready before adding the essential oils. This is because EOs can sometimes thicken the soap batter, meaning you have to work quickly to get it into the mold.

- Now it’s time to get it into the mold. Pour or spoon the batter into your loaf mold. Give it a couple of light taps down to even the soap batter out, and use a silicon spatula to level it out if needed.
- 1 tbsp Cornflower PetalsYou can leave the top of the soap flat or add some texture with a spoon. Adding texture is a great way to conceal any uneven flaws, and can make the soap interesting. You can also top with flowers.
- We now need to leave this to saponify for 24-48 hours before we can remove it from the mold. I like to keep it well insulated during this period, so the gel phase is efficient. I do this by cutting a piece of cardboard to sit on top of the mold and then covering it with an old towel.
- Once our soap has fully saponified, and the sides of the mold come away easily from the soap, it’s okay to remove it from the mold.
- Now it's time to cut the soap loaf into bars. This can be done using a soap cutter or a sharp knife. You should get between 5 or 6 bars, depending on how thick you cut them.The soap will need to cure for 4 to 6 weeks before using. Curing the soap allows excess water to evaporate, resulting in a harder, longer lasting bar. This also results in a more gentle bar and a better lather.


New to DIY skincare?
If you’re enjoying making your own products, you might like Radiance, my free email course where I teach the foundations of DIY skincare step by step!Oil Substitution Guide
If for whatever reason you can’t get your hands on these basic oils, you can substitute, but it’s important to remember that changing oils also changes the amount of lye your soap needs too. You’ll need to recalculate your lye and water values using a trusted lye calculator to maintain safe and accurate measurements.
If you haven’t completed my natural soap making course, I would strongly recommend following the formula as is, and not messing around with a lye calculator. All of these oils are readily available worldwide, and are not expensive (or at least not as expensive as other soap making oils). In fact, most of it can be found at your local grocery store.
But here are some beginner-friendly substitutions, should you need them:
- Olive Oil: Can be replaced with rice bran oil or high oleic sunflower oil for similar mildness and skin feel.
- Coconut Oil: Babassu oil is a good substitute with similar cleansing and lathering properties.
- Castor Oil: Try jojoba oil in a pinch, though it will produce slightly less lather.
- Cocoa Butter: You can swap in shea butter or mango butter for similar moisturizing effect, but your soap will be softer. Cocoa butter is very stiff.
Always recalculate your lye amount when substituting oils! Each oil has a different saponification (SAP) value, and incorrect lye amounts can lead to a failed or unsafe batch.
We haven’t suggested a substitute for the lavender essential oil, as this would not be a lavender soap without it. However, feel free to use this formula with any of your favorite essential oils to create a variety of different themed or scented soaps.
For more information on the equipment you will need for soap making, take a look at my basic cold process soap making method. We’ll take you through everything you need to know about stick blenders, molds and other essential soap making equipment.
FAQ For Our Lavender Soap Recipe
1. Can I use fresh lavender instead of essential oil?
Not really. While you can, it poses a risk for spoilage. It also wouldn’t smell strongly of lavender at all after saponification. I would rather work with an essential oil and dried lavender buds (if you wanted some whole flowers in there). However these don’t look that nice when embedded inside a finished soap, as they will turn black. I would avoid it and stick to embedding them gently ontop. This goes for the cornflower petals too, those will also turn black if embeded too deeply in the soap.
2. Why did my soap batter thicken too quickly?
All essential oils have the possibility of thickening up your soap rapidly after you add it. While lavender essential oil is usually fine, floral EOs can still expedite trace. Be more careful when stick blending, blend in shorter bursts, and check for trace more often.
3. Can I make this recipe without a stick blender?
No. Okay so that’s a lie you can, but it would take a very very long time and… quite frankly… your time is worth more than that. Just get yourself a stick blender, they’re more affordable now than they ever have been.
4. What if I don’t have cornflowers? Can I leave them out?
Of course! You can leave them off completely, or you could swap them with dried lavender buds. However, in my experience the dried cornflowers look much nicer than the lavender buds.
5. My soap came out crumbly — what went wrong?
If your soap is crumbling, it’s likely lye heavy (meaning you have used too much lye. In this case, you will want to rebatch or just start again. Be more mindful of your measurements. Or, if you have made a substitution, make sure to recalculate the correct amount of lye using a lye calculator.
6. Can I add color to this soap?
Of course. We would recommend using a few pinches of purple mica. Or, if you prefer an all natural pigment, you could use ½ tsp of indigo root powder added to the lye and 1.5 tsp pink clay added to the oils. However, using natural colors usually results in a softer, more neutral tone than the mica.
7. Why does my soap smell different after curing?
You will always see a softening in the aroma of your soaps overtime. However, they should still smell lovely right after curing.
8. How long should I cure this soap before using it?
Standard soap curing time is 4-6 weeks.
9. Can I use this soap on my face or just my body?
Sure! However, those with sensitive skin types may struggle using any kind of CP soap on the face.
10. Can I make this recipe in a loaf mold or individual bar mold?
You can use either. Sometimes you’ll see some small differences, as the size of the mold can change the speed and rate at which your soaps will gel. However, I wouldn’t overthink it; you’ll have lovely soap either way!
Storage & Shelf Life For Homemade Lavender Soap
Once your lavender soap has fully cured (usually after 4–6 weeks), it’s ready to use or store. Keep your bars in a cool, dry place away from direct sunlight to preserve both the scent and the quality. A well-ventilated storage area, like a wooden drawer or open box, will help prevent any moisture buildup.
If gifting or selling, wrap the bars in breathable paper or place in cardboard boxes. Avoid airtight plastic wrapping, especially if the soap hasn’t fully cured.
Properly stored, your soap should stay fresh for up to 12 months. The scent may mellow over time, but the bar will still be safe and effective to use. To enjoy the full lavender aroma, aim to use your bars within the first 6–9 months.
These bars are so lovely that it’s unlikely you’ll have any left by 9 months. However, it’s common to use soap in the bathroom as decor, as well as provide a fresh scent to the room. Consider swapping them out for fresher bars after 9-12 months.
Final Thoughts
Im a big lover of this soap. There’s always a reason to make it too. Whether It’s for yourself, a thoughtful handmade gift, or even for your market stall.
It’s beginner-friendly, beautifully fragrant, and consistently produces a lovely bar you’ll be proud of. The combination of gentle oils and calming lavender essential oil makes it one of those staple recipes you’ll find yourself coming back to again and again.
Don’t forget, your soap will need to cure for 4–6 weeks before it’s ready to use. This step is absolutely essential, especially before packaging (if you plan to). It allows the water to fully evaporate and gives you a harder, longer-lasting bar. It also helps the scent settle beautifully into the soap.
If you’re tempted to tweak the recipe by swapping out oils, remember to always run your adjusted formula through our soap calculator. Each oil has a different saponification (SAP) value, and using the wrong lye amount can ruin the batch. It can even make it unsafe to use! That said, if you’re new to soap making, I’d encourage you to stick to the original formula for now. The ingredients are affordable and easy to find, and this recipe is a great place to start building confidence.