
Hyperpigmentation is one of those skin conditions that really gets to people who suffer from it. Don’t take my word for it, just google it and see how many people suffer from this and are looking for a solution.
I myself have had many comments and emails about it on my homemade moisturizer posts, so this week I made it my mission to develop a DIY hyperpigmentation cream that can help ease some of the symptoms.

Introduction
You’d be surprised by the number of people who suffer from hyperpigmentation and how much it can affect our self-esteem. One of my friends is a sufferer, and she tells me regularly how it makes her feel so self-conscious.
Let’s not even discuss how much makeup she goes through trying to cover it up and how much money that sets her back. But what if there was a moisturiser for hyperpigmentation that could help even out those dark spots?
If you’d like to explore more creams and moisturizers, I cover this in much more depth inside my Fabulous Face Creams & Moisturizers Course.
Inside the course I share a wide range of tested recipes for creams, gels, oils, and balms, along with clear guidance on how these products are built and how ingredients work together. This makes it much easier to adapt recipes or start creating your own when you’re ready.
It’s 25% off this week. 👉 Explore the course here
What Is Hyperpigmentation?
But first, what is hyperpigmentation? If we look at the different components that make up our skin, one particular cell is responsible for the dark spots that we associate with hyperpigmentation. These are the ‘melanocytes‘. These tiny cells are found in the lowest parts of the epidermis and are the building blocks of our skin color.
When skin is exposed to the sun a message is sent to these cells telling them to produce a substance known as melanin, which helps to block the damaging UV rays from penetrating deeper into our skin. It’s important to note that people with naturally dark skin tones do not have more melanocytes than fairer skinned people, but rather their melanocytes are simply more active.
But due to a variety of factors, such as skin damage (via sun exposure, inflammation or other skin injuries), acne and various medical conditions, some melanocytes can become more active than others. When melanocytes have divergent activity in this way, patches of skin can become more pigmented than others.
This is what we refer to as ‘hyperpigmentation‘. Those of us with naturally darker skin tones are more susceptible to this condition than fairer people, but absolutely anyone can experience this and it is very common across the globe.
So What Can We Do About It?
So I did my research, trawling through my books on natural skincare but also the web. I found a whole host of ingredients that can help to reduce the visible signs of this condition, and I narrowed the list down to a few key ones that should help anyone who suffers from this debilitating condition. These ingredients can be used to create a powerful homemade hyperpigmentation cream, the recipe to which I will share with you in this post.
While this cream will certainly help mask the symptoms, it is important to keep in mind that this will not cure the condition. Hyperpigmentation is still a bit of a mystery to us and while a cure could be on the horizon, it just isn’t here right now. But nevertheless, we natural skincare formulators are always trying to find ways to improve the look and quality of our skin, so why would hyperpigmentation be any different?
So let’s take a look at the different ingredients I’ve chosen for this recipe and discuss how they will perform in this formulation.
Supplies for the best homemade hyperpigmentation cream
Oil Phase
- Evening Primrose Oil – 16g
- Rosehip Seed Oil – 10g
- Shea Butter – 3g
- Emulsifying Wax – 11g
Water Phase
- Distilled Water – 60g
Other Ingredients and Botanicals
- Vitamin E – 1g
- Broad Spectrum Preservative – 0.5-1g
- Carrot Seed Essential Oils – 4 drops
- Frankincense Essential Oil – 3 drops
This should produce roughly 100g of cream, and so you should choose a container that can hold this amount. Ensure the container is made of glass, PET plastic or aluminum.
Notes on Ingredients
So let’s take a look at these ingredients in more detail. I’ll be excluding any talk about the water, emulsifying wax, preservative, and vitamin e, as these are necessary for the foundations of oil in water emulsions or because adding them is just good formulation practice.
Base Oils
- Let’s talk base oils. Evening Primrose Oil is one of the best carrier oils for hyperpigmentation. It’s a wonderful toning oil that can do wonders for evening out dark spots.
- Rosehip Seed Oil is similar, although you may have read about it being used specifically for acne scarring and the associated dark spots that can come along with that (although it does its magic on all dark spots, not just acne ones).
- If either of these carrier oils don’t excite you much, you could swap one of them out for Tamanu Oil, which is equally good, just more expensive (at least it is for me in my area) without any better results.
Essential Oils
- Now, let’s discuss essential oils. So Carrot Seed Essential Oil is your go-to for dark spots. It’s absolutely amazing at evening out skin tones. Its high beta-carotene content reduces pigmentation in the skin by inhibiting tyrosinase, an enzyme produced in our melanocytes that is responsible for the production of melanin. It’s really great stuff and your formulation would not be complete without it.
- Frankincense is another good EO for hyperpigmentation. While not nearly as good as Carrot Seed, it does have some powerful abilities to lighten and brighten skin. If you’re not planning on using this as a day cream, you could easily substitute frankincense for lemon essential oil (which has proven properties of lightening dark spots and the pigmentation of skin in general). I only worry because Lemon EO has the problem of being phototoxic when you’re out in the sunlight. If it’s a night cream, feel free to substitute.
Others
- Oh, I might as well mention here that the shea butter doesn’t really help all that much to reduce hyperpigmentation. However, it does leave your skin feeling lusciously soft and super smooth! I don’t know about you, but having too many moisturizers is just a pain.
- You want one or two that do their job well, and shea butter helps make this cream more versatile. Not only will it help alleviate dark circles, but also works as a high-performance moisturizer as well!
How To Make Hyperpigmentation Cream
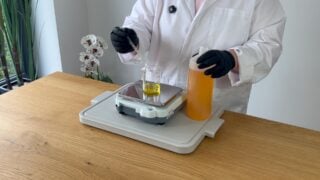
Step 1: First, take the time to measure out all of your ingredients, with the exception of the essential oil, vitamin e oil, and the preservative. Ensure your water and oil phases are in separate beakers.

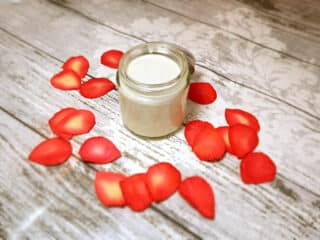
You’ll notice my water is a deep reddish color. This is because I am using a homemade rose petal hydrosol. I’m making this for a friend, and she just loves everything rose. Because we’re not using a rose essential oil, I thought it would be a nice personal touch to use a rose hydrosol. She just loves the thought of applying rose to her skin.
This is an important thing to keep in mind when making custom/bespoke skincare gifts for your friends and family. If there is a way you can add something that really gives your product a personal touch and it doesn’t negatively affect the formulation, you really should.
While rose hydrosol doesn’t add anything to the formulation that will benefit my friend’s hyperpigmentation (although rose hydrosol has many lovely benefits for our skin), it doesn’t detract anything from it either. It just makes the gift feel extra special and when I told her I had added some she was even more excited to start using it.
Otherwise, you can use ordinary distilled/bottled water.
Step 2: Place both beakers, one with your water phase and one with your oil phase, into a water bath. Simply fill a pan with a couple of inches of water, bring it to a boil, turn it down to just a simmer and then place the beakers into the pan.

You want to leave the beakers in the water bath for as long as it takes for the shea butter and emulsifying wax the melt. Ensure that the water is only ever simmering, and never actually boiling. This process should take around 15-20 minutes but may vary. Keep your eye on it at all times and stir occasionally.
Step 3: Now that your shea butter and wax have completely melted, remove from the water bath. Be careful not to burn yourself as the beakers will be very hot.

Once out of the water bath, go ahead and pour the water into the oil. Always pour the water, as you will lose too much oil to the sides of the beaker if you attempt to pour the other way around. You will notice immediately that the mixture changes color and become quite opaque.

Step 4: Now we have mixed both our water and oil phases, it’s time to whisk. Using either a small hand whisk or an electric milk frother, whisk until the mixture until it thickens.

You will notice that the mixture will only thicken as it begins to cool. I like to whisk for a minute and then leave it for a further 5, then return to whisk for another minute. Continue this process until the mixture has cooled and you reach a consistency that resembles a facial cream/lotion.

Step 5: Now that our cream has cooled, we can go ahead and add the last of our ingredients. I like to do this on a scale, adding the vitamin e first followed by the preservative, hitting the T button on the scale each time so we can get exact measurements more easily.


Then, add the 7 drops of essential oil. Once these final ingredients are added to the beaker, give it a thorough whisk once more to ensure everything has fully combined.

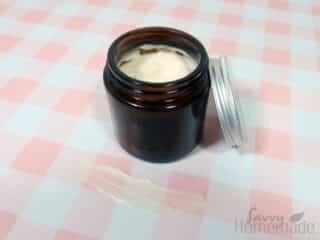
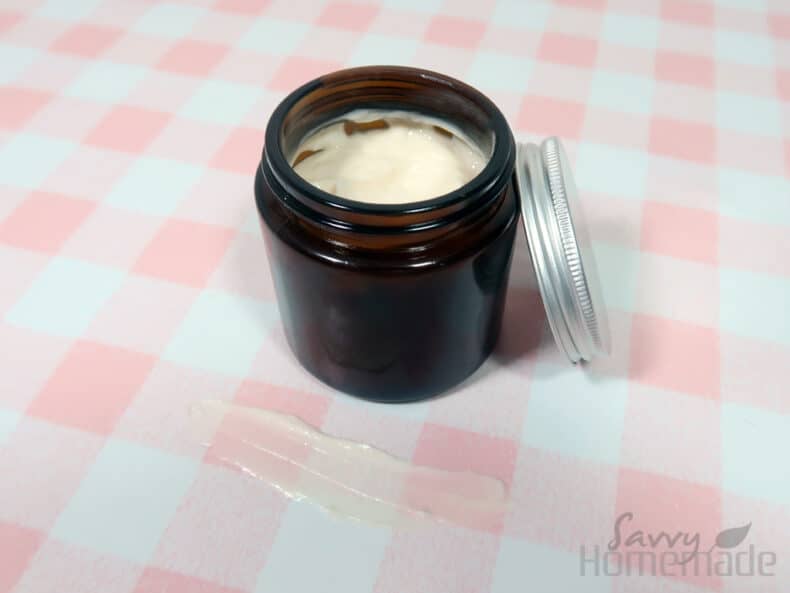
Step 6: Transfer to your chosen container and label. Ensure that it is either glass, PET plastic or aluminum. I prefer to use a dark colored glass, as it’s easy to work with and will protect the essential oils that are suspended within the cream from oxidizing in sunlight.

This hyperpigmentation cream, providing you’ve used a good quality broad-spectrum preservative, should last about 6 months. Use daily.


Hi Angela,
Could I use carrot seed oil instead of carrot seed essential oil? Is there much of a difference?
Hi Panida,
You can! Although it isn’t nearly as effective as the essential oil.
I don’t see where you used the distilled water in your instructions. 40 grams is a lot of distilled water and after reading and rereading this page it appears there is no distilled water phase. Help me understand, please. Thank you.
hello Mickie,
I can see why this might be confusing, as the instructions are not very clear. Rest assured, I will be addressing this issue. In the meantime, I hope the following makes it clearer.
Instructions for Making the Cream:
In Beaker 1 (Oils)
Evening Primrose Oil – 16g
Rosehip Seed Oil – 10g
Shea Butter – 3g
Emulsifying Wax – 11g
In Beaker 2 (Water)
Water – 60g
Heat the Ingredients
Place both beakers in a pan with simmering water. Heat gently until:
The oils in Beaker 1 have completely melted.
The water in Beaker 2 is heated through.
Combine the Ingredients
remove both beakers from the heat.
Pour the heated water (Beaker 2) into the melted oils (Beaker 1).
Stir the mixture continuously until it forms a uniform cream.
Cool the Mixture:
Continue stirring the cream until it cools to room temperature or reaches 40°C or less.
Add Final Ingredients
Once cooled, add the following to the cream:
Vitamin E – 1g
Broad Spectrum Preservative – 0.5–1g
Carrot Seed Essential Oil – 4 drops
Frankincense Essential Oil – 3 drops
Stir thoroughly to incorporate these ingredients evenly.
Final Check:
Ensure the cream is smooth and well-blended before transferring it to storage containers.
hope this helps Angela x
Thank you for this post. With the above mentioned ingredients, would this lotion make our skin more susceptible to future sun damage and to proceed with caution in using when you know you wont be out in the sun after applying?
The lotion ingredients don’t generally increase sun sensitivity, but Rosehip Oil can mildly increase it. If you’re going out in the sun after using it, it’s best to apply sunscreen as a precaution. Otherwise, it’s safe to use.
Kind regards Angela x
Do you sell this depigmenting cream?
Hi Tonza,
Sorry I don’t sell any of these products, only the information on how to make them (most of which I provide free here on my blog!).
Not a fan of smell of the Evening Primrose Oil can I swap the quantity of it and the Rosehip oil? Or is there a essential oil to masks the scent?
Hi Bridgette,
Yes that should be fine. Rosehip is actually an excellent choice. It’s so good for the skin and will also provide a dewy like appearance to the skin that looks so beautifully radiant.
This is so lovely.
Concerning the carrot seed oil, I tried extracting carrot oil without a carrier oil because I did not want it adulterated so I used petroleum ether instead and what I got was a viscous orange-colored substance. Do you think I can use this in the formulation of cream ?
I am not even sure carrot itself has enough oil
Hi MJ,
I really cannot say for sure, as I’ve never worked with petroleum ether before. Usually we use a carrier oil because we know that is will always be safe. Furthermore, it also ensures that the ingredient will behave in an expected way within our formulas.
However, if you’re unsure, you could use a carrot seed essential oil, instead of trying to make and infused oil. You can buy this from your local cosmetics supplier or from an aromatherapy shop. You can even get them on amazon.
I know you have an anti aging type moisturizer, but after reading about carrot seed EO, I wonder if this recipe might also be good to try.
Hi Beth,
Absolutely it would. I would for sure give it a go. Carrot Seed EO is packed with antioxidants, so would be great in an anti-agining moisturizer.
Thank you! I have used carrot seed oil; excited about trying out the carrot seed EO. I love Plant Therapy, so I ordered from them!
Hi Beth, I love Plant Therapy as well! Last time I checked they were still a family company!
That sounds wonderful! When testing your cream, it’s best to use it for a full month before trying to evaluate. It takes this long for the skin cells on our faces to renew themselves. As carrot seed EO penetrates many layers of skin, the soft, plump, fresh cells that sit at the bottom of our skin are being nourished right now! When they make their way to the top layer of skin over the next month, you’ll see the difference.
Yes! All good things are worth waiting for.
Could i use this cream in private area such as between butt cheeks, inner thighs, armpits?
Hi Cleiton,
I would be very cautious about using anything in your private areas that are not prescribed by or under the advisement of a medical practitioner. I would totally give it a go on the armpits, though. If you’re looking for something to treat your more intimate areas, it might be best to consult your family doctor or dermatologist.
Hi,
Will this cream lighten all of your skin or just the areas with hyperpigmentation?
Hi Leanne,
I don’t think it will. It’s more about targeting areas of the skin with hyperpigmentation. It’s also important to manage expectations, as this cream will not cure a condition, but will help manage the symptoms.
I am new to making skin care products, every recipe I have seen calls for preservitive but never say what they are. Just what do I use for preserving my product?
Hi Susan,
It’s extremely important to use a preservative in a product. By doing so, you protect yourself from unwanted microbial growth within your skincare products. It’s a bit like food in this sense. If you bought a fish that you wanted to eat the next day, you wouldn’t leave it out on the kitchen counter all night, would you? You’d pop it in the fridge. Adding a preservative is to your skincare products is just as important as storing your food in the fridge.
There have been many reports of people making DIY skincare products without preservatives and then developing various skin diseases. I have even seen articles about people being permanently blinded by poorly preserved skincare products. Keep yourself safe and ALWAYS use a preservative.
It’s also worth mentioning that storing skincare products in the fridge will not prolong their shelf life.
I hope this has cleared things up for you Susan. Good luck with formulating your skincare products!
Hi
Thanks . Can you tell me the name of a preservative which is free or less of acid chemicals though we are making homemade creams.
Thank You
If you’re looking to avoid preservatives with naturally occurring chemicals such as Sorbic acid or Salicylic acid, (Preservative Eco/Geogard) you can make use of synthetic preservatives that are made of parabens, or perhaps a natural preservative such as Naticide that is made up of some of the components of essential oils. However, whatever you use, it must be broad-spectrum.
The issue of which preservative to use is a very controversial issue at the moment. It’s difficult to say which preservative is best for you, so take a look at my recent post about preservatives. Hopefully it’ll help you make an informed choice.