

Have you seen eye creams you can buy in a store, or maybe even tried to make your own DIY eye cream? I’m sure you have, but sometimes I feel like eyes don’t get enough love. We’re always so obsessed with the way other parts of the body look, such as growing waistbands or wrinkly hands. But what about those two organs that most of us rely on to interpret the world?
Okay, so I’m not going to be sharing anything that’s going to improve your eyesight, but did you know that the skin and muscles in and around the eyes are some of the most delicate and sensitive soft tissue on the face?
Let’s also not forget that this area can easily succumb to the signs of aging, with wrinkles around the eyes (also known as crows feet) are some of the first facial lines to appear? So yeah, eyes need some tender love and care as well!
Why This Is Not Really A ‘Cream’

I know that I’ve titled this post with the phrase ‘DIY eye cream’, but that’s kind of a little white lie. Before I confuse you further, lets briefly discuss what a cream actually is.
So a cream, also known as a ‘lotion’, is a mix of water, oil and emulsifying wax. The problem we have here is that because of the water content, a preservative is a kind of a necessity. But preservatives aren’t natural, remember, and no amount of vitamin E is going to stop bacteria growing. This is also the reason I’d never use a commercial produced eye cream you can pick up at your local drug store (no matter how expensive it is).
To Preserve Or Not Preserve
As we’ve already said, the eyes are super sensitive, so if possible I would rather not use a preservative around my eyes. I, therefore, have a choice of making the eye cream up as and when I need it. Or I make something without water so I don’t have to use preservatives at all.
But the whole point of this post was to make a homemade eye cream that’s preservative-free. So, I sat and thought about it for a while on how to make a suitable eye cream or an alternative that does something similar. I had a coffee and a few cookies too because a girls gotta keep her strength up, you know?
After a while, I came to the conclusion that the best thing I can do is formulate something that is designed to nourish, soothe and care for our delicate eye region while also excluding water and preservatives.
I came up with two of them! Let’s take a look.
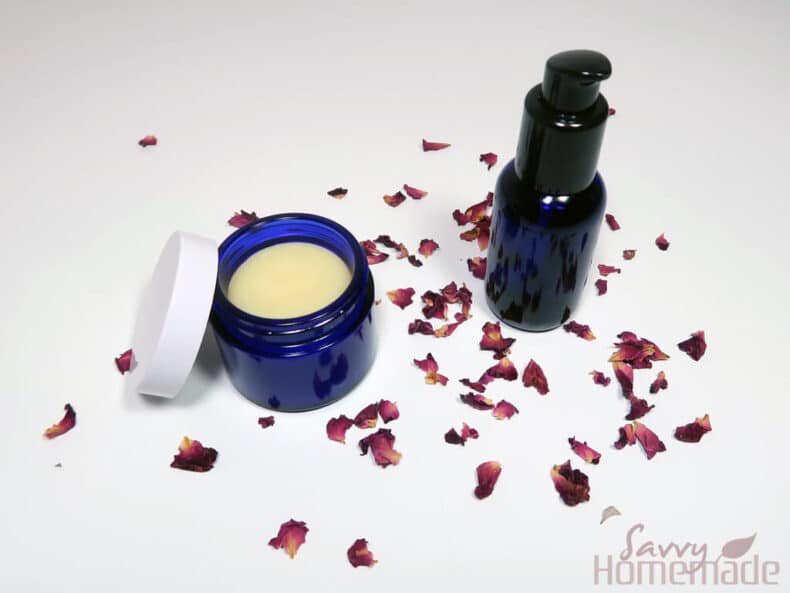
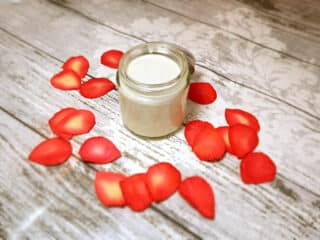
Eye Butter Is Better Than Cream

Yup! A butter! You’ve probably used one of these all over your body, and that’s because they’re deeply hydrating, exceptionally nourishing and well… just so darned good!
This one has been specially formulated to keep our eyes looking bright, young, and full of life! Better yet, because the recipe doesn’t call for any water or hydrosol, it can happily keep for up to a year!
- I’ve included shea butter in this recipe, mostly because it’s probably the best cosmetic butter you can readily get your hands on. It’s such a wonderful ingredient in any skin care product, packed with nutrients that will nourish our skin, but also keep it moisturized with help from the various carrier oils that we’ve also included.
- But let’s not forget that Rose Essential Oil! It’s possibly the most treasured of all the EOs, coveted for its ah-mazing anti-aging properties. It will also soothe eye irritation, something all of us experience in this day and age with the amount of pollution and chemicals being pumped into our atmosphere every second.

As an Amazon Associate, I earn from qualifying purchases. If you buy via the links here I may earn a small affiliate commission at no cost to you, please read my affiliate disclosure.
Ingredients
Equipment
Method
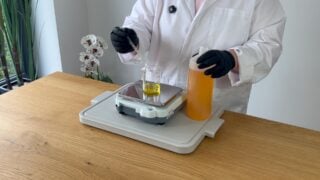
- 2 tbsp Shea Butter, 1 tbsp Coconut Oil, 1.5 tsp Rice Bran Oil, 1 tsp BeeswaxMeasure and then combine all of your ingredients, except the essential oil, into a heatproof vessel. A pyrex jug/beaker, mason jar or a simple bowl all work quite well. Place tit into a water bath or double boiler for about 10 minutes, or until the solid butter, oil and wax has melted together.To use the water bath method, fill a pan with a few inches of water and bring to a boil. Reduce to a simmer, and then place the jug into the center. Do not allow the water to boil while you’re melting your ingredients.

- Once your ingredients have melted, remove from the heat and allow to cool for about 5 minutes. Do not leave it long enough to completely harden. We’re looking for a thick liquid, a little like ketchup.
- 4 drops Rose Essential OilAdd your drops of essential oil. We needed our oil, butter and wax mixture to cool a bit first as otherwise, you’ll lose all the goodness of our EO. Once the essential oil is in, give it a good mix.
- 1 Cosmetic JarPour, or spoon, the mixture into your chosen jar. Ensure you’re using glass or coated/cosmetic grade aluminum, or you can use a PET plastic (ordinary plastic is not suitable).


Notes
New to DIY skincare?
If you’re enjoying making your own products, you might like Radiance, my free email course where I teach the foundations of DIY skincare step by step!A DIY Eye Serum That Also Works Way Better Than Eye Cream
You may have used a face serum before, but if not here’s the scoop. Serums are a mixture of different carrier oils, essential oils, and other products and can be applied directly to the skin to fight off wrinkles and take care of our eyes.
Much like the butter, the lack of water here allows you to keep using the same one for up to a year. This also means we don’t need a preservative!

- So let’s talk about what goes into this magical elixir. The carrier oils, Avocado, and Kukui Nut are chosen for their ability to quickly sink into the skin, whilst simultaneously care of aging and dry skin. They’re pretty fabulous oils, and you can read more about them here.
- Neroli essential oil is a fabulous ingredient for any skin care product. It helps to rejuvenate the skin, as well as restoring the elasticity that we lose as we get older. It also has a fabulous way of encouraging the growth of new skin cells.
- Squalane is great also. We all produce this naturally before the age of 25, and it lends a youthful, vibrant appearance to our skin. After this age, however, we stop producing it. This loss is one of the causes of wrinkles and fine lines. By adding this to our serum we can reclaim this and keep our eyes looking more youthful for longer!
Ingredients For The Eye Serum Recipe
- 1.5 tbs Avocado Oil
- 1 tbs Kukui Nut Oil
- 7 drops of Neroli Essential Oil
- 1 tsp Olive Squalane
- Glass or PET plastic bottle (to store)
How To Make Eye Serum
This is so simple that I won’t even bother to list steps. Simply combine all of your ingredients and pour it into a suitable bottle made of glass or PET plastic (try and get your hands on a dark color as well, just to keep that essential oil working for longer).
I like to use this at night before I go to bed. It lets all of the oils soak in as you sleep, preparing your eyes for the day ahead.
Final Thoughts On These Eye Area Recipes
So there we have it, two recipes that are (in my opinion) a million times better than any homemade eye cream you can make, or a commercially produced alternative you can buy in a store. Like I’ve already said, homemade moisturizers are great but for some people, the preservatives necessary to keep bacteria levels stable are sometimes just too problematic for this region of skin.
I’ve already said how and when I like to use these products, but in reality, you can use them whenever you like. You could even use them together, as they sink into the skin relatively quickly anyway.
I hope you’ve enjoyed reading this post today and learning about the different ways we can care for our eyes as we age. If you take one thing away with you, I’d hope it would be how important it is to limit the use of products with added preservatives around the eyes.
Please go ahead and share on Facebook to let others know more about this hidden danger, and how they can quickly whip up a safe alternative at home.
Next, take a look at my lovely green tea and cucumber eye gel, this can take the place of your toner in the evening. Gels are better than toners for tightening up the skin under your eye. They can also offer powerful soothing, softening and anti-aging properties to keep your eyes feeling young and fresh for longer.


Hi there, I can’t afford nor have all the time to make these up due to having a baby. The eye serum seems easy and quick to do.. does this work very well on its own/can it be used on all the face like a night oil?
Does the avocado oil have to be a certain one like refined/unrefined cold pressed and so on? Or would ordinary cooking oil 100% avocado oil do? Many thanks for your help.
Hi Abbie,
Yes, this can be used as a night cream. It doesn’t contain any water, so it is a slow-absorbing cream.
For a face serum or cream, I would always use a cold-pressed carrier oil. The only exception to that rule would be coconut oil; I would happily use this from the supermarket shelf. Oils can usually be substituted for another one in our recipes, so if this is your first time making a cream, go for something economical such as sweet almond oil, which is easily obtainable on Amazon.
Hope this helps, Angela x
Hi Angela, I have so enjoyed making and using these lovely creams, butter & serum recipes.
I have had no problems with any of the recipes except the preservative free eye cream.
Twice now this cream has turned grainy after cooling. I did substitute candelilla wax for beeswax and adjusted the amount as suggested otherwise followed the recipe exactly. If I warm the cream in my palm first, the graininess seems to mostly dissolve and then is usable around the eye area. Can you please comment on this problem and suggest a solution. Again thank you for these great recipes.
Claire
Hi Claire,
Shea can be quite prone to graininess, and have experienced this myself with some batches of shea I’ve used over the years. The best thing to do in this case would be to melt it back down and to cool it more quickly. You can cool it using an ice bath method. You could also try a different butter – Mango tends to be less grainy.
Can you use wheat germ oil instead of olive squalane? Or what would be another substitute? Thanks!
Hi Jan,
You can substitute it, but it wouldn’t do the same job. There’s also no good substitute for it I’m afraid. Although, you’re always safe to replace your olive squalane with whatever carrier oil you’re already using.
Hi Angela, yes, it’s me again. (I might as well just say I’m vegan at this point.) Is there a substitute for the beeswax please, in the eye butter above? Thank you so much.
Hi Lara,
Not to worry, I love enthusiastic crafters! Of course, I always recommend candelilla wax to my vegan friends. It has a lot of the conditioning power that beeswax has, and protects skin from the elements. Although, it has double the ‘stiffening’ power of beeswax, so I would always use about half as much.
Thank you so much.
Hi Mam,
Do you have DIY Anti Aging cream with preservative? I want to do it for myself since my husband doesnt want to spend anymore for my eye cream coz it is too way expensive and I am just a house wife. I cant find on your site for an Eye cream.
Hi Maria
Try these recipes https://www.savvyhomemade.com/homemade-wrinkle-cream-that-works/ https://www.savvyhomemade.com/diy-face-cream-recipe/
Thank you so much Mam Angela, I really appreciate your kindness and help. May I know which one of the ingredients of wrinkle cream is the preservative please? Thank you for sharing some of the information about the other ingredients , what it do to our skin. May you have a good day and keep safe.
Hi Maria,
Info on preservatives can be found here.
Hi Mam,
So in all these recipe you have not used any preservatives so how long do they last? And with in how many months it has to be used? Can I store it outside or normal room temperature?
Hi Shaj,
Yes, there’s no preservative in this one. I would suggest using it for no longer than about 6 months, although if at any point it starts to change in texture without the temperature going up or down, best to throw it. I say keep it at normal room temperature. You’ll find it’ll melt at a higher temp, and at a lower temp, it may become too hard to use.
I hope this helps
I love tour recipes but I can’t afford all the ingredients as I’m on a fixed income. Will I get just as much benifit from just using the frankincense oil and lemon oil on my skin if I mix them together at night before applying them. Thank you Andrea
I forgot to ask what is the best thing I can use/do to get rid of my dark under eye circles. It really stressed me out to have these dark circles. Again thank you so very much for all your recipes and great help. Hugs Andrea
Hi again Andrea!
When you say dark circles, are we talking eye bags or hyperpigmentation? If it’s hyperpigmentation, I would definitely recommend making use of Carrot Seed Essential Oil. It’s wonderful for that sort of thing. Remember to dilute it into oil, no more than 1-2% essential oil. As for eye bags, the Frankincense Essential Oil in your facial oil should help with this. It’s great for tightening skin. Lavender is also good, as well as Geranium. While I wouldn’t say it’s a miracle cure, it definitely should help to reduce some of the signs. This, in combination with good hydration and rest, should help you out.
Hi Andrea,
Essential oils are very potent and should never be applied directly to the skin. However, if you didn’t want to make use of the other ingredients, you could whip up a facial oil. Any carrier oil would do. Sweet Almond Oil is great for your skin and is cheap and relatively affordable. You could even use Olive Oil if you wanted to, but I find it doesn’t absorb into the skin very easily. I would suggest using 1-2% essential oil to 98-99% carrier oil. So, if you wanted a batch size of 50g, I would recommend using 0.25g Frankincense essential oil, 0.25g Lemon essential oil and 49.5g Sweet Almond/Olive Oil.
I hope this helps!
I love your recipes! My question is, if you’re making these just for yourself, you have to buy big bottles of the products. How do you keep the big bottles fresh? Thank you!
Sally
Hi Sally,
This is a very good question! I tend to make a lot of skincare products, so I don’t usually let my ingredients ‘go off’ so to speak. However, there are some things you can do to keep your ingredients fresh.
Always store anything you plan to use in skincare formulations in the fridge. I have a refrigerator in my garage that I use only for my oils, essential oils and various other perishable skincare ingredients.
Other than that, try to buy products you know you’ll use a lot. For instance, Sweet Almond Oil is a great carrier oil to have as it’s suitable for pretty much all skin types. It’s a great go-to ingredient for whatever you’re making, so buying that in a relatively large bottle probably isn’t going to be much of an issue, as you’ll use it up before it goes off.
I will also prioritise any ingredients that I know are coming to the end of their life, just to make sure I get a chance to use it up. The more expensive, niche ingredients (e.g. Rose Essential Oil) I only buy in very small quantities, just to make sure I will get through it all before it oxidizes or turns bad.
Nevertheless, this sort of thing can definitely be a problem, especially for people like yourself who only really make products for them. Perhaps it could be an opportunity to start formulating skincare products for friends and family, just as gifts. You’ll be surprised how many dollars you can save come Christmas time.
Hope this helps!
Angela
Hi
Instead of rice bran oil can I use olive oil or almond oil ?
thank you so much for all your recipes and great help.
Hi Afroza,
You absolutely can! Although I personally would prefer almond over olive oil. While olive oil has great benefits, I find it doesn’t fully absorb into my skin and sometimes it makes products feel a little greasy. Almond would be a better choice for this reason.