

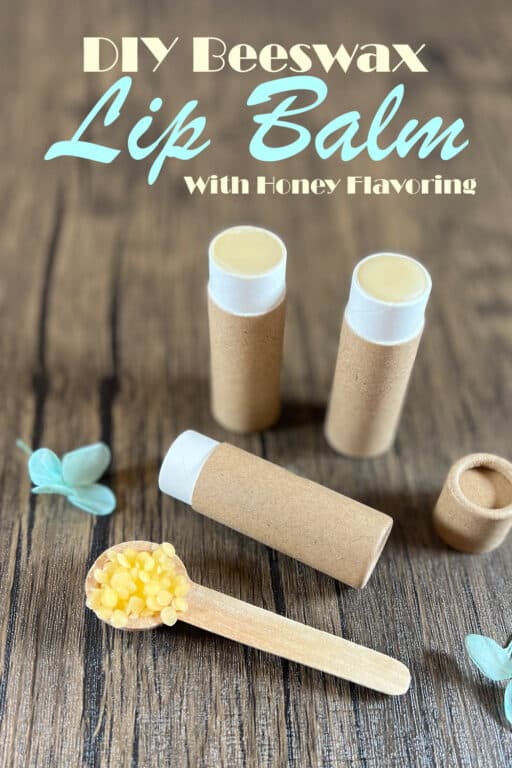
So, your lips are chapping, and you’re looking for some relief. Look no further than one of my lip balm recipes. I’ve made several recently, and this one is a lovely beeswax lip balm recipe!
It’s fabulously soothing for your dry, cracked lips. In fact, this lip balm will form a protective layer for your skin, so that moisture can never escape into the air.
Furthermore, once your lips have healed up, thanks to the lovely calendula oil, this balm will continue to make sure your lips are soft, supple, and well-hydrated all year round.


As an Amazon Associate, I earn from qualifying purchases. If you buy via the links here I may earn a small affiliate commission at no cost to you, please read my affiliate disclosure.
Ingredients
Equipment
Method
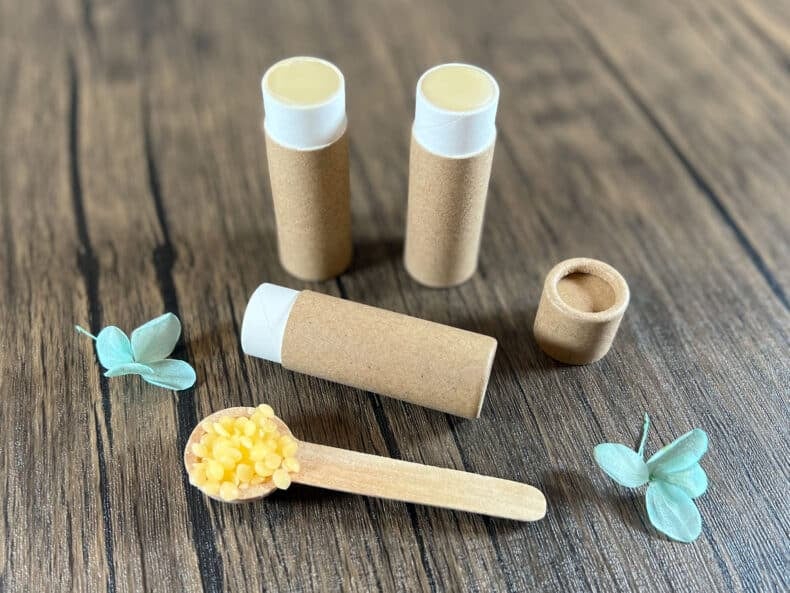
- 13 grams Beeswax, 10 grams Cocoa Butter, 5 grams Shea Butter, 5 grams Castor OilPlace the beeswax, cocoa butter, shea butter, and castor oil into a heat-proof beaker.

- To melt the oils, place the beaker into a water bath or bain marie. You can create a water bath by filling a saucepan with a couple of inches of water and bringing it up to a gentle simmer. Let the beaker sit in the simmering water until the wax and butter have just melted.
- 14 grams Calendula OilOnce fully melted remove the beaker from the saucepan, but keep the water bath close by as you may need it again. Stir in the calendula oil, If it starts to become solid and cloudy you can pop the beaker back into the water to gently re-melt it. We are trying to heat our calendula as little as possible so that we do not lose all of its wonderful skin loveing potency.
- 1 grams Sunflower LecithinAdd the lecithin, stirring it in so that it is well combined. You will notice that the lecithin will slightly slow down the hardening process, making it easier to handle.
- 0.5 grams Vitamin E Oil, 1.5 grams Honey Flavor OilAdd the vitamin E, and flavor oil, stirring after each one. Once again, pop it back into the water bath to gently re-melt if it does start to solidify.
- 5 Lip Balm TubesMake sure any tubes that you are using are fully twisted down. Pour the oils into lip balm tubes or containers. Lip balm containers can be fully filled, tubes are best with a little space left at the top ready for topping up later. For this, you will need to hang on to a small amount of the balm mix. When filled Leave the lids off, and put them into a cold place to solidify. A fridge is a perfect place for cooling them quickly, they shouldn't take much more than 30 minutes.
- Re-melt the leftover balm mix and top the tubes up. Set aside and leave them to solidify. When they are completely solid and cold, you can pop the lids on and leave them to sit for 24 hours before using them. This gives the lip balm time to thicken and bond with the lip balm screw at the bottom of the tube.


Notes
New to DIY skincare?
If you’re enjoying making your own products, you might like Radiance, my free email course where I teach the foundations of DIY skincare step by step!Spotlight On Ingredients
This beeswax and honey lip balm recipe is 100% tried and tested. We’ve made sure that our formula works, so you don’t have to worry about wasting your ingredients.
Speaking of ingredients, let’s take a look at what we’ll need.

Cosmetic Wax
We’ve formulated this recipe with beeswax in mind. Why? Because it’s so wonderfully skin conditioning, and fantastic at protecting our lips from chapping.
Waxes are great at preventing moisture loss. They form a barrier between the skin and the air. During winter, the air becomes more humid due to an increase in rainy weather.
And as water molecules like to follow each other, this usually ends with moisture being sucked from the skin and into the atmosphere.
Applying a balm with a good amount of wax in it, creates a protective layer that prevents this from happening. But they can also help the skin itself heal, and condition it so it feels softer and more supple.
However, beeswax is not vegan, and substituting it is a little tricky. If you prefer the idea of a vegan lip balm, take a look at this recipe we’ve formulated with candelilla instead of beeswax.

The Butters
We’re using two butters in this beeswax lip balm recipe! This is because we want the best of both worlds. Butter does two jobs in our lip balms formulas – stiffening power, and also for thier moisturizing and conditioning ability.
Cocoa butter provides a nice, hard balm that has good slip-and-slide. It allows us to store our lip balms in lip balm tubes that require a harder texture to be able to use the wind-up mechanism.
However, shea butter is much softer, but we’re not using it for its stiffening power. We’re using it here to provide amazing skin-softening and hydrating benefits. Your lips will feel super soft after using this balm!
We wouldn’t recommend substituting the cocoa butter here, as there are few butters as hard as it. However, you can happily substitute the shea for whatever butter you like the sound of. Mango etc.
Carrier Oils
We’ve chosen castor oil for this DIY beeswax lip balm, because it provides amazing slip and glide to a balm. While cocoa butter is good at this too, together they synergize for a balm that will have very little drag – which is perfect for the sensitive skin of the lips.
We partnered this with calendula oil, which provides excellent skin healing and soothing properties. It’s also excellently anti-inflammatory, perfect if you already have chapped lips and are seeking some relief.
While we wouldn’t recommend substituting the castor oil, because it provides good functional benefit for the consistency of our balm. However, if you wish, you can swap out the calendula oil for whatever you prefer.
We find this balm excellent if you’re suffering from chapped lips. But if you’re more concerned about prevention and skin-softening benefit, then go ahead and swap it for something you know your skin loves.

Essential Oils Or Flavoring Oils
Lip Safe Essential Oils
You have to be careful when selecting essential oils for your lip balm recipes. This is because EOs are powerful extracts that are potentially toxic if ingested. This is no good when we’re applying a product to the lips, as it’s inevitable you’ll end up swallowing a little of the balm.
So, it’s best to stick to your lip-safe EOs. Don’t know which ones are lip safe? Take a look at the DIY lip balm basics to learn more about essential oils that are safe to use in your balms.
But we thought we’d try something a little fun with this beeswax lip balm, and using a flavoring oil. These come in a variety of different flavors, including cola and root beer!
While you can use whatever you like, we thought using a honey-flavoring oil would work well with the ethos of our balm as a beeswax product. However, flavoring oils are not natural, so if you care about this you might want to opt for an EO.
If you wish to use an EO, you can add it at 0.5%. This is a safe concentration for use on the lips. You will need to compensate by increasing our carrier oils by 2.5%, as flavoring oils should be added at around 3% (as seen in our recipe card below).
It’s also worth noting that you don’t have to use any scented oils in this recipe at all, natural or otherwise! Just up your carrier oils to compensate.
What Is Lecithin?
So, what’s this lecithin stuff and why is it in our recipe? Well, the main reason we’re using this is its ability to help other ingredients sink in faster.

There are lots of different ingredients that can do this, but lecithin works best here because it’s oil soluble and also provides some benefit to product consistency. It actually makes our product feel creamier and more silky on the skin.
It provides some excellent skin moisturizing benefit too, and you can’t have too much of that in a lip balm formula. It’s also very high in vitamins A and E, both of which are important for the health and appearance of our skin.
While there isn’t a great substitute for this ingredient, you could leave it out of you wanted. Compensate by replacing this with some more shea butter.
It’s also worth noting that lecithin is an emulsifier, although one that is very tricky to work with. We don’t recommend including any water-soluble ingredients in this formula because of this ingredient, as lecithin is best used for water-in-oil emulsions, such as foot lotions.
So No Actual Honey?
You’ll notice that we haven’t included actual honey in this recipe. This is a conscious decision because there is literally no safe way to include honey in a traditional, anhydrous (all oil and no water) balm formula.
Be Aware Of Dubious Recipes
Honey is a humectant, which is a type of ingredient we use in cosmetics formulation. However, all humectants are water soluble and oleophobic, meaning they will mix only with water, and never with oil. A humectant is actually a very important ingredient, but only for recipes that contain water.
I’ve found a lot of dubious lip balm recipes on various blogs around the web while doing research for this formula. Some ‘bloggers’ will actually tell you to mix in some honey like it’s oil-soluble. This is absolutely not the case, and you really want to avoid doing this at all costs.
The main job of a humectant is to draw moisture from the atmosphere. It keeps our products moist and easy to apply to the skin. Without a humectant, the opposite happens. Water wants to evaporate into the air, and this includes the water in your lovely lotions & face creams.
However, any recipe that contains water absolutely must have a preservative system as part of the formula. We’re giving bacteria and fungus everything they need to grow, and exposing yourself to these microbes can cause serious and potentially life-changing infections.
So, if we include a humectant in our all-oil lip balm recipe, not only would it not mix properly, but it would actively feed bacteria and fungus by providing it with more and more water as time goes by. Do yourself a favor and stick to oil-soluble ingredients for your anhydrous balms.
How To Use Beeswax Lip Balm
You can use this beeswax lip balm like any other, by applying a small amount to the lips and allowing it to sink in on its own.
While you can apply a balm as often as you like, we don’t think you’d get much benefit from applying more than once every few hours. This is extra good if you currently have very dry, chapped lips.
Otherwise, apply in the morning, after lunch, and then before bed. This will ensure your lips feel soft and supple all day long.
But don’t stop at just your lips! Did you know that you can apply your balms anywhere?! This includes your dry chapped feet, knees and elbows too! Just don’t use the same balm for your feet and your lips!
How To Store Beeswax Lip Balm
Not all balms are created equal. Some are soft, some are hard. This one sits towards the harder end of our balm spectrum, which means it’s ideal for use in a wind-up lip balm tube.
These are pretty nifty, and give your balms a more professional look. They’re great for enticing customers or lending that wow factor to your next gift basket.
But this recipe will also sit happily in a small cosmetic pot or jar with a screw-top lid. It really depends on what you like and prefer to use.
If you opt for a lip balm tube, you’ll want to tackle the problem of sinking and sinkholes. This happens because as wax and butters cool, they contract, allowing the top to sink down and holes to appear within the balm.
While you can accept this, as it makes no difference to your lips, but you might want to solve this problem if you’re a perfectionist like me. Do this by holding back some of the mixture during your initial pour. Then, top your tubes up once they’ve hardened after an hour or so. This technique will be familiar to anyone who has experience with candle making.
Final Thoughts
I hope you’ve enjoyed learning about making beeswax lip balms today. I love writing these for you, and do my best only to write stuff that’s important and pertinent to the recipe we’re discussing. You’ll get no fluff and filler about my recent vacations!
If you have any problems with my formula, or need a little help with the method, let me know in the comments section below and we can troubleshoot together.
I’m loving this balm, and it’s come at such a good time with the weather getting colder by the day. My lips feel great, and so will yours!


I just made this tonight for work gifts, it feels amazing on your lips. I’m sure my coworkers will love it too😊.
That great Christina, I’m sure your coworkers will absolutely love it.
Angela x
Really appreciated the chemistry notes in the lip balm recipe!
Hi you take workshop also about all skincare, bodycare, Haircare, footcare, and mouthcare, facecare