How To Make Homemade Earrings With Beads & Pendants – 7 Great Examples

Last Updated:
Updated:
making homemade earrings

This site is reader-supported. If you buy via the links here I may earn a small commission at no cost to you - my affiliate disclosure

Here’s how to make earrings with beads and pendants, they are fairly inexpensive when you compare them to buying jewelry from a store. And making homemade earrings also allows you to use your imagination to create something original and unique for a loved one!

Before you try making some of my homemade earrings, take a moment to read through the basics below and check back here if you have any difficulties.

making homemade earrings

When making earrings the size and weight need to be considered, but apart from that, anything goes. There are jewelry making tools and materials to attach any type of earring, bead, or pendant to any ear wire.

Don’t despair if your ears aren’t pierced, clip-on or screw-on are used in exactly the same way as pierced earring findings.

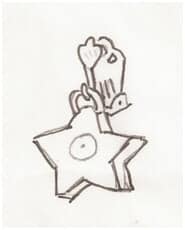
Some findings can be quite small and it’s sometimes difficult to see how a technique has been created so for this reason I’ve given a mixture of real photos along with some drawing to make the technique more visible.

How To Use Earwires

The most popular ear wires for pierced ears are long ball wires. The loop at the bottom is easily opened to attach your pendant or beads. Round-nosed pliers are best because they will not bend the earwire’s loop out of shape.

wires for pierced ears are long ball wires

Kidney wires are formed to close once in the ear. They have a partly formed loop onto which you attach a pendant or beads. Squeeze the sides of this loop together to secure.

A stud and hook are suitable for a shorter and daintier style of earring. The loop is easily opened and closed with a pair of round-nosed pliers. A scroll back or butterfly is needed to hold the stud in place in your ear.

A scroll back or butterfly is needed

Those without pierced ears have a choice of clip-on or screw-on earrings findings. Jump rings are useful additions and help your pendants or beads to hang freely.

Flatback jewelry findings are designed so that various pendants can be stuck to them. Choose pendants that have discreet holes and at least one side flat. Use an epoxy resin to stick the flat backed item onto your stud. Always follow the instructions on the glue packet.

Flat back findings

How To Make Earrings With Pendants

Some pendants can be joined directly to the earring wire, while others require additional findings. Pendants or beads with holes at the top that run from front to back hang directly on the ear wire.

Hanging earrings featuring pendants
Hanging pendants with jump rings

With holes that run from side to side, or for pendants that have a deep set hole, a jump ring or two will be needed.

Holes that run from front to back, but are too deep for the earring wire loop need two jump rings or a bail and loop. These two findings can also be used to give your homemade earrings a bit of extra swing.

Two jump rings or a bail and loop

How To Make Earrings With Beads

A simple homemade earring is created by threading your choice of beads onto a headpin.

Long and flexible homemade earrings Step5
  • An important factor is the size of the hole in the most prominent bead. If the hole is too large to fit on the pinhead a plain small cup at the base will ensure that your bead does not slip off. If the hole is very large (2mm or over) you will need a small bead at top and the bottom of your feature bead.
  • Cut the headpin leaving a generous half inch. Bend the pin directly above the bead at a right angle and then curl the top of the pin into a loop with the round-nosed pliers.
  • Your first attempt may appear a little untidy, this is perfectly normal. What is important is that the loop is closed, if necessary make a small overlap, the loop can then be attached to an earwire.

The pictures below show a wire being bent at different stages with the pliers removed for maximum exposure, with practice you should be able to do this procedure in one movement.

Threading beads onto a headpin for homemade earings Step1
Threading beads onto a headpin for homemade earings Step2
Threading beads onto a headpin for homemade earings Step3
Threading beads onto a headpin for homemade earings Step4
Threading beads onto a headpin for homemade earings Step5
Threading beads onto a headpin for homemade earings

By joining a headpin and eye pin, you can create long and flexible homemade earrings with maximum swing. With beads on headpins and eye pins, it’s not important which way the loops are formed, as the beads don’t have a definite front or back.

Long and flexible homemade earrings Step1
Long and flexible homemade earrings Step2
Long and flexible homemade earrings Step3
Long and flexible homemade earrings Step5
Long and flexible homemade earrings Step4
Long and flexible homemade earrings Step5

Hanging hoops enable you to arrange your beads in a circle. You can fill the hoop completely or select a few select beads.

Open the hoop and add your beads. With flat-nosed pliers, bend the tip of the hoop slightly upwards before replacing it in the slot at the top.

Hanging Hoop Earrings

Making Earrings With Beads And Pendants

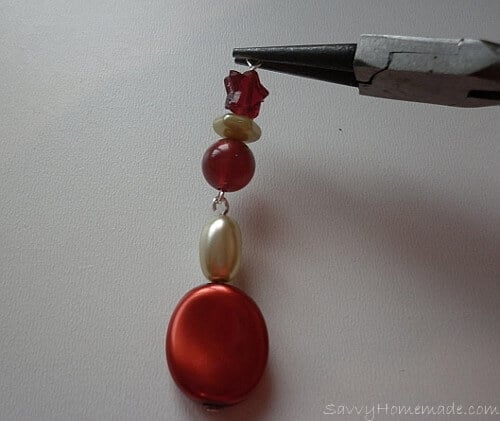
An attractive design feature is a pendant set off by beads on an eye pin.

Making earrings that feature both pendants and beads

Start by threading your chosen beads onto the eye pin. Be careful to make your loop at a right angle to the existing eye pin loop. This will ensure that the pendant hangs correctly along the line of your ear.

When the pendant hole is too deep to comfortably attach to the loop on your eye pin, a jump ring comes in handy. In this situation, turn the loop on your eye pin in the same direction.

Making Head Pin Earrings The Simple Way

I love to make these simple DIY headpin earrings, and I’ve spent many fun evenings with friends and a couple of glasses of wine showing them how to make them. Yes, they are that easy!

simple head pin earrings

They are great fun and incredibly cheap to make, you can literally create endless pairs for every occasion in minutes.

You can make them in almost every style and color imaginable, so you can enjoy wearing unique homemade earrings daily without the hefty price tag! This is great because, let’s face it, you can never have enough earrings!

What You Will Need:

  • 2 headpins & 2 earring wires
  • Jewelry Making Findings
  • Selection of Jewelry Making Beads
  • Round nosed pliers
  • Wire Cutters
Materials & tools for making head pin earrings

Method:

Step 1. Thread the beads onto the headpins; you will need to leave about a 1/2 inch of the headpin free at the top. If you have more than a 1/2 inch, trim it down with the wire cutters.

How to make head pin earrings

Step 2. Using the round-nosed pliers bend the headpin directly above the beads into a 45-degree right angle.

How to make head pin earrings Step2

Step 3. Now hold the bent headpin at the very tip with the round pliers and roll it back up and around upon itself to create a loop leaving just enough space to slip on an earring wire before closing completely.

How to make head pin earrings Step4
How to make head pin earrings Step5
Homemade Head Pin Earrings

How To Make Pretty Crimp Bead Earrings

If you are looking for a lovely unique homemade gift that’s kind to your wallet then look no further. These pretty crimp bead earrings are very simple to make using almost any type of bead.

I priced up two pairs of these crimp-bead earrings, with some average and some semi-precious beads. I purchased all the beads and findings I needed and got to work.

homemade crimp bead earrings

The first project below is a three-beaded, three-strand earring. It’s made with 6mm glass beads, which cost me just 70 cents per pair to make at the time of writing (and this is being conservative). If I had used 6mm Swarovski Crystal Bicone beads, they would have cost $1.50.

The second set is the pink 6-bead earrings. I made them with a mix of 4mm glass beads and 6mm Swarovski Crystal Bicone beads, and they cost me around $1.50 to make.

6 Strand Crimp Bead Earings

So, I’ve spent the last couple of evenings making up a good batch of these earrings, ready for any birthdays or last-minute gifts I may need. I think this is going to save me a small fortune this year.

The only problem I’m having is learning how to part with them all… they look so good!

What You Will Need:

  • Stranded beading wire
  • Jewelry Beads 6mm or 4mm
  • Jewelry Findings Crimp beads and Ear wires
  • Crimp pliers
  • Flat/round-nosed pliers
  • Wire cutters
crimp bead earring materials

Method:

Step 1. Cut two lengths of beading wire of about 2 inches (3 for a longer earring).

Thread one of the cut beading wires through the earring wire and bend the wire over leaving one end slightly longer than the other one. Then thread a crimp bead onto both wire ends pushing it as close to the earring wire as you can.

Thread the beading wires through the earring wire

Step 2. Close the crimp bead using your crimp bead pliers. (See notes above on closing crimp beads) Repeat with the other earring making sure they are both the same length.

Step 3. Choose one bead and thread it onto the end of one of the wires followed by a crimp bead. Close the crimp bead at the end of the wire using your crimp bead pliers. Choose another bead and crimp bead and attach them to the second wire in the same way. Repeat the process with the second earring.

Cut two more lengths of beading wire of about the same size as the first ones. Thread one wire through the earring wire in the same way as you did with the first one. Slip on a crimp bead push it up to the earring wire and close it with the pliers. Now, because I only want 3 strands of wire on these earrings I’m going to snip the fourth strand off.

Thread on beads and crimp

Step 4. Repeat this with the second earring.

Step 5. Hold your earring up and check the length of this last wire strand. It needs to be slightly shorter than the other two. If it’s not, trim it to size. Once you’re happy with the length, attach the last bead and crimp bead to the final wire strand as with the other two wire strands.

Crimp bead to the final wire strand as with the other two wire strands.

Step 6. Once again, repeat with the other earring.

The crimp bead earrings below are another great example. I created these with the same method as above, only this time I’ve used six strands for each earring and 4mm beads.

6 Strand Crimp Bead Earings

How To Make Swing Style Earrings

Flexible beading wire is mainly used to make homemade necklaces and DIY bracelets, but here, I’m using it to create simple, modern, swing-style earrings.

First, remember that when you thread beads with the wire still on the spool instead of cutting the wire in advance it makes the wire less likely to kink and helps to eliminate waste.

homemade swing style earrings

What You Will Need:

  • 2 Crimp beads, 1 Pair of ear wires
  • 64 seed beads, 2 interesting 9mm beads
  • 2 x 6 inches silver beading wire
  • Crimp pliers
  • Flat/round nosed pliers
  • Wire cutters
swing style earring supplies

Method:

Step 1. Slide a crimp bead onto the spool of beading wire, followed by 16 seed beads, one 9mm bead, and then 16 more seed beads.

Slide a crimp bead onto the spool of beading wire

Step 2. Take the tail of the wire and thread it back through the crimp bead, making a teardrop shape approximately 3/4in (2cm) wide, and 1 1/4 in (3cm) long under the crimp bead. Take up any slack from the spool end instead of the tail end to conserve wire. Leave the wire tail about 3/4in (2cm) long.

teardrop shape

Step 3. Hold the earring between your fingertips right under the crimp bead. Turn the tail of the wire under the back through the crimp bead, forming a loop. Pull so that the loop measures about 1 1/2in (4cm).

forming a loop

Step 4. Put the crimp bead in the crimping pliers parallel to the loop. Crimp the bead, and then trim the excess wire.

Crimp the bead, and then trim the excess wire

Step 5. Repeat steps 1-3 for the second earring. Then to finish, attach the loops to ear wires using chain-nose or bent chain-nose pliers to open and close the jump rings.

Crimp the bead, and then trim the excess wire
homemade swing style earrings

When learning the basics of how to make homemade earrings, size and weight need to be considered, but apart from that, anything goes. There are findings that attach any type of earring, bead, or pendant to any earwire.

How To Make Clustered Earrings

It’s hard to believe that this tutorial on how to make clustered earrings is still very much in the beginner’s section of easy homemade jewelry.

Most of the beads I’ve used to make these DIY earrings are from a basic glass bead mix that I had left over from the clustered necklace I created.

homemade clustered earrings

Bead mixes can usually be purchased for a reasonable price online or at a crafts shop. I’ve also added a few small, inexpensive charms just to give it a bit of bling. If you can’t get hold of any charms, metal beads work just as well.

When making clustered earrings, there’s no rule as to which size or shape bead you should use, but you do need to make sure you have two of each style or your DIY earrings won’t match.

What You Will Need:

  • 16 Jewelry Beads (may include metal beads or charms along with any other beads you have to hand; different shapes and sizes just add to the interest )
  • 4 Jump rings I’ve used 7mm, Headpins, Earring wires
  • Eye pins, bead caps (optional)
  • Jewelry Wire cutters, pliers, and round-nosed pliers

Method:

Step 1. Open the jump rings and set them aside, then thread each bead onto a headpin.

thread each bead onto a headpin

If the hole in the bead is too large for the head pin, you will need to use a bead cap or a small bead to prevent it from falling off.

use a bead cap or a small bead

Charms are treated the same way as beads, but they must be hung on eye pins rather than head pins. With the pliers, open an eye pin, pop on the charm, and close it up again.

open an eye pin, pop on the charm

Step 2. Use the wire cutters to trim the headpins so that about half an inch comes out from the top of the bead.

trim the headpins

Step 3. Bend the headpin over into a right angle to make a loop at the top of the bead. Now hold the very end of the headpin with the round-nosed pliers and twist the head pin up and back over itself to make a loop. (See the process above for hanging drops and beads on head pins.)

make a loop at the top of the bead

Step 4. Repeat the same process with all the beads until you have 16 beads/ charms with loops above them.

Step 5. Thread four of the beads onto one of the jump rings, and then close the jump ring with the pliers making sure no gaps are left.

Thread four of the beads onto one of the jump rings

Step 6. Thread another four beads onto a second jump ring, but this time before you close it up. Also, slip on the jump ring containing the other four beads, along with one of the earring wires. Close the jump ring up with the pliers once again, making sure there is no gap.

slip on the jump ring containing the other four beads

Step 7. Repeat the same process with the other earring.

If you enjoy making these clustered earrings, you may want to match them with the homemade necklace.

How To Make Unique Chain Tassel Earrings

Here’s how to make chain tassel earrings at home using multiple lengths of lightweight chain for a low-cost cost, stylish, and elegant look.

I love making homemade earrings; this is another excellent way to use those leftover beads, wood, resin, glass, and shells. Various shapes and sizes can be mixed to create these fashionable, unique earrings.

diy chain tassel earrings

Supplies You Will Need:

  • 2 Jump Rings
  • Length of lightweight chain (about 12 inches)
  • Selection of Jewelry Beads
  • Bead caps (optional)
  • Earring wire
Supplies you will need to make chain tassel earrings

Method:

Step 1. String the beads onto the eye pin in your preferred sequence.

String the beads onto the eye pin

Step 2. You will need to create a loop in the eye pin just above the beads so that it can be attached to the ear wire. (See above for the basics of how to make earrings).

You will need to create a loop in the eye pin

Step 3. Carefully open the ear wire, slip on the beaded eye pin, and close it again.

Carefully open the ear wire and slip on the beaded eye pin

Step 4. Cut the chain into six 2 inch pieces.

Cut the chain into six 2 inch pieces

Step 5. Open a jump ring and thread on three of the chains, then hook it through the loop at the bottom of the eye pin before closing it up.

thread on three of the chains

Step 6. Trim the chain to the required length and repeat the processes for the second earring.

homemade chain tassel earrings

Try threading a seed bead onto the ear wire and jump ring for an interesting look

chain tassel earrings

I hope you enjoy making your own earrings using beads and pendants. Once you master this skill, take a look at the other homemade jewelry featured here on SavvyHomemade.

Photo of author

Angela Wills

Angela is the founder and driving force behind Savvy Homemade. With over fifteen years experience in DIY home crafts, and a Diploma in skincare formulation, Angela brings a wealth of knowledge and dedication to every post she writes. She is fearlessly dedicated to creating tried, tested recipes & products that will work for everyone, and she infuses each DIY product with her passion and expertise.

Download my eBooks >

Discussion (2 Comments)

Join the conversation

Flipboard