
I regard stringing as the backbone of jewellery making. It uses easily obtained supplies and teaches a fundamental sense of coordinating colors and shapes into an attractive design.
Stringing homemade jewelry using beading wire or thread is also perfect for practicing how to manipulate small items with your hands, using pressure and angle to obtain different results.
Methods for most tasks are interchangeable, so if you discover that you’d preferably use a needle and thread for a project calling for beading wire, then go for it.

How To String A Necklace With Thread
Making a strand of simple beads is an ideal homemade gift and a great way to familiarize yourself with traditional stringing using a needle and thread. And the following technique is a method that’s been used for centuries.
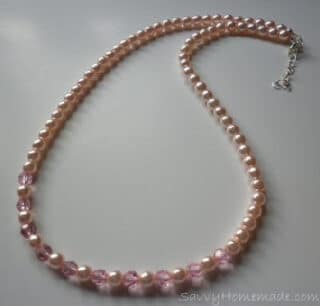
Though stringing homemade jewelry using beading wire may be cheaper, I think this method provides a traditional high-quality finish, especially when making use of pearls and semi-precious gemstone beads.
I personally find the 0.7mm silk thread one of the most versatile threads to use. It’s usually strong enough to tackle most beading jobs and it comes in an array of different colors. Silk thread can also be purchased in 2-meter lengths (makes about 3 good sized necklaces) and it comes complete with its own integral needle, making it extremely easy to use.
You Will Need
- Silk Thread 0.7mm or thicker (depending on the heaviness of the beads) or Nylon Thread, such as C-Lon Micro 0.12mm
- Jewelry Beads and a clasp
- A Jump ring and 2 calotte’s
- G-S Hypo Cement or strong glue
- Jewelry pliers
- Flexible beading needle
Method
Step1. Start by working out the length and pattern of the necklace, a beading board is useful for this, but if you don’t have one using a piece of felt to work on will stop your beads rolling about too much whilst you arrange them.

Step2. Thread a beading needle with the required length of thread and tie a knot in the end. You can give your knot added body by passing the end of the thread back through the knot for a second time. If you are using the silk thread with the integral needle attached, remove the entire thread from its holder and tie the knot in the very end of the spool. By feeding the beads through the entire length of silk thread, you will be keeping the integral needle intact for your next necklace.

Step3. String on the beads, following a repeated pattern if you are using different styles or colors, finish with another knot and then dab a little glue onto each knot and leave to dry.
Step4. Lay the knot inside the hollow of the calotte and squeeze it tightly closed. Trim the loose strands that stick out at the very top.

Step5. Open one of the loops on the calotte and fix it to the clasp. Open the other loop on the calotte and add a jump ring. Adding a small length of curb chain to the jump ring will allow the necklace to be adjusted in length

Tip
Over time, the thread will stretch, creating unattractive spacers between the beads and the clasp. You can prevent this to an extent by stretching the thread before making your jewelry. I recommend stretching the thread overnight by suspending an object weighing 1lb (0.5kg) from the length of the thread.
How To String A Necklace With Beading Wire
Let’s move on to learn about stringing homemade jewelry using beading wire.
One of the easiest ways to make a quick and stunning homemade necklace is to add an attractive pendant to a length of leather thong or cotton cord. Check out how to make this Attractive homemade pendant necklace.
Methods for most tasks are interchangeable, so if you discover that you’d preferably use a needle and thread for a project calling for beading wire, then go for it.

Deciding On The Length
- If you are using jewelry beads of the same dimension, you can work out how many you’ll need once you’ve decided on the length. Use a tape-measure around your neck to get a good idea.
- Next, divide that measurement by the length of a bead (hole to hole). Thus, for a choker of 40cm you will require about 50, 8mm round beads.
Stringing Your beads
Stringing with flexible beading wire is definitely an economical way to string beads of all shapes and sizes plus you don’t even require a needle to do it.
Step1. Start by working out the length and pattern of the necklace, a beading board is useful for this, but if you don’t have one using a piece of felt to work on will stop your beads rolling about too much whilst you arrange them.
Step2. Cut the desired length of beading wire. While holding the wire in one hand about 1 1/2 inch (4cm) from the end, slide on a crimp bead. Push the short end of the stringing wire back through the bead, creating a loop.

Step3. Adjust the size of the loop by pulling the crimp bead towards it, making it smaller, but large enough to let a jump ring move freely then squeeze the crimp bead closed with the crimp pliers. (See notes on crimp beads).

Step4. Slide your first bead onto the strand of stringing wire. Let the tail of the wire from the crimped loop pass through the hole of the bead if the bead hole is big enough. Trim the excess wire and then string on all the beads for the project.

Step5. When you have strung on the last bead, slip on another crimp bead as you did in step 2 followed by a clasp, and pull the tail end of the wire back through the hole of the crimp bead, and the bead next to it. Pull the end of the wire, to create a loop as you did in step 3 and secure the crimp bead with the pliers. Finish by trimming any surplus wire.
If you think your crimp bead looks a little untidy, Using a crimp cover will give it a more professional look. Just place it over your crimp bead and squeeze it closed.


I am in love with this site !!!!!!!
So pretty necklace. Liked it.