


I’ve recently investigated making DIY liquid soap in a few different ways, and I have to say I’m beginning to become a little hooked. If I’m honest, it’s something that’s been alluding to me for a while now.
As you know, I love making soap, so I decided to take the plunge and have a go at the most traditional liquid soap-making process, and I’m so glad that I did.
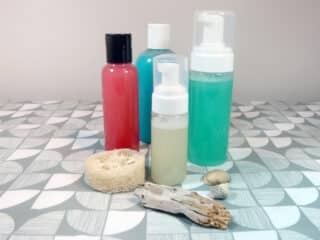
Here’s how to make liquid soap at home!
Traditional Lye-Based Liquid Soap Making

If you are familiar with making cold process or hot process you shouldn’t find liquid difficult, however, that’s not to say that you wouldn’t be able to make it if you haven’t, you may find it a little more taxing that’s all.
I’ve chosen simple but effective oils that are easy for a beginner to work with and are suitable for all skin types. No surfactants here to irritate my skin, just nourishing creamy soap packed full of moisturizing oils.
You can, of course, choose your own carrier oils and cosmetic butters to make some wonderful unique natural liquid soap using our very own calculator here at SavvyHomemade.
You can use this for shower gels, body wash, hand soap, shampoos, and even bubble bath. It can be packed with many vitamins, minerals, and cleansing properties.
If you have young children try my liquid castile soap recipe, this is mostly olive oil, with a little coconut. It’s gentle, nourishing, and great for mother and baby, or anyone with sensitive skin.
Below is the video of how I make my liquid castile soap, it’s the same process, the only difference is the oil ingredients.
Oils For This Liquid Soap Recipe

Castor oil
Castor oil is rich in ricinoleic fatty acids which gives a longstanding fluffy lather with lots of moisturizing properties.
Coconut Oil
The Coconut oil also has good lathering qualities and helps to lighten the finished color making it a little clearer.
Olive Oil
Olive oil doesn’t give much of a lather however its moisturizing and conditioning properties are second to none and it also gives a lovely silky feeling on the skin.
Note:
The recipe shows almost 2 days to make this soap, but remember that most of the time is not really active, it is spent waiting for the processes to complete.
Stage 1: Making The Soap Paste The soap paste in this recipe will take around 6 hours to cook depending on the heat setting on your crockpot.
Stage 2: Dilution Stage The dilution time usually takes around 24 hours, you don’t need to do anything to it during in this stage, however, it’s almost impossible not to give it a quick stir now and again.

As an Amazon Associate, I earn from qualifying purchases. If you buy via the links here I may earn a small affiliate commission at no cost to you, please read my affiliate disclosure.
Ingredients
Equipment
Method
- 600 grams Olive Oil, 105 grams Coconut Oil, 45 grams Castor OilWeigh out all the oils and place them in the slow cooker, set the cooker on low to warm them up and melt them. You can quicken this process by melting the coconut oil in the microwave first.

- 429.63 grams Distilled Water, 143.21 grams Potassium Hydroxide KOHMake sure you are working in a well-ventilated area and wearing your protective clothing (apron, gloves, and glasses). When you’re ready, prepare the lye solution by weighing the water and potassium hydroxide into separate containers. Carefully add the potassium hydroxide to the water and stir until dissolved, so that you are not inhaling any fumes you may want to turn your head away from it as you stir. As this is an alkali that can cause serious burns. Place the lye in a safe and secure place where it won’t be knocked over until its fully dissolved and clear.
- Once the oils have fully melted give them a good stir to make sure they are well combined. Keeping the slow cooker on low add the lye solution. There is no need to wait for it to cool as you do when making solid cold processed soap.
- As always I prefer to start mixing manually with a spatula for the first few minutes before changing to an electric hand blender. Always be cautious and remember to give the blender a quick blast before using it just to release any trapped air bubbles.
- Using the electric blender bring the mixture up to a light trace. Once you have reached a light trace you will need to bring it up to a nice thick one, so that it looks a bit like mash potato. This may take a while depending on the speed/power of the blender and the oils you have used so be prepared for it to take anywhere between 10 to 30 minutes. As you don’t want to fry your blender try blending in 1 or 2 minute blasts.
- When you have reached the mashed potato stage it’s time to let the cooker do its bit, so pop the lid on and let the mixture cook. This could take around 4 to 7 hours depending on how hot your slow cooker gets when it’s set on the lowest heat setting. If you have a warm setting this may be a better option.
- As your soap batter cooks it will need stirring every 20 to 30 mins. You may notice the it go through various stages whilst it’s cooking, the final result should be a glossy golden translucent color similar in texture and look to Vaseline but not in color. This is what we call the soap paste stage.If you are not sure if it is fully cooked and ready for diluting there is a quick test you can do. Take a teaspoon full of the soap paste and mix it with 25g of distilled water, as the soap dissolves the water should just be fairly clear or just a little cloudy. If it’s very cloudy give it another 30mins cooking and test again. It’s worth mentioning that the water in your test will only go clear when using distilled water, any other type of water can result in remaining cloudy. At this point, you can move to Part 2 (dilution) right away or you can leave the paste to sit in the crockpot overnight and deal with it the next day. Just make sure the crockpot is turned off and the lid is on.


- 2 liters Distilled WaterYou can now choose to dilute some of the paste and store the rest for a second batch later. Just make sure that any paste you are saving is stored in an airtight container for later. The paste will last for up to one year if kept in the fridge and can be diluted when you need it in exactly the same way.Deciding how much water to add to your paste to thin it down can be a little tricky as many different oils and butters require more liquid than others. Although you can thicken the soap if it is too thin, it’s much easier to get it right the first time.I usually work on a ratio of 1 to 2, so if I have 700g of paste I will dilute it with 1400g of water. You can do this by placing a container on the weighing scales and setting them on zero before adding the soap paste. Once you have the correct weight (700g) place it back into the slow cooker and weigh out double the amount of hot distilled water (1400g).
- Once you’ve added the water to the paste, give it a good stir, it will at this point feel a bit like you are pushing it around the pot rather than stirring it. Then put the lid on the slow cooker and turn it onto the lowest setting for around an hour. You can leave it on for longer but you will need to keep an eye on it and give a stir now and then. The soap could take a good 24 hours to dissolve so you do need a bit of patience here. Never be tempted to leave the cooker on overnight, the soap will continue to dissolve in the water even without the heat, it just takes a bit longer.
- Don’t worry if skin begins to form on the top of the soap, this is just undiluted soap and it can be moved to one side so that the diluted mixture bellow can be poured into a fresh container. You can then add a little hot distilled water to the skin and leave it to dissolve. Once the soap has dissolved it should be the color of the liquid oils you have used. If it’s too thick, add more distilled water until you are happy with its consistency.
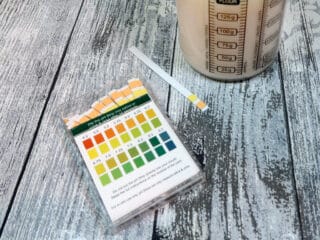
- Now it’s time to PH test your soap. If you have cooked it long enough and measured the ingredients accurately it should be between 6 to 9 (green) when you dip a PH strip into it. This is a good level and is now ready for color and fragrance. If it’s not then you will need to lower the PH value. To neutralize the soap and give it a lower PH value, mix 14g of citric acid with 56g of boiled distilled water. Adding this should bring the PH level down, but it can make your soap cloudy and also give a temporary curdling effect. Give it a good stir then leave it alone to settle for a while.
- Adding a preservative is always controversial, as the soap has a high PH you don’t need to add a preservative however if you are likely to be keeping it in the bathroom or selling the soap, I would recommend adding one. This will also extend the self-life from 6 to 18 months.
- Essential Oil or Fragrance Oil, Liquid Soap DyeYou can add fragrance or essential oil at 2%. Many fragrances and essential oils can cause a reaction when you add them, making them cloudy or/and most commonly making the soap thicker or thinner. It may be an idea to remove a small amount of the soap for a trial run. For colors I find liquid soap color is the best to use as mica seems to fade over time. Add a drop at a time until you reach the desired color.
- It is a good idea to keep a cup of distilled water (room temp is fine) to add to the soap if it becomes too thick. If it becomes too thin, which is common when using citrus essential oils, it can be thickened with salt that’s been dissolved in hot distilled water. I work with 20% salt and 80% water, adding it a bit at a time until I’m happy with the consistency.


Notes
New to DIY skincare?
If you’re enjoying making your own products, you might like Radiance, my free email course where I teach the foundations of DIY skincare step by step!Final Thoughts
There we have it, natural liquid soap making that produces a wonderful product that’s both colorful and smells gorgeous. While this is quite basic, it’s important to get the techniques right before you waste money on more expensive ingredients.
One thing I really like about this recipe is just how much soap you can get from your paste. Each bottle can have its own unique fragrance and color and really gives you the opportunity to play around with fragrance combinations and scent profiles. You can pop leftover paste in the fridge to use later on, too!
I like to think of making liquid soap as one of the 3 pillars of diy soapmaking, along with hot and cold process methods. Mastering all three gives you so many options for you to play around with. You really can get creative!
So have look at some of my cold process recipes, as well as my hot process recipes too so you can get good at all three. Once you do that then the next step is to formulate your own recipes using the SavvyHomemade soap calculator.
You won’t regret it when your home is filled with the aroma of beautiful essential and fragrance oils. You’ll impress your friends, too.


could the coconut oil be substituted with anything else due to allergy? That was the reason for making our own soap and it’s turned into a nightmare. I hate allergies and even, more hate being disabled, not being able to work and buy all this crap. My skin without the new soap itches all the time but it’s not being made correctly which is, ehh exhausting. Much appreciation for the help.
Hi September,
Yes, you can substitute coconut oil with either palm kernel oil or babassu oil. However, you will need to run this through a soap calculator to check if the lye amount needs adjusting.
best wishes Angela x
can this also be used as a shampoo alternative?
Hi Tammy,
Lye-based liquid soap has a high pH. Although you can use it as a shampoo, it’s always best to use a hair rinse, such as our apple cider vinegar rinse to reduce its pH. Constantly using a shampoo with a high pH can cause irritation, fade natural hair color, and result in brittle hair.
Hope this helps, Angela x
hi. thanks for this valuable info about sop making. every step is mentioned very nicely.thanks again
Hi! Thank you for the recipe; very nice! Do you know if replacing the olive with pomace olive will give the same end results in relation to the feeling on the skin and the cleansing?
Hi Tammy,
Pomace olive oil will be fine in this recipe. Honestly, after saponification there’s likely to be little difference between the two. Hope this helps!
hi can I use this soap for my face too?
Hi Aya,
Absolutely you can!
Hello! ????
I think I would like to try this, with a twist.. I’ll try to cook it in a pot on the stove. I have done that before, but I don’t know if it will work with every recipe… I also am thinking of using sweet Almond oil instead of the olive oil… I have just bought a big bottle and want to try it.
I just wish it was easier to find information if how oils will react in liquid soaps since it can be very different from a soap bar.
A pure coconut oil liquid soap makes runny soap and olive oil makes a hard paste, I have heard from an experienced soap maker.
Do you know where to learn about thing like that?
Thank you!
Your best bet is to run your amended recipe through a soap calculator. Soap recipes are not very forgiving, especially when you change the ingredients. This is because all ingredients have different SAP values. This is the main problem we have when substituting ingredients like carrier oils, and if you don’t run your subs through a calculator there’s a good chance your soap won’t SAP properly.
Hi Angela
i make my own herbal shampoo using cold process method
now i wnt to sell d product
will u suggest a good preservative for my product
Hi There,
As you’re planning to sell your liquid soaps it probably would be a good idea to add one. I would go for Saliguard PCG/Plantaserve P. You will need something with a very high PH tolerance range, and this one is pretty good for that.
Hello. Can I use deionized water to keep the ph lower?
Hi Kelly,
I would just use distilled water. It’s the best thing to use for soap making as it’s pretty standard and easy to get hold of worldwide.
Hi. Is the soap thick?
It is quite thick yes. It’s about as thick as any store bought alternative, I’d say.
Hello,
Thank you so much for the recipe. I have one quick question, you said you like to work 1 to 2, if you have 700g of paste use 1400g of water but then it said to measure out the paste and then use that same amount of warm water. Do I double the amount of water?
Thank you!
Hi Angel, thanks for pointing this out, I will alter the post to make it clearer, it’s a bit weird… But yes you double the water. That’s the best place to start, then you can add more water if it’s too thick.
Hi, Angela. Thanks a lot for this Blog. Injust have one question. May I know what is the preservative I should use in liquid soap making?
Hi there,
I like to use Plantaserve P/Saliguard. Essentially you are looking for a preservative that has a high PH tolerance but is also broad spectrum.
Where do you recommend getting the liquid dyes from?
Hi Alexis,
I just use food colouring which I just order from amazon. They come in a variety of colours and are great value for money.
hi there, thank you so much for the blog, is there a way 1 can use this same recipe with out a slow cooker?
Hi there,
We don’t have any experience making hot process without a slow cooker, sorry.