
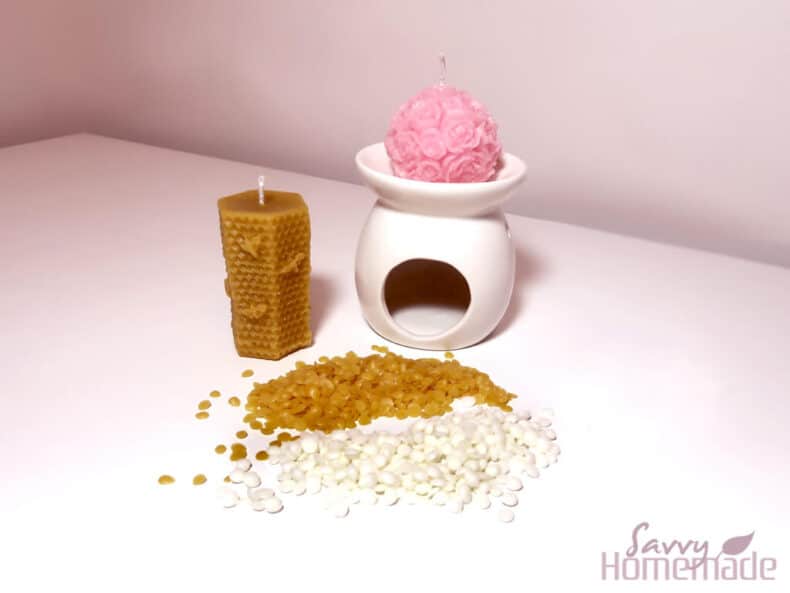
If you’ve been making candles for a little while, you’ve probably stumbled upon silicone candle molds. I absolutely love making candles with these, so today I thought I’d show you how to use silicone candle molds like a pro.
They’re great fun, very easy to use and there’s a huge range to choose from. Christmas, Easter, and Halloween; name the occasion and they’ll be a mold to cover it.
Introduction
Something to keep in mind if you are thinking of adding color and fragrance to your candles. As with many molds, scents and dyes will eventually seep into the silicon. This will pollute it and causes it to degrade.
Having said that, you should be able to produce half a dozen or so candles before they begin to deteriorate. You can pick them up rather cheaply on Amazon if you don’t mind waiting for shipping.
What I love the most about silicon mold candles is how creative and amazing they are for such little effort. They’re pretty much the same as any other molds, with a few more steps. Nevertheless, the beautiful patterns and shapes you can make with only a couple more steps are definitely worth it!
Buying Silicon Candle Molds
- Always ask for the size of the finished candle as this can differ dramatically from the size of the mold. I’ve fallen into that trap on many occasions. You’ve been waiting for 2 or 3 weeks for your amazing mold to arrive and it makes a candle only 2 inches high! Very disappointing!
- Some silicon molds, usually the more expensive and better quality ones, have a slit down the side of the mold for easy removal. Don’t worry if the one you are using doesn’t. You can easily do this yourself with a sharp craft knife or razor blade and your mold will still be usable afterward. See step 9 on how to do this.
- Some candlemakers recommend using a candle release spray to help remove the finished candle from the mold. Although this can be beneficial, this doesn’t have a 100% success rate and can affect the shelf life of your mold. Always check with the seller before using.

As an Amazon Associate, I earn from qualifying purchases. If you buy via the links here I may earn a small affiliate commission at no cost to you, please read my affiliate disclosure.
Ingredients
Equipment
Method
- Thread the needle with the wick. Making sure you have enough for the candle plus extra to wrap around the wick holder. Thread the needle and wick through the hole in the mold.If your mold doesn’t have a hole for the wick you will need to create one. Find the center of the mold and pierce a hole with the wick needle.

- Pull the needle completely through the mold dragging the wick into place with it. You can thread from the outside or inside, whichever you feel more confident in doing.You may need to use a wick sealant or white tac, which should keep any of the wax from seeping out. I have found that the sealant doesn’t stick all that well to the silicon, but do the best you can.

- Find a suitable container to suspend the mold in. I usually find a glass or a couple of books good for this. If your mold has slits running down the sides for easy removal, place a couple of elastic bands around it so that it fits back together nice and snug.Once your mold is stable, straighten and fix the wick in place by wrapping it around Wick holder or as in my case a piece of bamboo. You may need to secure it with some sticky tape.

- Place your wax into a double boiler, if you don’t have a double boiler put a pan half-filled with water to boil on the stove.You will need to estimate the amount of wax depending on the size of your mold, but if in doubt go with more rather than less. Once the water is boiling, turn down the heat so it is only simmering and place a metal or heatproof glass bowl on the rim of the pan so that the base is only just touching the water.

- When your wax has melted and totally transparent, remove it from the heat, add your color. If you compare the amount of dye I have added here to the picture below, you can see that a small bit of dye can go a long way. Try to be conservative with your dye. You can always add more but you can never take back what you’ve already added.

- Then, add your fragrance. You can use either an essential oil or a fragrance oil. I prefer to use a fragrance oil in my candles, as essential oils are more expensive and better used in skincare products. I’m using a lovely jasmine fragrance oil for my candle today, I use around 5% of the weight of my wax

- To reduce any air bubbles forming pour your wax slowly into the mold, then set aside until solid. As your wax hardens you may notice it begin to sink. Don’t worry if this happens as it’s completely normal.

- An hour or two after pouring the wax (this would depend on the size of the mold and the amount of wax used. Re-melt any leftover wax and top up any sinkholes that have formed in the candle.

- Once the wax has cooled and hardened it’s time to remove it from the wax. If your mold already has slits running down the sides of the mold you should be able to easily remove the candle.If not you will have to carefully make the cuts yourself with a sharp craft knife or razor blade. You will need to cut about halfway up the mold and all the way through to the candle until it can be eased out. I do about 3 or 4 cuts around the mold.

- The mold is still usable after being cut, just place a couple of rubber bands around it so that it fits back together nice and snug and you are good to go.

- I like to leave a candle 24 hours after I've removed it from the mold. This just makes sure the wax is completely settled.

Tried this recipe?
Let us know How It Was!Silicon Candle Molds With Beeswax
As beeswax is a beautiful natural wax I don’t like to use synthetic fragrance oils to scent my candles. Generally, essential oils are a fair bit more expensive than fragrance oils but you don’t need to break the bank here.
Beeswax is quite expensive, so we tend not to make very large candles out of it, which means you won’t need to add as much oil for a nice scent. Shop around and use the ones that are reasonably priced. Beeswax actually has its own honey-like aroma, so maybe you won’t need to add a fragrance at all.

I’ve added sweet orange essential oil mixed with the natural mild scent of honey carried by the beeswax, it makes the room smell lovely. Lavender essential oil also works well in beeswax and has the added bonus of relaxation and meditation for a truly wonderful experience.
You could also omit the fragrance completely, therefore allowing the natural fragrance of the wax to take center stage.
This beeswax candle has been made in exactly the same way as the pillar wax rose above with a tsp of essential oil for every 200g (7oz) of wax. So I don’t end up repeating myself too much, I’ll be showing you how I made this mainly through pictures. If anything seems vague, just have another read through my in-depth guide above and it should clear everything up.
Step1 Wick your mold using a wicking needle as we discussed above.

Step3 Stabilize your mold and use a pencil, wicking needle or piece of bamboo to hold the wick in place.

Step3 Add any color and fragrance oil (note that I am not using a dye for this candle).

Step4 Pour your wax, remembering to pour slowly to reduce bubbles.

Step5 Remove your candle from the mold using the technique I discussed above.

I hope you’ve found my post on how to use silicon candle molds informative. I also hope you enjoy making them as much as I did. Let me know in the comments section below how you got on. I’ll do my best to answer any of your questions, so go ahead and post them in the comments section below!


Hi,
I’m using silicon moulds with pillar soy wax. I am pouring around 65 degrees Celsius. I am getting sinkholes and when I top them up it looks quite ugly. Is there a way to stop the sinkholes. They only happen on some of my moulds.
Hi Amanda,
Unfortunately not. It’s just the way the wax behaves when it transfers from liquid to a solid. What I would try to do, is to be more careful when you do your second and third sinkhole pours, and to make the holes you poke a little wider. Also, only pour enough so that the holes are filled. Try not to add too much length to the shaft of your candle. Otherwise you’ll find when the wax hardens, it can be evident on the sides and at the base that you’ve re-poured.
Do you add stearic acid to candles to make them firmer?
Hi Diann,
We haven’t added stearic acid before, but sometimes the wax we use already contains it.
Hi, i love how you reply in detail to every question asked. My issue is driving me crazy and don’t know what else to do : my finished product looks porous. Using nice silicone molds from different vendors, cleaned them after, tried paraffin block and also beads, tried mixing both, tried pouring slow, still same results. I would greatly appreciate your help and any tips you can provide me with. Thanks in advance !!!
Hi there, It sounds like you’re doing everything right so I’m not really sure why this is happening. The only thing I can think of is perhaps try changing the wax.
Hi!!! Thank you for replying so promptly ; i tried changing the wax, different types and forms as described above, still getting the same porous finished result.
I appreciate your response.
Hi,
Are you making sure that your molds are completely dry before use? They need to be left for 24 hours in between use.
Are your candles cooling too quickly? Perhaps wrap your mold loosely in aluminium foil to keep it warm.
Are you fixing sink hole problems?
Hi I see that you don’t use this little metal thingy- anchor I believe this is called, the thing that is in the end of the wick. I was wondering how important it is for safety or something? I will just add that I do molds,not glass candles
Hi Barbara,
Yeah, I only really use one of those in a container candle, as it helps keep the wick central. In molds, I find they’re a little redundant, so I say just carry on as you are without it. Sometimes I use a little candle sealant so the wick is more stable and none of the wax leaks out, but that’s it. Happy candle-making!
Hi ,
What is better for the silicone molds , paraffin wax or soy wax?
With paraffin wax can i use mica Powder?
What is the melt and pour temperature for it
Thank you so much
Hi Maha,
If we’re talking ordinary paraffin and soy, then you’ll want to go for paraffin. It’s much stiffer, will get a better finish, and won’t fall apart. Soy is a much softer wax.
Having said that, you can get blended soy waxes, which are suitable for use in a pillar. Look for a soy wax that’s referred to as a ‘pillar blend’.
Thanks for your time,
Yeah I noticed thar soy wax is softer, did not use the paraffin before, but I will soon.
Do you think mica powder will be ok with paraffin wax?
You’re more than welcome,
Unfortunately not. Mica is not at all good in candles. It just settles at the bottom as your candle hardens. You’ll want to use block or flake candle dye. You can find it on amazon. Paraffin takes to these types of dye very well, so you won’t need to use that much.
Hi
I’ve cut my silicone moulds because they wernt precut I’ve been using rubber bands to hold it together and the wax still leaks out
Hi Renee,
So sorry you’ve had this problem. You could try wrapping greaseproof paper (baking paper/baking parchment) around the mold first and then securing the mold with 2 elastic bands. This should give you a layer of protection against leaking wax. Hope this helps!
Hi Angela, some advice please I’m having trouble making my bubble cube candle. Should I be cutting the mould off once set? I’m peeling mould off&getting frosting all over the candle. I’ve changed wax&still it’s having pit marks all over it. Would a silicone release spray work? Denise
Hi there,
Yeah when I use a mold for the first time, I tend to cut my molds enough so I can get the candle out. Then I’ll use a hair tie or elastic band to help keep it closed when I use the mold again. As for the candle frosting, it’s one of those annoying defects that’s really difficult to avoid. I’ve had some success warming my molds in the oven before I do the initial wax pour. You only want it to be warm though, don’t cook your mold.
Hi Angela,
How often do you recommend washing or cleaning the molds?
Warm water & soap? After every use?
Thanks,
Tiffany
Hi Tiffany,
Yes, after each use is the way to go. This is especially important if you use candle dye and candle fragrances, as you don’t want any cross-contamination to ruin your lovely candles. Hot soapy water should do just fine.
Hi Angela, this was the most informative post I’ve seen about candles and molds.
I’ve been having a lot of trouble with frosting, is there something you recommend?
I use a plastic shell mold, and other silicone molds, but the one with most frosting is the plastic one.
Thank you
Hi Mafalda,
Yes, candle frosting can be a nightmare! I only have one trick that I’ve had mixed success with. You can try warming the mold before you fill it. Sometimes this can help the candle cool more evenly and reduce the amount of frosting. However, if this doesn’t work for you, I can only recommend trying a new mold. It happens to me all the time. I buy a new candle mold, get excited to use it, and have poor results. Eventually, you’ll find one you just love working with and couldn’t candle make without it!
If you do decide to warm the candle first, I find the best way is to pop it in the microwave for a few seconds. Be careful not to burn/melt your mold, as it’s made of plastic.
Hi Angela,
How long do you leave on mould
For after poured the wax in? How long does it take to set? I use soy wax
Hi Bethany,
Once you’ve finished with pouring, I like to leave in the mold overnight. This just allows it time to settle, and you can be sure it’s completely solid.
Hi! I’ve been trying to make candles with silicone mold but it is always frosting 🙁 I use naturewax C-3 Soy Wax. What wax is best for silicone molds?? and do you suggest to pour fast or slow? Thank you.
Hi Jas,
Yes, this seems to be a problem that can plague some candlemakers. Although I have found that candlemakers in warmer climates seem not to have this problem too often. Nevertheless, I would try to warm your molds up a little before pouring your wax. It shouldn’t really matter what type of wax, just warm the mold in the oven for a bit prior to pouring. Silicon should do fine in the oven. I hope this helps!
What temperature should i set the oven to before putting in the silicone mold and for how long should i warm it for?
Not that hot at all, I’d say no more than 150 and only for about 5 minutes. You just want to warm it up, that’s all.
It does depend on your wax! Your need a pillar wax which can be a soy wax blended with palm or paraffin. It will make it stronger and realise better from the mould and no frosting!
I’m really interested in trying my hand at candle molds . Could you tell me what type of wax and wicks I need ?
Thank you
Hi DeAnna,
Absolutely! Take a look at my guide to everything candles. It takes you through the whole process, as well as more complex candle making. enjoy!
What temp do you pour your wax so that it doesnt frost, nor ruin the mold?
Hi Valerie,
It really depends on the type of wax you want to use in your mold. However, I would try around 150-160F to start with and see how it turns out.
Hi Angela,
I’m using 464 soy wax for my candle molds and getting very bad frosting. I’ve adjusted the pour temperature many times but no success. Can you recommend a good soy blend or natural wax alternative?
Thanks
very informative. thanks!
Do you wax the wick before putting in the mold?
Hi Jane,
I actually don’t and have never done this. I know lots of people say you need to, but honeslty I haven’t seen a difference.
Thank you, also I am having a problem with lines around my candle, I’m using a silicone mold.