
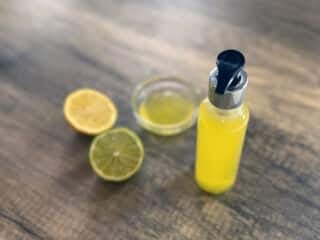
If you are battling oily, thick, or lackluster hair, often weighed down by product build-up, my latest clarifying shampoo recipe is tailored just for you. Designed to cut through the grease and grime, this shampoo is your once or twice-a-month ticket to refreshed, vibrant hair.
We’re focusing on another homemade shampoo recipe here, but this one is specifically created for those who need a deep cleaning.
Perfect for individuals with thicker, oilier hair types, this DIY clarifying shampoo recipe is adept at removing excess oils and the build-up of styling products, which can often leave hair feeling heavy and dull.

Key to our recipe is Decyl Glucoside, a gentle yet effective cleanser. While it’s notoriously challenging to thicken, we’ve tackled this by pairing it with Xanthan Gum – a reliable thickener that harmonizes well with Decyl Glucoside. For those looking for alternatives, we suggest using Coco Glucoside as a surfactant if you prefer different thickening agents.
This post will guide you through creating a homemade clarifying shampoo that not only deeply cleanses but also leaves your hair feeling rejuvenated and looking its best.
A recipe that’s easy to make and hard to resist for anyone seeking a powerful cleanse for their oil-prone or thick hair.

As an Amazon Associate, I earn from qualifying purchases. If you buy via the links here I may earn a small affiliate commission at no cost to you, please read my affiliate disclosure.
Ingredients
Equipment
Method
- 28 g Decyl Glucoside, 28 g Lauryl Glucoside, 20 g Cocamidopropyl BetaineIn a heat-proof beaker, weigh out the surfactants and stir them together, trying to avoid making any bubbles.

- 12.4 g Glycerine, 1.6 g Xanthan GumIn a separate heat-proof beaker, mix the glycerine and xanthan gum until you have a smooth paste.
- 100 g Distilled WaterAdd the water, to the gum paste, and stir until combined.
- The lauryl glucoside usually comes as a paste so we will need to melt it. We will also be warming our gum and water mix as we find they mix better when they are both warmed through. We can do this by placing both beckers into a shallow pan of simmering water, it should only take around 2 minutes to melt the lauryl glucoside and warm the gum water sufficiently. Once warmed and melted, remove both beakers from the heat.
- Now it's time to add the gum water to our surfactant. Do this slowly and stir carefully to keep the bubbles at a minimum.
- 2 g D-Panthenol Powder, 4 g Hydrolyzed Silk PeptidesWe need to let our shampoo cool to around 40c before adding our cool-down ingredients. Then we can stir in the panthenol followed by the hydrolyzed Silk. Stir until well combined.
- 2 g PreservativeWe will need to protect our shampoo by adding a broad-spectrum preservative. Make sure you fully blend this into the shampoo. Finally, add the lemon and lime essential oils. Once again stirring after each one and trying not to create bubbles.
- Using a pH strip test the pH of the finished shampoo. We are looking for a pH of around 4 to 5. If it isn't and it most likely will not be you will need to adjust it. See instructions on how to adjust the PH.
- You can make the shampoo more aesthetically pleasing by adding a drop of natural food coloring. This is completely optional.
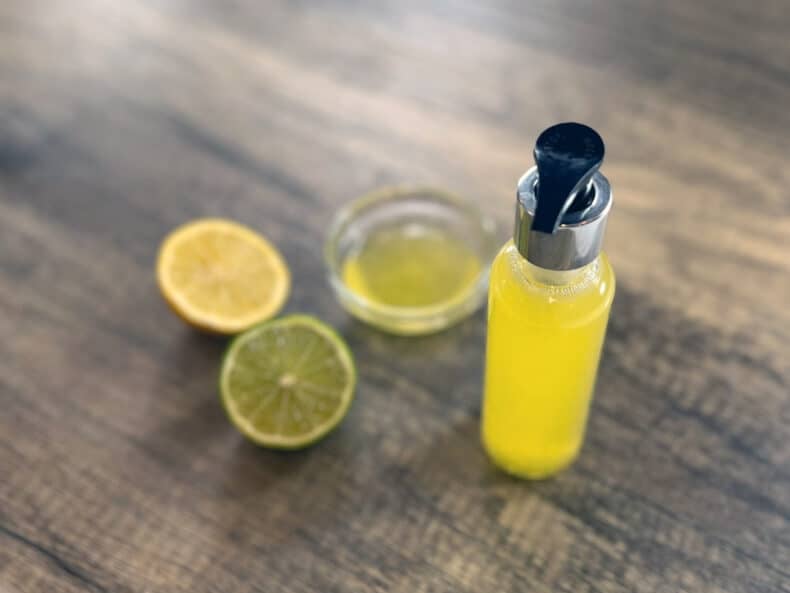
- 1 8 oz PET Plastic BottleWhen you are happy with the fished shampoo transfer to a suitable container.


New to DIY skincare?
If you’re enjoying making your own products, you might like Radiance, my free email course where I teach the foundations of DIY skincare step by step!Spotlight On Ingredients
Let’s take a look at some of the ingredients we use in this recipe.

Surfactants
Surfactants, short for surface-active agents, are the cornerstone of any effective shampoo formula, especially a clarifying shampoo. Their primary role is to cleanse by reducing the surface tension between different substances, such as oil and water.
This unique property allows surfactants to bind with oil and dirt on the scalp and hair, which are then rinsed away with water.
In a homemade clarifying shampoo recipe, surfactants are particularly crucial. They work diligently to penetrate and remove heavy build-up from styling products, excess sebum, and environmental pollutants.
Without surfactants, a DIY clarifying shampoo would lack the fundamental mechanism to deeply cleanse the hair and scalp. It’s their powerful cleansing action that makes them indispensable in tackling the challenges of oily, thick, or heavily styled hair.
Furthermore, because surfactants can reduce surface tension between different substances, it also allows us to add small amounts of oil soluble ingredients to our formula. You can add around 3% oil, be it carrier oil, essential oil or even oil based botanical extracts.
So let’s break down the different surfactants in this recipe further.
Lauryl Glucoside
Lauryl glucoside Is a gentle cleansing mild surfactant derived from natural sources like coconut oil and sugar. It effectively cleanses the scalp and hair without causing irritation, making it suitable for sensitive skin. Lauryl glucoside produces abundant foam making it the perfect choice for a homemade clarifying shampoo.
Decyl Glucoside
Decyl glucoside is a natural surfactant known for its mild cleansing properties. It removes dirt, oil, and impurities from the skin and hair without causing irritation. So it’s a great surfactant for those with sensitive or irritated skin.
Cocamidopropyl Betaine
Cocamidopropyl Betaine is a mild natural surfactant that’s derived from coconut oil. It’s a great allrounder that works best when used with other surfactants.
Its gentle nature plays a crucial role in reducing skin sensitivity caused by other surfactants, and its ability to boost the foaming performance makes it a must-have surfactant in all our liquid shampoos.
The Gelling Agent
Xanthan Gum
We’re making use of xanthan gum for this recipe. While our surfactants will help to add viscosity to our finished product, most of our stiffening power will come from this unassuming ingredient.
Xanthan gum is a gelling agent and stabilizer, meaning while it will increase viscosity, it will also make sure it stays thick for longer. It will also help to keep our essential oils solubilised too.
While I wouldn’t recommend another type of gum for this recipe, I would suggest you could play around with either soft or clear xanthan gum. This ingredient is readily available and pretty economical too, so you should be able to get your hands on it without any problems.
Actives, Extracts & Extras
D-Panthenol Powder
D-Panthenol is a power humectant that will help the scalp and hair retain moisture for longer. This makes hair stronger, more elastic and less prone to breakage. I add this to all my shampoos for its superb deep conditioning properties. It absolutely fantastic and a must if you’re serious about making your own shampoo.
However, you can swap it out for either more glycerine or you could also try some honey.
Hydrolyzed Silk Protein
Silk protein or peptide is a great audition to just about any formula intended to treat hair. It penetrates deeply into the hair, moisturizing it and making it stronger from the inside out. I always try to include at least one in my shampoos.
I’m using the liquid version (Silk Amino Acids) I find it easier to use and it has very little odor.
Lemon and Lime Essential Oil
These two aromatic oils are a match made in heaven. They give a sharp crisp citrus scent to the shampoo that is to die for. It’s the perfect wake me up to get your mind energized for the day ahead.
They also have natural astringent properties that can help clarify the scalp and hair whilst protecting it from environmental damage. However, like with many essential oils, we need to take some precautions to ensure our safety.
Ordinary lemon and lime essential oils are phototoxic, much like many citrus EOs. This means that the product will become toxic when exposed to sunlight. It doesn’t matter if the product is leave-on or wash-off, as I’ve seen reactions in people from lemon shampoos in the past.
However, this is only true for lemon and lime essential oils that are extracted using a mechanical extraction method. You can safely use steam distilled lemon and lime essential oil, which are not phototoxic. Be sure to check with the manufacturer or supplier to ensure your essential oil is extracted using steam distillation.
Substitution Guide
Surfactants: If Lauryl Glucoside or Decyl Glucoside is unavailable, you can double up on the one you have. Alternatively, use Coco Glucoside or Caprylyl/Capryl Glucoside as replacements.
If substituting Lauryl Glucoside, increase Xanthan Gum to 1% to maintain viscosity.
Note: Cocamidopropyl Betaine is recommended to be kept for its mildness and compatibility with other surfactants.
Hydrolyzed Silk Liquid: Powdered Silk Peptide, or another peptide suitable for hair
Note: As a wash-off product, the differences between proteins are minimal, but silk peptides can enhance the luxurious feel of the shampoo. If going for the powdered versions, add to the water before heating, rather than at cool down. Due to potential odor for powdered silk peptide, reduce the quantity to 1% (1.5g for this recipe).
D-Panthenol Powder: Liquid Panthenol at double the quantity. Alternatively, use more glycerine or try honey.
Note: Liquid Panthenol is less potent, so use 2% if replacing powder form.
Lemon and Lime Essential Oil: Any essential or fragrance oil based on preference.
Note: Citrus oils contribute to the thickening effect. Non-citrus oils may result in a thinner consistency. Consider swapping them for a different citrus essential oil, such as grapefruit or orange.
Understanding pH Balance in Shampoo Formulation
In our journey as DIY shampoo creators, understanding the role of pH – potential hydrogen – is fundamental. It’s a measure that tells us whether a solution is acidic or basic. This knowledge is not only crucial for ensuring ingredient effectiveness but also vital for hair and scalp health.
In this formulation, the pH level is particularly significant for our preservative’s efficacy, as it operates optimally within a specific pH range. However, pH balance is equally important for maintaining the natural health of our hair and scalp. Typically, hair has a slightly acidic pH, around 5, and maintaining this balance is key to preventing dryness and brittleness.
To guarantee our shampoo aligns with these requirements, we need to test and possibly adjust its pH. This can be done easily using pH testing strips or a universal indicator. Once we ascertain the initial pH, we can fine-tune it as necessary.
To lower the pH, a few drops of lactic acid can be effective. Alternatively, a 10% Citric acid solution (1g Citric acid in 9g water) can be used. In both cases, add the acid incrementally, testing the pH after each addition.
Our goal is to achieve a pH that not only matches the hair’s natural acidity but also falls within the preservative’s effective range. For Preservative ECO, with a range of 3-8, aiming for a final pH of around 5-6 will ensure both the stability of our homemade clarifying shampoo and the health of the hair.
How To Use & Store

Using your shampoo couldn’t be easier, as you use it just like you would any other shampoo. Simply massage deeply into the roots of the hair, taking time to scrub the scalp too. Then, work the product to the tips of your hair, making sure to distribute it evenly.
Then, rinse with warm water in the bath or shower. It’s best to make sure to remove all of the product, then follow up with a good quality conditioner.
This shampoo is stronger than your regular shampoo, so I only recommend using it once or twice a month. It’s really geared towards people with very thick hair, or those with oily hair type.
If you’re using a good quality, broad spectrum preservative, you can expect your shampoo to be good for 6-12 months.
Final Thoughts
As we wrap up our guide to creating a DIY clarifying shampoo, it’s clear that crafting the perfect formula is both an art and a science. We’ve delved into the importance of choosing the right ingredients and the nuances of making suitable substitutions.
We’ve also explored the critical role of pH balance in ensuring the efficacy of our preservative and maintaining the natural health of our hair and scalp.
Creating a shampoo tailored for those with thicker, oilier hair requires a thoughtful blend of ingredients. From mild surfactants that provide deep cleansing without stripping natural oils, to nourishing agents that leave hair refreshed and revitalized, each component plays a pivotal role.
And, with the understanding of pH balance, we ensure our shampoo is not just effective but also harmonious with the hair’s natural state.
Remember, the beauty of DIY formulation lies in your ability to customize and adapt. By testing and adjusting, you can craft a DIY shampoo that meets your specific hair needs while providing the satisfaction of using a product made by your own hands.
Thank you for joining us on this journey. We hope you feel inspired and equipped to make a clarifying shampoo at home that brings out the best in your hair, leaving it cleaner, healthier, and more vibrant with every wash. Happy formulating!

Hello Savvy Home,
Would using only Decyl Glucoside as my only surfactant here be too strong? Was reading that Decyl Glucoside can act as a primary surfactant, and am looking to buy as few material as I can.
Hi Elaine,
In my experience, Decyl Glucoside is a good surfactant to use either as a standalone or co-surfactant, so I don’t see a problem. It’s a mild surfactant, but it does have a high pH, so you will need to lower this with a little citric acid or lactic acid. Another thing to consider is the viscosity of the shampoo, as Decyl Glucoside can lead to a thinner product. I suggest you make a small amount to start and see how it turns out.
Best wishes,
Angela
Hi. I’m Lisa .
Just started my business. Tried a DIY shampoo turned out good but after a day I realized when it seethed it didn’t look properly mixed but I used a hand mixer after I initially got that look. Also after making my shampoo I added a bit of color to it so you see yellow dots on the bottle. I want to know why it’s so
Thank you for sharing, I am excited to make it! Would collagen peptides be beneficial? I only ask because I am hoping not to wait for the 2 week lead time on the silk peptides 🙂
Hi Amy,
Absolutely, collagen is very beneficial for your skin and hair and would make a great addition to this shampoo.
great recipe thank you
did you post your conditioner yet?
Hi Dana,
I did indeed! It was more of an update of an old recipe I did years ago and wanted to revamp it, making it more luxurious for your hair. You can find it here
Hi, can carrier oils be added to this recipe?
Hi Anecka,
Unfortunately not. The surfactant in this recipe isn’t enough to solubilize the oil. You would have a lot of separation issues.
Can you substitute distilled water with coconut milk?
Hi Jennifer,
Unfortunately, I haven’t tried this. But it is worth a try. I always like to experiment with new ingredients. Let me know how it turns out!