

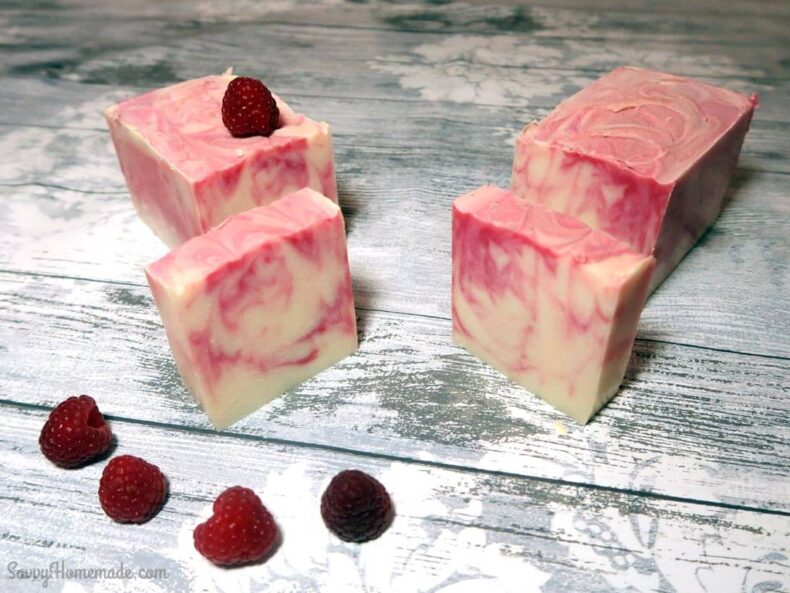
I’ve shared plenty of soap recipes over the years, you can see many of them here, but I’m so absolutely obsessed with this that I just can’t stop making more. Today I’m going to show you soap swirling to achieve a cool marble effect.
I racked my brain for what scent and color to work with for this recipe, and I thought it would be a fun play on the idea of a ‘raspberry ripple’ ice cream soap, so will be using raspberry fragrance oil.
To get that cool ‘ripple’ effect, I’ll be using red mica as a raspberry coloring and titanium dioxide (optional) to make the white and pink colors pop.
So let’s get on and make some amazing swirled soap!
A note on the fragrance oil
As this is a raspberry ripple soap, I have obviously made use of raspberry fragrance oil. However, I originally wanted to use vanilla as well to compliment. After a few experiments, I found that using the vanilla discolored the soap too much for my liking.
There is a chemical in vanilla fragrance oil that can reek havoc on the light, pure color of your soap. If this isn’t a problem for you, then go ahead and use it at a 50/50 ratio. Otherwise, stick to just using 40 mls of raspberry. You can see in the image below the difference between using vanilla and omitting it.

Watch How To Make Basic Cold Process Soap
If you haven’t made soap before, take a few minutes to watch the video and basic steps for making CP soap at home.

As an Amazon Associate, I earn from qualifying purchases. If you buy via the links here I may earn a small affiliate commission at no cost to you, please read my affiliate disclosure.
Ingredients
Equipment
Method
- If you’ve not made soap before, take a look at my full cold process tutorial here.Make sure you are making the soap in a well-ventilated area. Put on your gloves and eye protection, your mask, apron, and long rubber gloves.

- Gather your ingredients. If you aren’t using a silicone mold, you’ll want to line whatever you are using with baking paper. Try to keep the paper as smooth as possible, as it can leave marks on the surface of the soap if it wrinkles.
- This is the time for you to prepare all of your ingredients, measure everything, all of your oils, butters, water and lye. But do not mix your water and lye yet.In a small dish or glass, mix 1 tablespoon of olive oil with 1 tee spoon of red or pink mica, set this aside or later. Do the same with the titanium dioxide in a separate glass (you can usually mix this with oil, water or glycerine, check packing to be sure).Using a milk frother, whiz both mixtures so that they are diluted and mixed very well, you do not want any lumps at all in this.Note on Titanium Dioxide: Although the Titanium Dioxide is completely optional, I find it’s necessary to get a brighter color out of your soap. This will help the ripples of red mica coloring pop and look fantastic. But the recipe will work perfectly fine without it.
- Combine your butter and oils in a pan and put it on the stove on a low heat. You don’t want your oils to boil or even simmer, just melt gently.
- Right after you’ve put your oils on to melt, combine your lye and water and mix gently so not to spill or splash. This will spark the chemical reaction, causing the lye to become very hot very quickly.You can place it on the windowsill with the window ajar to help ventilate your work space and cool it down more quickly.If you have little ones in the house, be very careful during this and the next few steps. I find it best to set them up in another room with some coloring and keep them well away from my lye.
- You’ll now want to balance the temperatures of your lye and your oils. You want both to be between 120-140F before you mix. Once they’re roughly the same temperature, pour your lye into your oils and mix thoroughly but carefully so not to spill or splash. I like to use an infrared thermometer gun to test my temperatures.
- Using your soap making stick blender, whizz the soap mixture until you reach a light trace. You’re looking for that residual trace that is left behind when you run the stick blender or a spoon through the mixture.Once you reach this point, ladle out 3 spoonfuls of your mixture into a separate jug and put to one side.
- Add your fragrance oil to the larger part of your soap mixture and mix thoroughly.
- Now pour the titanium dioxide into your main soap batter mixture and stir thoroughly.
- Now we can add the mica to the soap batter we collected earlier. It is very important that your oil and colors are fully mixed and must never be lumpy when you add it to your soap.
- Working in layers, pour your soap batter, you’ll want to do a layer of white soap about half way up.Follow this with a thin layer of the colored soap batter, using a spoon to dribble it on.
- Then, using the thin bamboo stick, give the mixture a quick stir. You don’t want the colored soap to fully immerse into the plain soap, we’re looking for that cool marbled effect.
- Then pour the rest of your white soap batter up to the top of the mold.
- Spoon more of the colored soap solution and use the thin bamboo stick to give the mixture a quick stir again. You don’t want the colored soap to fully immerse into the plain soap, we’re looking for that cool marbled effect again.
- Once you’re happy with the marbling of your soap mixture, cover the top with a piece of cardboard and then lay a towel over it to insulate through the gel phase.
- Leave your soap of a minimum of 24 hours, although sometimes it’s necessary to leave it as long as 48. Free your soap from the mold and cut it into even rectangles. I like to cut my soap by hand for a more rustic look, but you can use a soap cutting box for precision.You’ll want to then recover and leave to cure for around 4 weeks. Test with PH Strips to ensure that your soap has fully saponified and is safe to use.


New to DIY skincare?
If you’re enjoying making your own products, you might like Radiance, my free email course where I teach the foundations of DIY skincare step by step!Final Thoughts
So there we have it, an amazing swirl cold process soap that smells and looks fantastic. I love how the ripples of red mica look against the creamy white of the soap. It really does look and smell like a gorgeous raspberry ripple ice cream!
This makes a wonderful homemade gift for a friend or loved one. People always think homemade soap is something special, because it really is. All of the lovely oils and butters that go into this soap will cleanse your skin and also nourish it, giving you skin that is so much softer than if you were to use a store bought soap.
This also makes a great addition to a soap hamper, with a selection of your homemade soaps for an extra special gift for mom or your best friend. It’s such a luxurious gift that anyone would adore.
You can experiment with different colors and fragrances to customize this soap for yourself or a giftee. You could even be adventurous and use multiple colors for a cool tri-colored marbled soap.
The more colors you use the more work you’re giving yourself, so keep things manageable while you’re building your skills.
Don’t forget to take a look at our other cold process soap recipes for more inspiration. Let me know how you get on in the comments section below. Sharing your successes and failures helps all of us on our way to expert soap makers. I’ll be back with another soap recipe soon!

Which olive oil are you using for this recipe . And does it really matter which one you use I am going to make this tomorrow I am new to soap making and only made pure olive oil soap Once which turned out wonderful
Hi Christine,
Apologies if this hasn’t gotten to you in time. I’ve been a super busy lady recently and I’m so sorry! Anyway, yes, pretty much any olive oil will work for this.
Hope this helps!