

Leading on from my tutorial on how to make a keychain using beads, charms and pendants I thought it would be great to show you how I make a personalized homemade keychain using plastic.
These are so quick to make there’s still plenty of time to make them as a simple yet very personal gift for Christmas this year! Below I’m using shrink plastic sheets and marker pens, and further down the page I’m making a unique keychain using photos and quotes.
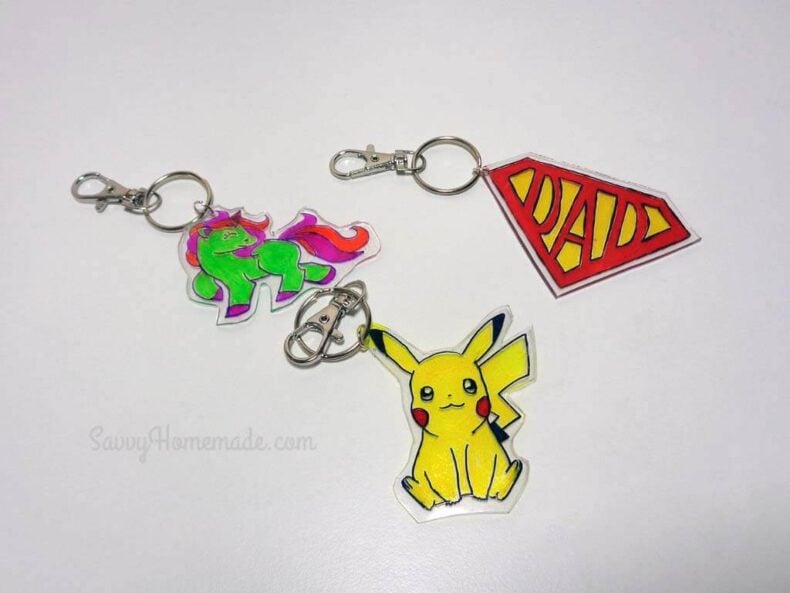
DIY Shrinky Dink Keychains
These are great fun to make and one to get the kids involved. If you’ve never used shrink plastic before, it’s pretty amazing stuff. You can hand draw or trace a picture on to the shrink plastic, bake it in the oven for around 3 minutes and watch it shrink.
The sky’s the limit with this stuff. You can experiment until your hearts content with shapes and colors. If you’re a dab hand at free drawing, great, but if not there are hundreds of templates online for you to print off and customize a DIY keychain to your hearts content.

As an Amazon Associate, I earn from qualifying purchases. If you buy via the links here I may earn a small affiliate commission at no cost to you, please read my affiliate disclosure.
Ingredients
Equipment
Method
- Using permanent markers, draw a picture on to the shrink plastic or download and print off a template, then trace it on to the shrink plastic. Remember that the end result will be 3 times smaller than your original drawing. So that I can see what I’m doing, I find it easier to color my picture on a white back ground. An ordinary piece of white paper is sufficient for this.

- Leaving a decent sized border around your drawing, cut your picture out. Use a hole punch to pierce a hole in one of the corners. Remember that this will shrink too, so it needs to be large enough to attach a key chain afterwards.

- Place the piece of parchment paper on to a cool baking sheet and place your plastic on top. You don’t want your plastic to be in direct contact with the metal sheet. Do check this against the instructions on your shrink plastic as some makes recommend using silver foil.

- Bake in the oven at the manufactures recommendations for a few minutes until it has shrunk and is flat. Whilst shrinking you will see the plastic curl and twist, don’t panic wait until it’s become flat again before removing from the oven. (See notes on curling below)Once removed from the oven immediately place it on to the work surface and place a table mat or book on top until hard, if it’s not pliable don’t try to press it flat. Place it back in the oven and reheat.

- Attach the keychain to the key ring. A jump ring can be used if the hole is a little on the small size.

Notes

New to DIY skincare?
If you’re enjoying making your own products, you might like Radiance, my free email course where I teach the foundations of DIY skincare step by step!How To Make A Personalized Keychain Using Photos
A personalized gift can be a very special keep sake, the fact that it’s handmade makes it extra special!
Unique photo keychains are one of the most popular and you can DIY them in minutes. You can add a different photo to each side or you can place a photo on one side with a small saying or personal message on the other. I’ve listed a few message ideas at the bottom of the page for inspiration.

Of course you don’t have to place a photo in the frame at all. An inspirational or fun message can be really personal. A drawing from a young child to her mom, dad or grandparents is a wonderful treasure and a great way to personalize a keychain. Or how about a miniature tapestry or some funky patterned paper to match their style and personality? Whichever you choose to make, you’d be hard pushed to find a cheaper or easier homemade gift to make.
What You Will Need
- Blank photo key chain
- Passport size photo, drawing ect.

How To Make Them
Photos need to be placed back to back, if you are only using one photo it’s nice to print off an interesting saying or pattern for the back.

By placing the panel on a piece of paper and drawing around it should give you the correct insert size. This is particularly helpful for a child who will draw the picture. The same technique can be used with patterned paper, messages or pictures that have been downloaded and printed off.

There are hundreds of quotes and sayings available online, enough to fit any DIY keychain or other situation. But do feel free to use any of the ones below that I’ve used and that have been much appreciated over the years.
God couldn’t be everywhere, so he created mothers
With a picture that my granddaughter had drawn for her mom. So cute!
Silence is golden, unless you have kids, then silence is just plain suspicious
My sons wife (she has four little ones) with a picture of her children.
I am nobody. Nobody is perfect. I am perfect.
My teenage daughter. Used with a funky pattern on the back.
Choose a job you love, and you will never have to work a day in your life. (on one side)
Teachers open the door but you must walk through it yourself. (on the other side)
For my son at college (he did get the message)
If I had a flower for every time I thought of you… I could walk through my garden forever
My mother, I used this saying with a beautiful picture of a country garden.
With your love there is nothing I cannot do
My husband, I think this one speaks for its self.
Organized people are simply too lazy to search for stuff
My son for his school locker key.
A good friend knows all your stories. A best friend helped you write them.
One of my closest friends. I dug out an old photo (20 years old) of us being silly together. I took a snap shot and downloaded it to my laptop then printed it off. The example below is the one she sent to me a few weeks later.
A best friend is like a four leaf clover, hard to find, lucky to have.
Written on top of a four leaf clover picture, it was gorgeous!
What message would you write? Please feel free to use comments below to give us some more inspiration!


I liked the way how you did it. I gave it to my friend and she liked it
Thanks for sharing such a good blog. Very useful for making a personalized keychain with the help of colour pens, paper and plastic. Even one of my friend told me that he had made personalised keychain by adding his name on the piece of leather.
Ok, cool!