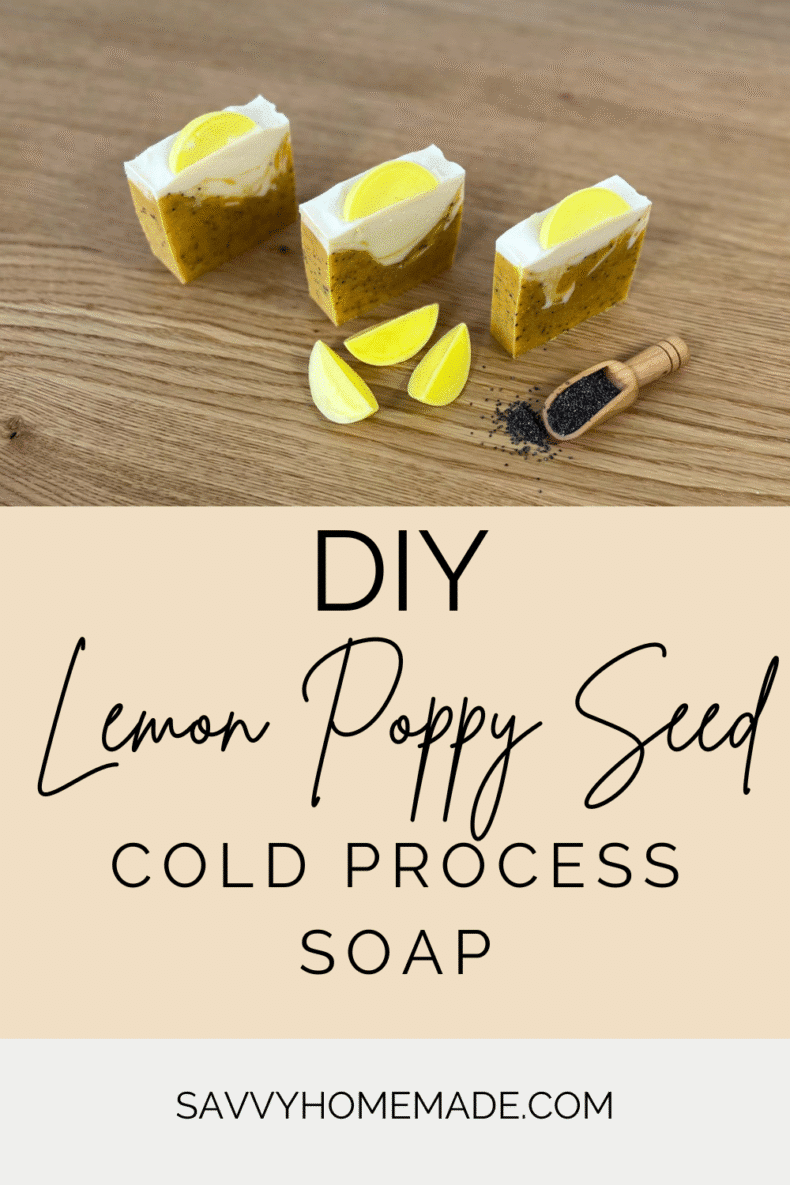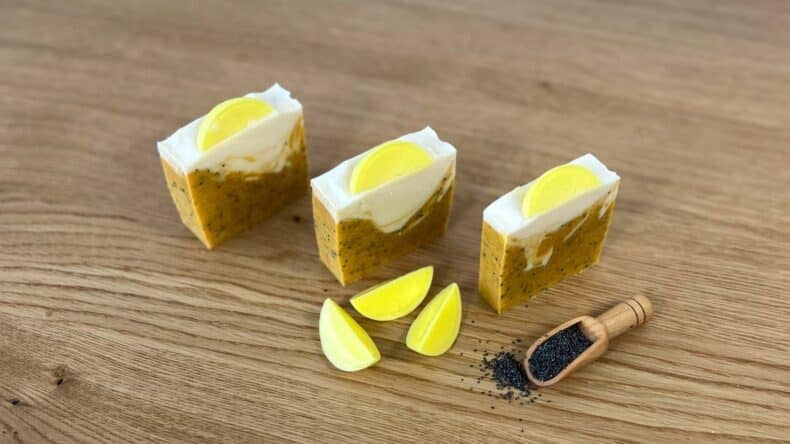
There’s something about the scent of lemon that just makes me happy. It’s fresh, bright, and somehow manages to wake me up even before I’ve had my morning coffee. So when I first tried this lemon poppy seed soap, I knew it was a keeper.
The clean citrus aroma, the cheerful yellow tones, and the gentle exfoliation from those little poppy seeds, it’s everything I love about handmade soap rolled into one bar.
And you know what’s funny? I didn’t even plan to love it this much. It started as a “let’s try something new” experiment, and now it’s one of my most-used soaps in the house.
About My Lemon Poppy Seed Soap

If you’re new to soap making, this is a lovely intermediate project that looks fancy but feels approachable. You’ll be working with lye, so proper safety gear is a must: gloves, goggles, and a well-ventilated space. Once you’ve got that sorted, it’s all about creating a silky lemony swirl that smells like sunshine.
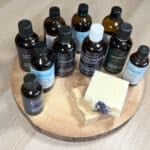
If you enjoy making cold process soap and want more reliable results, you might also like my Natural Soap Making Course.
Inside the course I share tested recipes along with clear guidance on oils, lye, colors, and additives, so you can make beautiful, dependable, & natural soaps with confidence.
It’s 25% off this week. 👉 Explore the course here
This batch makes around half a loaf of soap, giving you a few chunky bars that last beautifully in the soap dish. It takes about an hour of active time, plus a curing period of four to six weeks so the bars can harden and mellow.
It’s an intermediate-level recipe, mostly because we’re blending natural colorants and a lovely essential oil mix for scent. Still, it’s very doable if you’ve made at least one cold process soap before.
The combination of Litsea Cubeba and Sweet Orange essential oils makes it smell like a sunny kitchen in springtime, clean, cheerful, and a little zesty.
Ingredient Spotlight

When you’re formulating cold process soap, every oil plays its part. This lemon poppy seed soap is all about balance, creamy, bubbly, conditioning, and firm. Here’s what gives it that character.
Beef Tallow
This old-fashioned ingredient is one of my favorites for hard, long-lasting bars. It gives the soap that creamy, stable lather you just can’t get from vegetable oils alone. And don’t worry, it doesn’t smell meaty at all once it’s saponified. If you prefer a vegan option, you can swap it for vegetable shortening (just run it through a soap calculator first).
Coconut Oil
The cleansing powerhouse. It helps lift oils and dirt from the skin and creates those big, fluffy bubbles that make handmade soap so satisfying. A little goes a long way though, too much and your bar could feel drying. That’s why it’s balanced with plenty of olive oil and tallow here.
Olive Oil
The heart of this recipe. Olive oil brings that smooth, lotion-like glide and a conditioning finish that makes your skin feel soft after washing. It’s what gives the soap its mildness and makes it suitable for most skin types. High in oleic acid for nourishing, moisturising benefits.
Annatto Powder and Brazilian Yellow Clay and Zinc Oxide
These three team up to give the soap its gorgeous natural color. The annatto powder lends a sunny golden hue, while the clay softens it into a warm pastel yellow. The clay also adds a touch of silkiness and helps absorb excess oils without drying your skin. Zinc oxide is known for its soothing and calming properties on the skin.and provides a creamy, pastel finish.
Poppy Seeds
The little dots that make this soap special. They offer gentle exfoliation and a charming speckled look, a bit like a slice of lemon poppy seed cake. Just enough scrub to smooth rough spots, but not so much that it feels gritty.
Litsea Cubeba and Sweet Orange Essential Oils
This is the scent combination that makes people go, “Oh wow, what is that?” Litsea brings a crisp, lemony brightness, and sweet orange adds warmth and sweetness. Together, they smell fresh, clean, and happy, like the sun coming up on a spring morning.
Substitutions and Variations
Please note any changes to the oils in our recipe must be run through our soap calculator.
- Beef Tallow: A different tallow such as deer, lamb or lard. For a veg friendly version you could replace the tallow with vegetable fat or palm oil.
- Olive oil: Rice bran oil would be a good, or a High Oleic Sunflower Oil. it should say High Oleic Sunflower Oil on the label, if it doesn’t then it’s probably not. Basic sunflower oil can easily go rancid, causing the soap to develop yellow or brown spots.
- Coconut oil: I would go for Babassu Oil or RSPO Palm Kernel Oil. you could go for a 2 oil soap 50% olive and 50% tallow. Remember to run it through the soap calculator first.
- Color – Annatto powder and Brazilian Yellow Clay: Yellow oxide would be an option, it may be a little more mustard looking, but still very similar. Micas look beautiful in soap, you could create a lovely bright or deep yellow. As far as them being classed as a natural product this is very controversial. Personally I’m not against using them, as long as you are using skin safe micas. On the down side they do not have any skin benefits like the annatto or clay.
- Zinc oxide naturally whitens the soap: You could leave this out. This would make the top more cream looking.
- Essential oil: Distilled lemon essential or lemon grass, or you could go down the orange route making the lemon topper orange and use 14g orange. I would go for the 5 fold as its 5 times as strong, sweet orange can begin to fade when used alone. If you are not worried about being natural, a fragrance oil would work well. Fragrance oils can be unprofitable so always check its suitable for CP soap first.
- Lemon wedge/Segment topper (this is optional): Dried lemon slices can also look great in this soap. Cut them in half and push them down vertically. You could texture the top of the soap and sprinkle it with some poppy seeds.
Tips and Mistakes to Avoid
- Don’t rush the lye. Always add lye to water, never water to lye, and stir until it’s completely dissolved.
- Blend slowly. Over-blending can cause the soap to thicken before you’ve added color or scent. Short bursts with the stick blender work best.
- Keep your workspace cool. High temperatures can make citrus essential oils fade faster or cause the soap to overheat.
- Patience pays off. Resist cutting the soap too early, wait at least 24 hours or until it’s firm enough to slice cleanly.
Watch The Video

As an Amazon Associate, I earn from qualifying purchases. If you buy via the links here I may earn a small affiliate commission at no cost to you, please read my affiliate disclosure.
Ingredients
Equipment
Method
- Clear Melt Pour Soap BaseMake sure you are making the soap in a well-ventilated area. Put on your gloves and eye protection, your mask, apron, and gloves.Its best to make your lemon wedge embeds the day before your soaping day. Chop the melt and pour soap into medium size squares, you will need around 100 to 150 grams. Place the soap into a small size pitcher. Melt the soap on a low heat in a microwave.

- Food ColoringOnce melted, add a few drops of yellow food coloring and carefully stir until the food coloring has been disbursed. Pour into the mold and leave to set for a few hours Before removing.
- Pre weigh the essential oils into a small glass container. Once weighed, set it aside for later use. Place the yellow clay into a small container and add around a half tablespoon of water to it. Giving it a good mix before setting it to one side. Place the zinc oxide into a separate small container and add around a tablespoon of oil. Giving it a good mix before setting it to one side.
- 129 grams Distilled Water, 64.5 grams Soapmaking LyeIn a heat proof pitcher weigh your distilled water. In a separate plastic container, Weigh the lye crystals.When you’re ready, carefully pour your lye crystals into the water. Never pour the water into the lye as it can create a sudden intense reaction that can cause splashing. Then, start stirring it. Although you are wearing a mask, we still recommend turning your head and leaning away while stirring, so you do not breathe any of the fumes. As the water and lye mix this will result in a chemical reaction, and the lye water will increase in temperature and release toxic fumes.Stir until the lye crystals have dissolved and the water looks fairly clear. Now place it to one side, somewhere well-ventilated but safe so that it will not be knocked over. Allow to cool as we get on with our other steps.
- 140 grams Coconut Oil, 150 grams TallowWeigh your coconut oil and Tallow into a good-sized heat proof container. Melt the oils in a microwave, using 30-second bursts.
- 160 grams Olive OilOnce the coconut oil and Tallow have melted, add the olive oil, giving it a quick stir.
- Now it’s time to balance our oils and lye water. Check the temperature of the oils and the lye water. You can do this with a temperature laser gun or a jam thermometer.We want them both to fall between 120 -100F (48-37C). If they are still too hot, leave them to cool for a while longer.They do not need to be the same temperature, for example, the lye could be 120f and oils 110f, but it is best to keep them within 10 degrees of each other.
- Once you’re satisfied they’re balanced, pour your lye solution into your oils.
- Before turning on the stick blender to mix the oils and lye, gently tap the stick blender against the bottom of your container. Continue tapping until all the air bubbles have been released.Turn the stick blender on and blend until all the oils have been fully emulsified into the lye solution, switch off the blender, and check to see if the soap batter has reached what we call trace, we want it to be at a light trace. Trace is when you can drizzle a little of the soap over the surface and you can see it before it disappears back into the mix, you have reached a light trace. If the soap hasn't reached a trace, continue to blend, checking regularly.
- 7 g Litsea cubeba essential Oil, 7 g Orange Essential OilNow that we’re at the trace, it’s time to add our essential oils. Give the batter another quick blend with the blender or with a spatula.
- 1/2 tsp Annatto powder, 1/2 tsp Brazilian Yellow Clay, 1 tsp Zinc OxideRemove around one third of the soap batter into a sparse pitcher. Add the Annatto powder and the Brazilian clay to the remaining container with the larger batch of batter and the zinc oxide to the smaller batch of batter. Give them both a good stir with a spatula.
- 1 tbsp Poppy SeedsIf the batter is very thick you may want to continue stirring with the spatula. Otherwise continue to stick blending them until all of the colorants have been disbursed. If possible I try to start with the lighter color first. In this case that would be the zinc oxide. Bring them both up to a medium to thick trace, then add your poppy seeds to the larger container with the Annatto powder and the Brazilian clay
- Once you are ready, pour or spoon the Annatto and clay batter into the mold. Leave it to thicken to give some support to the second layer.
- When thickened pour around ¾ of the white layer onto the first layer, mixing it in with the stirrer to create an uneven look when it's cut. Pour the remaining white on top.
- Once the soap has thickened enough to hold its shape, use a spoon to texture the top. You can create swirls, peaks, or waves depending on the look you want.
- When you’re happy with the texture, gently place the embedded toppers onto the soap. There’s no need to press them in too much, just position them carefully between where you plan to cut each bar. Then, Leave the soap for 24 to 48 hours to harden.
- Once the soap has hardened, you can remove the soap from the mold.
- Carefully cut it into slices. Take your time and avoid cutting through the embeds so each bar has a lemon wedge on it. The soap will need to cure for 4 to 6 weeks before using.


Tried this recipe?
Let us know How It Was!If you enjoy making cold process soap and want more reliable results, you might also like my Natural Soap Making Course.
Inside the course I share tested recipes along with clear guidance on oils, lye, colors, and additives, so you can make beautiful, dependable, & natural soaps with confidence.
It’s 25% off this week. 👉 Explore the course here
Storage and Shelf Life
Once fully cured, store your lemon poppy seed soap somewhere cool and dry, away from direct sunlight. The natural citrus scent will last longest if you wrap the bars in paper or pop them into a breathable box. Properly cured, they’ll stay fresh for many months.
How to Use
Just wet the bar, lather up, and let the poppy seeds do their gentle scrubbing magic. It’s lovely for hands, body, or feet, anywhere that needs a touch of polish. I like keeping one by the kitchen sink because it cuts through cooking oils while leaving my skin soft.
Scaling and Cost Notes
Because the recipe is written in percentages, it’s easy to scale up for full loaf molds or gift batches. Doubling it won’t affect performance, but make sure your containers are large enough to handle the extra volume.
Troubleshooting
- Sometimes cold process soap throws a curveball. If your batter thickens too fast (called “seizing”), it might be due to temperature or fragrance acceleration. Just spoon it into the mold, it will still make good soap.
- If it separates or looks oily, you may have under-mixed it, so give it a few short bursts with the stick blender next time. Too soft after unmolding? That usually means too much water or not enough cure time. Leave it another few days before slicing.
- Homemade soap is surprisingly cost-effective once you’ve stocked the basics. Most of the ingredients stretch over several batches, and the satisfaction of using (or gifting) something you’ve crafted yourself? That’s priceless.
FAQ
What makes this lemon poppy seed soap so special?
It combines a fresh citrus scent with gentle exfoliation and a creamy lather. The poppy seeds polish the skin, while the natural oils leave it soft and clean.
Can I make this lemon poppy seed soap without tallow?
Yes, you can replace the tallow with palm oil or a vegetable shortening. Just make sure to recalculate the recipe in a soap calculator before you begin.
Why does my lemon poppy seed soap look darker than yours?
Natural colorants like annatto and clay can vary. The temperature and curing environment can also slightly change the final shade.
Can I use a different essential oil blend?
Absolutely. Lemongrass, distilled lemon, or extra sweet orange work beautifully. Just ensure the oils are skin-safe and suitable for cold process soap.
How long should I cure lemon poppy seed soap before using it?
Let the bars cure in a cool, dry place for at least 4 to 6 weeks. This helps them harden fully and ensures a mild, long-lasting soap.
Wrapping Up
Every time I slice a batch of this lemon poppy seed soap, I can’t help but smile at the marbled yellows and tiny black specks. It’s cheerful, simple, and wonderfully natural.
If you’d like to give it a go, check the full recipe card below for exact quantities and the step-by-step guide. And if you’re ready to level up your soap-making skills, come join me inside our Natural Soap Making Course, where we turn creative ideas like this into confident, skill-building projects.