
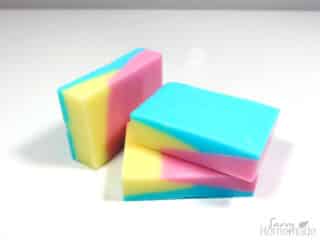

These attractive looking 3 colored soaps are slightly more time consuming than the average homemade melt and Pour soap recipe but I do think they are worth the extra time and effort. It’s also a great way of using up those leftover bits of soap that aren’t quite enough to make a full bar.
I’ve used three different colors to create theses soaps but don’t feel limited to this, as long as you continue to tilt the mold at different heights or directions. You can be as creative as you want, using as many colors and angles that you have the patience for.

Notes To Think About
Silicon soap molds are great for these sorts of single bars as they pop straight out and leave a flawless finish. Just remember to stand the mold on something solid such as a chopping board or book before pouring the soap, as they can be very difficult to move whilst the soap is still warm and liquidy.
What You Need
This recipe makes around 3 bars. I sometimes like to double the ingredients to get 6.
- 300g White Melt and Pour Soap Base
- 3 Soap Colorings
- Fragrance or Essential Oil
- Soap Mold
- Heatproof jug
How To Make It
Step 1: Prepare the mold by propping it up slightly on a book or any other object that will raise it slightly. You can rise the length or width the choice is yours.

Step 2: Cut 100g of the soap base in to small manageable 1 inch cubes and melt in the microwave using 30 second bursts. The soap can also be melted in a heat proof glass bowl that sits on a saucepan that contains several inches of water. This can then be placed on the stove over a low heat to create a makeshift double boiler.

Step 3: Stir in a few drops of coloring and fragrance/essential oil.

Step 4: working quickly so that the soap doesn’t begin to form a skin, Pour the soap into the raised mold cavities. Give the soap a good blitz with the alcohol to help disburse any bubbles that may have formed. Leave for around 10 to 15 minutes until the poured soap has forms a good thick skin.

Step 5: Melt another 100g of soap base in the same way as you did the first and add your color and fragrance/ essential oil.
Step 6: Turn your mold so that it’s raised in the opposite direction and give it another spritz with the alcohol. This will help the next layer stick to it.
Step 7: Pour the second layer of soap into the mold and blitz with the alcohol. Leave for another 10 to 15 minutes as you did with the first color to form the skin.

Step 8: Melt, color and fragrance the last 100g of soap. Remove the mold from its prop and lay it on a flat surface, and blitz with alcohol.
Step 9: Top the mold up with the remaining melted soap and spritz with the alcohol. Leave to settle for 10 minutes before placing in the refrigerator for 2 to 3 hours.

Step 10: Your 3 colored soap should now be ready to unmold and use. Cover any spare bars in plastic wrap and store in a cool place until needed.


I would like to learn how to make local soaps.
Hi Marriam,
That’s great. Watch this space as we have a soap course coming later this year!
hey
my name is Natisha Lashley. i really want to do soap making full time. i will like all the advice and help i can get.