So you want to become a spy or special agent, catching the bad guys and solving the clues. This probably means you are going to need one or two spy gear gadgets to keep you ahead of the game.
And as spy stuff can be very expensive to buy in the stores you may need to get stuck into making some of it yourself, here’s where we come in. Our homemade spy gear is very efficient and it’s also very easy and fun to make!

Ok so the first thing you are going to need is something to spy with. … Dah!! This is where our homemade periscope going to come in handy.
Making A Periscope For Kids
Any good spy should always check that the coast is clear before entering rooms. So making a periscope could be the perfect idea for your homemade spy kit. It will help make sure you know what’s around the corner and you can even use a periscope to see over fences!

You’ll need:
- Large cereal box or an A4 size or larger piece of cardboard
- 2 mirrors 2” x 2” (5cm x5 cm)
- Glue stick or glue
- Masking tape
- Scissors
- Paint for decoration (Optional)
- Periscope template
Method
- Print off the Periscope template and glue it onto the cardboard. If you are using a cereal box to make your homemade periscope and intend to paint it, then it really doesn’t matter which side you glue the template onto, the main thing here is that the template is well glued down.

- Once the glue has dried carefully cut out the template along the solid lines being careful not to cut off the end flaps.
- Using the ruler as a guide, ask an adult to score down the dotted lines with the craft knife.
- Fold all of the scored lines inwards. Folding over the ruler will help keep the folds straight.
- Fold the periscope over to make a tube, glue and secure with masking tape if needed.
- Glue the flaps at the end of the periscope down.

- Glue and insert a mirror into each opening of the periscope.


- The edges of the periscope can sometimes end up looking a bit untidy in the places where you scored it. You can tidy them up with a little masking tape if you like.

- It’s a good idea to paint your periscope in a neutral color or something that will blend into its surroundings, I will be using mine outdoors so I went with a rich deep green color.
- For the ultimate secret stakeout, you may want to consider camouflaging your periscope with a little of its surroundings.


Good luck on your mission, and I hope you have a successful stakeout!
Building a Homemade Telescope
Need to see a little further? Why not have a go at building a homemade telescope that’s slim enough to slip into a backpack, no problem.
There are many different ways to make your own telescope, but the fundamentals are always going to be relatively similar.

What You Need
To get started you are going to need a few items. Here is a list of the simple items you can put together to create your telescope:
- One Larger Convex lens – this must be smaller than the tube you are going to use, if you can get one that fits the inside perfectly
- One Smaller Concave or convex lens – a convex lens will give you the same view but turn everything upside down
- One long cardboard tube or 2 cardboard tubes in which one fits snugly inside the other – Old wrapping paper tubes are great for this.
- A piece of thick cardboard – one that has the ridged bit in the middle
- Sticky tape
- Craft knife
- Glue
- Colored tape – electrical tape is best as it’s a bit stretchy and more flexible
- Paint – black is the best choice for a telescope as it restricts light
- Stickers – optional

For 1 Cardboard Tube
These first instructions are for anyone who will be using a single cardboard tube. It’s a simple step by step guide to cutting down your tube to the correct size ready for constructing the telescope.
- Cut the cardboard tube in half
- Draw 2 parallel lines about 1/2 inches apart lengthways along one of the tubes, and then cut out the cardboard between the lines. This will be the inner tube.
- Check that the inner tube fits snugly into the second tube but can still slide nicely in and out.
- Now you need to tape the tube back together, the easiest way to do this is to secure the tube at both ends, then around and across the middle with sticky tape.
- As the sticky tape is difficult to paint, cover it (apart from one end) with some colored tape.

Make Your Telescope
- Mark a circle onto the piece of cardboard by drawing around the inner tube.
- Place the small lens onto the center of this circle and draw around this too. You may find this easier to use a ruler and mark out a cross in the larger circle first; this will give you a guide to the most central position to place the lens before drawing around it.

- Using the craft knife, cut the inner circle out of the cardboard, and then cut around the larger circle to remove it.

- If you are using a concave lens the flat side of the lens is the side that should be facing you, the convex lens is also placed with the curved side facing the sky.
- Push the eye lens into the center of the cardboard hole, it should be a good fit and held secularly in place with the cardboard, if you wish to you can add a dab of glue to the inside of the hole before pushing the lens in for extra security.

- Coat the rim of the inner tube with glue and press the cardboard circle that holds the lens onto it. To help it stick, stand the tube up with the cardboard lens facing down and leave to dry.

- Once dry wrap with electrical tape, try to over overlap the edge of the tube with the tape slightly so that it can be pressed around the eyepiece (see picture) this will give extra strength and a nice finish.

- Fitting the large lens to the outer tube; if you have purchased your large lens to fit the outer tube, you should be able to just push it into a good tight position in the end of the tube.

- Once again wrap the end with electrical tape, over overlapping the edge of the tube with the tape slightly, so that it can be pressed around the lens (see picture) otherwise construct using the same procedure as you did with the inner tube and eye lens.

- Paint both the tubes and leave to dry before adding any stickers and placing the inner tube into the outer one.


If you can keep the two lenses the right distance from each other, keep them parallel, and maintain a good line of sight, your new homemade telescope will be the perfect fit for you, your children, or a classroom full of eager young astronomers.
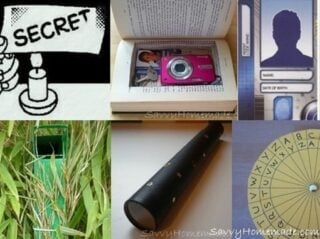
Making A Cipher Wheel
Every spy needs a secret way to exchange messages with other agents from time to time. Making a cipher wheel is an excellent addition to your homemade spy gear and a great way to keep the content of any top secret letter safe.
This clever little wheel can be used to encrypt and decrypt any code you like, keeping those messages away from prying eyes.

Materials
(You will need to make a cipher wheel for each agent)
- Card
- Glue stick
- Pen or pencil
- Paper fastener (split pin)
- Scissors
- This cipher wheel template
How To Make A Cipher Wheel
- Print off the homemade cipher wheel template, then carefully cut the wheels out and glue them onto the card with the glue stick.
- Write the alphabet in the outer boxes of both the small and large wheel.

- Use a sharp pencil to punch a hole through the center of both wheels. Push the paper fastener (split pin) through the small wheel and then through the larger wheel, open the split pin at the back so that the wheels are fastened together.


How To Use Your Cipher Wheel
First, place the wheels so that the A on both wheels are pointing up. Now choose two letters (one from each wheel) these will be your secret letters and need to be remembered by yourself and the recipient of the notes you will be sending.

I’ve chosen the letters C for the outer wheel and A for the inner wheel (which are the first letter in my two pets names).
You will notice in the photo that when I move these two letters together the letters no longer match around the wheels. So now A=C B=D C=E and so on, as you and your acquaintances are the only ones that know what each letter stands far you will now be able to sent endless messages to each other without anyone else being able to reading them!

Have a go at decoding these messages:
VQR UGETGV
HQT AQWT GAGU QPNA
OGGV OG CT OKFPKIJV
YGCT C TGF JCV
Hiding Your Secret message

You may need to leave a message outside for another agent to find at a later time or day. This may be tricky especially when it’s raining. Hiding a message in one of those plastic toy capsules are great for keeping it dry and can be hidden quite well in a bit of long grass or dirt.

Please remember that this information on how to make your own cipher wheel is top secret and should not be shared with others!
Making a Spy ID Card
There may be times when you will need a fake id card so that you will be able to glide unnoticed into prohibited areas. You may need a few of these homemade spy ID cards with different names and disguises so feel free to print out as many as you need.

Here’s what you will need
- This Spy id card template
- Card board (I’ve used an old cereal box)
- Photo
- Scissors
- Glue stick
- Clear tape
- Pen
Method
- Print out the spy id card template, then cut it down enough to glue it onto the cardboard.

- Once dry, cut the two pieces of the ID card out.

- Glue the two pieces together (wrong sides together).

- Cut your photo to size, and glue it on to the ID card.

- Fill in your name, date of birth, and code name in the spaces provided, and then cover the card with clear tape.


Keep your spy id card safe with the rest of your homemade spy gear!
Making a Book Safe
Spy kids need somewhere to hide their treasures. There’s no better place to hide things out of plain sight than in a book safe. Nobody would ever think of looking inside a book on your bookshelf for your important things, so a book could be the ideal safe.

What You Will Need
Before you start making a book safe you’ll need to find a, thick book with a hard cover.
There are plenty of old books in thrift shops that nobody would mind if you cut out to make your safe, or you can ask a relative if they have something that might suit what you need.
I will be using a book that’s around about 1 1/4 inches thick and has 480 pages.

How To Make A Book Safe
- Open the book to page 60 or 1/8 of the book depending on how many pages your book has. Lay the cover flat onto a second book, this will help to support and keep the book flat whilst working on it.
- Use a pencil and a ruler to draw a line along the side of the page about an inch away from the edge. Draw another line along the top of the page, also about an inch away from the edge, and another one along the bottom. Complete your rectangle with another line about a 1/2 to 1 inch away from where the page is bound into the cover.
- Important: Ask an adult to help you cut deeply along the edges of your rectangle so the knife goes through several pages at a time. You can remove as many pages as you need, I normally leave 1/8 (60 in my case) of the pages uncut at the end of the book, but as long as you keep the rectangle to about 1 inch deep then you’ll be able to store your items inside the book while it’s closed and nobody will think to open the book to find your things.
- It’s a good idea to place some of the pages you have just removed from the book, in between the final page of the book you will be cutting and pages you do not wish to cut to protect them.


Now place all of your homemade spy gear in your book safe.
Up next is how to make your own musical instruments!