

In my last post, I shared how to make a natural organic mascara, but today we’re taking it a step further. If you’re looking for a homemade mascara that rivals your favorite store-bought brand in both volume and staying power, you’re in the right place.
This recipe isn’t my simplest project, but it’s absolutely worth the effort. The result is a rich, smooth mascara that lengthens, defines, and conditions your lashes while lasting all day without smudging or the need for reapplication. A little extra effort for a truly professional finish!
Watch It Being Made
Two DIY Mascara Recipes
If you would like to try a more natural product with fewer ingredients, then head to our basic mascara page. Otherwise, if you’re looking for something that holds up like you’re used to, then most definitely keep reading.
So, as I just said, this craft is a little complicated, so let’s demystify some of our ingredients and the processes we’ll be using to make this gorgeous, long lasting mascara.
The Base

This needs to be made a couple of hours in advance so that it has time to cool and harden. You will only need 6g of this to make the mascara.
The recipe I’ve given for the base makes just over 55g which is enough base to add to around 9 mascara tubes. Obviously, you are probably not going to want to make 9 tubes in one go, I usually make it up and store it, so that it’s ready for the next time I want to make a new mascara.
Sweet almond oil is packed full of vitamin A and E which makes it a great product to use for lash health. It is also a well-priced oil so will keep the cost of your mascara down. If you have an allergy to nuts or If you do not have any sweet almond oil then you can use Jojoba or argan oil as a substitute.
This recipe contains beeswax and carnauba wax, which makes the mascara nourishing and hydrating which can promote lash growth. The beeswax will also help to relieve any irritation around your eyes.
Carnauba wax is a natural wax that’s devised from the leaves of Brazilian palm trees. It’s a hard wax with a high melting point. It’s commonly found in cosmetics, especially lips due to its glossy surface finish.
Phase 1

Ceteareth and Stearic acid are both types of emulsifying waxes. This is what will bind the base with all our other ingredients.
Once you’ve melted the phase 1 ingredient it will start to harden again within a few minutes of it being melted, so make sure you get it straight into the water before this happens.
If the waxes do start to harden, you can re-eat them in the microwave. I just try to avoid this as I feel constantly reheating the oils and waxes can lower their qualities.
Phase 2

The glycerine and D-panthenol give the mascara some well-needed glide and will moisturize and condition the lashes. D-panthenol (pro vitamin B) comes in a power or liquid form. For this recipe, I’m using the liquid form which is heat sensitive. This is one of the main reasons why I’m only warming phase 2 ingredients slightly in the pre-boiled water rather than the microwave. Overheating will cause the mascara to separate.
Aloe vera gel is great for sensitive eyes. It usually comes with a preservative already added to it but you will need to check that the one you are using does contain one as you don’t want to leave the mascara open to bacteria.
If you are at all unsure or would like the mascara to last, then I suggest you include your own preservative with the phase 2 ingredients. 0.5 percent should be plenty which is about 0.22g. This will also give the finished product a year’s self-life, without it you are only looking at a couple of months max.
Phase 3

Rice powder is a natural product that gives the mascara its excellent lengthening and thickening ability.
I’m using only black oxide for the color as I wanted a jet black coloring. If you want something a bit more striking, you could add ½ a tsp of mica, blue, green, or purple all look great.

As an Amazon Associate, I earn from qualifying purchases. If you buy via the links here I may earn a small affiliate commission at no cost to you, please read my affiliate disclosure.
Ingredients
Equipment
Method
- 25 grams Sweet Almond Oil, 15 grams Carnauba Wax, 10 grams Beeswax, 7.5 grams Stearic Acid, 1 grams Vitamin E OilPlace all of the base ingredients into a heat-proof container, and heat until melted in a microwave. Once melted, pour the base into a suitable container to cool and harden. The base can be kept ready for use and should last for a good year or two.

- 6 grams Base, 1.2 grams Ceteareth, 0.75 grams Stearic AcidNext weigh out your phase 1 ingredients into a heatproof container and set aside.
- 30 grams Aloe Vera Gel, 2.5 grams Glycerine, 10 drops Liquid D-PanthenolWeigh out your phase 2 ingredients into a separate heat-proof container.
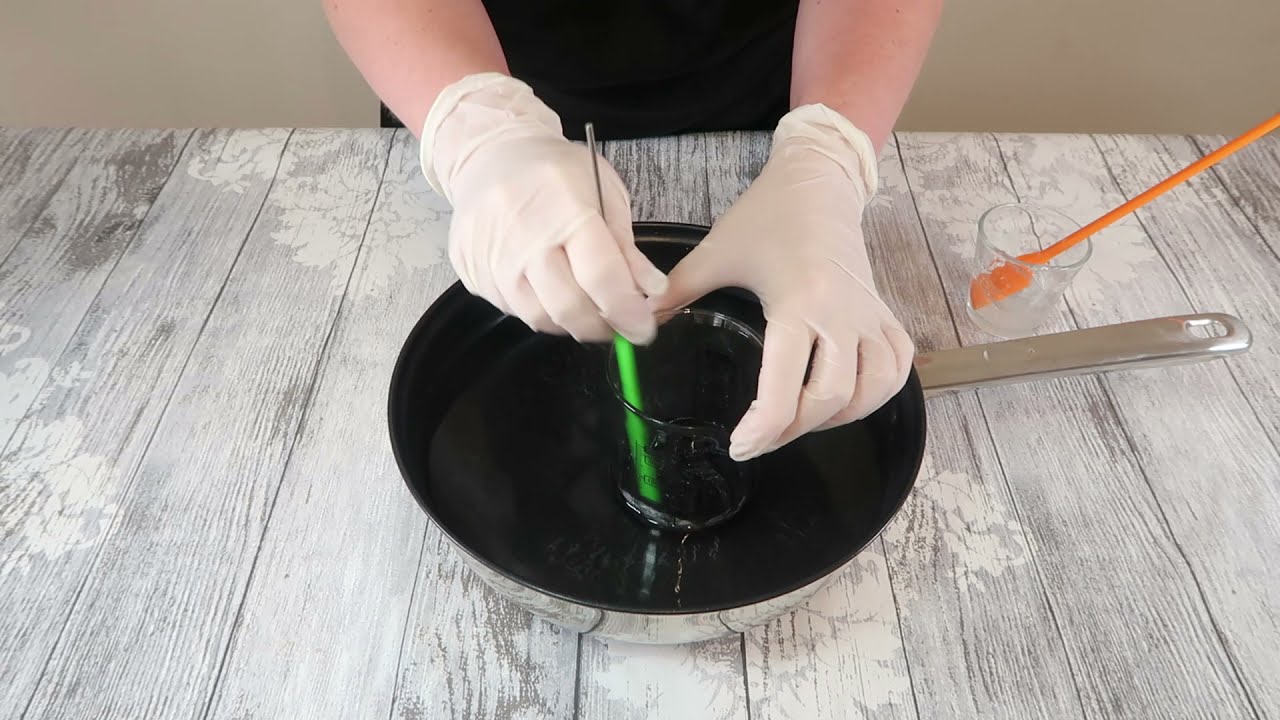
- Melt your phase 1 ingredients in the microwave. Meanwhile, place your container with the phase 2 ingredients into a pan that you've filled with just-boiled water. Once your phase 1 ingredients are fully melted, place that container into the pan alongside your phase 2.
- 2.6 grams Rice Powder, 1 tsp Black OxideLeave your container in the pan and set it aside whilst you weigh out your phase 3 ingredients.
- Add your phase 3 ingredients to your phase 1 ingredients and mix well.
- Next add in your phase 2 ingredients and stir well. The mascara should now be a good thick consistency so that it clings well to the lashes.
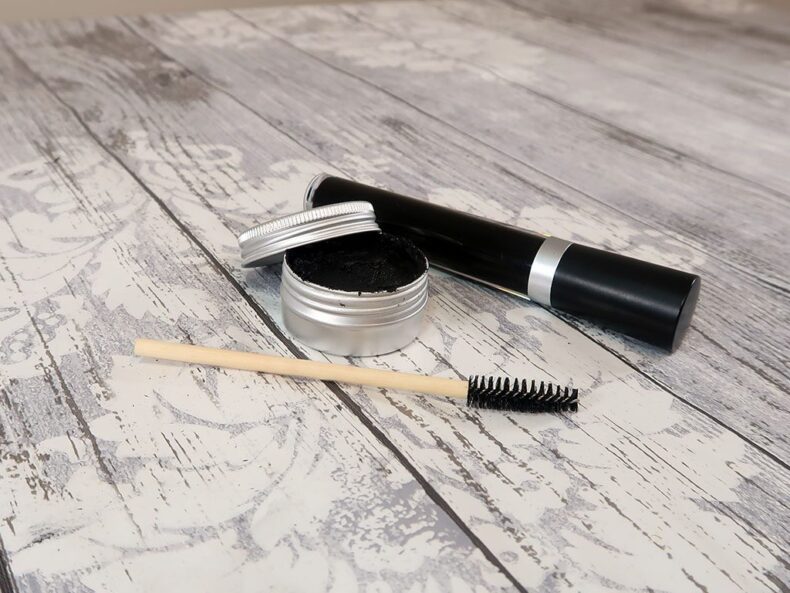
- 1 Mascara TubeNow it's time to get the mixture into your mascara tube. This isn’t easy and we did struggle to get it all in using a syringe, and so we changed to spooning it in with a thin stirrer towards the end.
- Once you have filled your tube ¾ of the way, place the stopper on the bottle and then the applicator lid.


New to DIY skincare?
If you’re enjoying making your own products, you might like Radiance, my free email course where I teach the foundations of DIY skincare step by step!How To Use
Applying one layer to the lashes will give a soft, natural look. But for fuller, longer looking lashes, add another two layers. Always allow the mascara to dry between each application, no matter how much or how little you’re applying.
For a more youthful look, try applying the mascara to only the upper lashes, then use an eye pencil on the lash line under the lower lashes.
Make-up, for many of us, is such a personal thing. If there’s a certain way you like to apply your mascara, you shouldn’t have any problems with this product. It also goes without saying, treat this product with as much care as you would with any mascara, and take any appropriate precautions.
Final Thoughts
I am in love with this DIY mascara! When I first made my organic version of this beloved makeup, I wasn’t blown away by it. Don’t get me wrong, for how easy it was to make and how natural it is, it’s a fantastic product. But I knew I had to push myself a little to come up with a better recipe. I most definitely succeeded.
So far, nobody has even noticed that my mascara isn’t store-bought. While this might not seem like a good thing. After all, we all want our hard work recognized. But when it comes to DIY make up, you really don’t want it to look ‘DIY’, you know?
This stuff slips under the radar, because it just looks so professional.
If a good quality, homemade mascara is what you’re looking for, then this absolutely is the recipe you need. You won’t be let down if you give it a try, and when you do let me know how you get on in the comments section below. I’m also here to answer any questions should you have them.
That’s all I have for you today. If you like the look of this recipe, why not sign up to our newsletter . Its the best way to find out about all of our most recent recipes, as well as some exclusive offers from time to time. You can also check us out on Facebook, Instagram, YouTube, Pinterest, and Twitter!


Hi! Do you think if I use kaolin or bentonite or some kind clay instead of rice powder that would work? I am having some trouble finding rice powder, but i have a lot of clays at home already… Please let me know! Looking forward to trying your recipe ! <3
Hi Lucy. I actually don’t know! You could for sure try it, but there is the risk of wasting ingredients here. Have you tried looking for rice powder online?
Hello!Can I use a black tea instead for black oxide and beeswax only without carnauba wax?
Hi Rena. No ~I don’t think black tea would work well as a pigment here. And I also wouldn’t play around with eh formula for this recipe in general as it’s very sensitive.
I’m wondering if phase 1 ingredients can be melted in a double boiler rather than microwave. We don’t have a microwave.
Also, can phase 1 ingredients be stored hardened like that for a while? Like, months? Years?
Hi Alex,
Not sure about this one, as I haven’t tried it. While there isn’t anything in it that could encourage microbial growth, it is possible for your ingredients to become rancid/oxidised over time. So, I’d say be careful how long you keep it for.
Hi Alex,
A double boiler should work fine. I use the microwave method here only because it’s much faster. Hope this helps!
I have a question – is there a substitute for the beeswax? I’m allergic to anything bee-related, so I’ve been trying to figure out a softer wax that could work instead. Maybe a little more carnauba wax and I put in an oil instead to help it stay softer?
I’d love to hear your suggestions! Thank you 🙂
Hi Tasha,
You’re definitely on the right track. I haven’t found a great like for like substitute for beeswax, so I basically do what you’ve just said (swap out for carnauba or candelilla, then up the liquid oil). The only problem I have with this is that it requires a little experimentation.
So I would suggest doing what you’ve said and see what happens. You might need to run a few experiments, tweaking each time. Make sure to decrease the batch size so you don’t waste too much of your ingredients.
Hope this helps!
This is a great mascara but I used activated charcoal instead of oxide. I also pit the mascara into a zip lock bag once it was fully mixed and cut a tiny hole in one corner….then put that tiny ziplock tip into the mascara holder/bottle and squeezed – taa-daa it went into the mascara holder/bottle with ease (and no mess). I put the little plug thingy into the mascara bottle and my mascara wand and it works perfectly. Thanks for the great recipe Angela!!
Wow that’s actually genius! I’m going to try this next time I whip this bad boy up. Thank you so much for sharing this with me, much appreciated.
Wow smth new, didn’t try it. Is it comfortable close to the eyelids? Used to experiment with homemade serums and mascaras but only when my favorite nourishing Cherish mascara is over. )) It is very nourishing and hypoalergenic too. Thanks great page
Hi Juli,
Honestly, it feels exactly like a store bought mascara. So if you usually feel a little irritation with your regular mascara, you might feel some with this recipe also.
Hi! I want to know if I can change the Ceteareth for anything else? (:
It looks like a really good formula, I have everything but the Ceteareth to try it 😛
Hi Sandra,
Unfortunately I don’t have a great substitute for this recipe. It’s the only thing I’ve found that works. Many apologies. You could try my other mascara recipe which doesn’t contain this ingredient. I will be honest, though, it’s nowhere near as good as this recipe.