
If you’ve ever looked on the label of a store bought hand cream and thought, what on earth are all those ingredients? you are not on your own! That’s exactly what started my DIY hand cream journey.
And honestly, I’ve never looked back, I love making my own skincare products at home.
The simple beginner friendly hand cream recipe I’m sharing today creates a silky, nourishing cream that melts into the skin without feeling too greasy. It’s perfect for dry hands (especially if you garden, wash up, or craft as much as I do). Plus, it’s natural, affordable and endlessly customizable.
About My DIY Hand Cream Recipe
Although I’m giving specific ingredients you can substitute any of the following, choose your own or pick from the recommendations below the recipe. Making substitutes will often change the consistency of the finished product. We usually make a small batch and tweak it, if its too thin add a little more wax to thick, then add a little less.

Why Make My Own Hand Cream?
Let’s be real here, store-bought hand creams can be lovely… but also pricey. And most are packed with silicones, synthetic fragrances, and stabilizers that don’t actually nourish your skin at all.
Making your own means you know exactly what’s in it. But it’s not just about purity. It’s about control.
You can tailor everything in this recipe and choose oils that suit your own skin. For example. If you want something rich and protective, go for cocoa butter. If you prefer something lighter, select mango butter. The flexibility of this diy hand moisturizer recipe is what makes it such a great gift idea.
Plus, a jar of homemade hand lotion will cost you just a fraction of what you’d spend on the high street. And it honestly feels so good to say that you made this yourself.
Ingredient Spotlight

Let’s talk about what makes this cream work so beautifully. Every ingredient has a job to do.
Sweet Almond Oil
This oil is a classic for good reason. It’s light, vitamin-rich, and sinks into the skin quickly, without leaving that sticky residue behind. It softens rough hands and helps restore moisture after all those daily washings. If you don’t have almond oil, apricot kernel or sunflower oil make great stand-ins.
Cocoa Butter
This butter is super creamy and deeply protective. Cocoa butter forms a barrier that locks in moisture which is perfect if your hands have become cracked or chapped. You can swap this for shea or mango butter if you prefer a lighter finish. (I sometimes blend half cocoa and half shea butter for a happy medium.)
Ritamulse SCG (Emulsifying Wax)
This is what lets oil and water mix into a stable cream instead of separating. It’s plant-derived and gives a silky, non-greasy texture. If you can’t find it, Olive M1000 or Emulsifying Wax NF both work, just know they’ll slightly change the thickness and feel.
Glycerin
The unsung hero of any moisturizing recipe. It draws water into the skin, keeping it soft and hydrated for longer. It’s especially great for dry climates or those of us who are constantly washing our hands.
Preservative (Geogard ECT)
Anytime there’s water in a formula, a preservative is non-negotiable. Otherwise, microbes will start throwing a party in your jar within days. Geogard ECT is a natural, broad-spectrum preservative that works beautifully here.
Essential Oils (Optional)
I love using lavender for its calm, floral scent, but you could choose sweet orange or rose geranium. But make sure you keep it under 1% total so that the recipe is safe for your skin. If you’d rather go fragrance-free, that’s perfectly fine too.
Tips and Mistakes to Avoid
- Don’t skip the preservative. Even if you plan to keep it in the fridge, bacteria can grow shockingly fast in water-based products.
- Use distilled water, not tap. Tap water can introduce minerals or contaminants that shorten shelf life.
- Be patient when cooling. Adding your preservative while the cream is still too warm can deactivate it.
- If it separates? It likely cooled too quickly or wasn’t blended enough. Gently reheat and stir to rescue it.
- Label your jar. Include the date made, you’ll thank yourself later.
Watch The Video

As an Amazon Associate, I earn from qualifying purchases. If you buy via the links here I may earn a small affiliate commission at no cost to you, please read my affiliate disclosure.
Ingredients
Equipment
Method
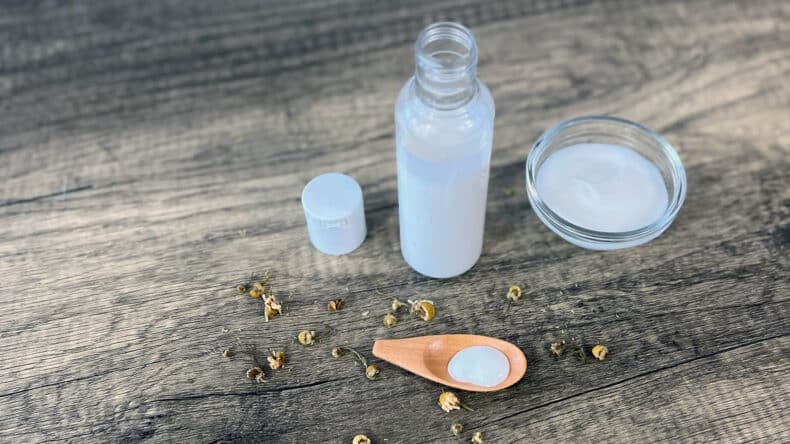
- 68 grams Distilled WaterWeigh the distilled water into a heat safe beaker.

- 5 grams Glycerine, 0.25 grams Xanthan GumWeigh the glycerin into a separate beaker, and add the xanthan gum. Stir to create a slurry before adding to the distilled water.


- 5 grams Cocoa Butter, 5 grams Sweet Almond Oil, 11 grams Ritamulse SCGIn a separate heat safe beaker, weigh the cocoa butter, emulsifying wax and the almond oil. Stir to combine.
- Place both of the beakers into a water bath. A water bath is made by adding a couple of inches of water into a shallow sauce pan, place the sauce pan onto a low heat and bring it to a low simmer, place the beakers in to the sauce pan and wait for the wax, oil and butter to melt and the water/ glycerin to heat through.
- Once the oils have melted remove both of the beakers from the water and pour the water into the oils.
- Use a spatula or mini mixer to blend the water and oil phases together. Stir briskly for the first few minutes, then continue stirring more slowly until the cream begins to cool and thicken.


- 1 gram Preservative, 0.75 drops Roman Chamomile Essential OilOnce the cream has cooled to below 40c (104f) we can add the cooldown ingredients, the preservative and essential oil, stir well to make sure they have been fully disbursed within the cream.
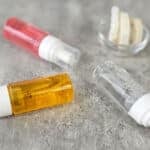
- 1 4 oz PET Plastic BottleTransfer the cream into a suitable container, label with a name and date. As some emulsifying waxes can take a few hours to fully thicken, I usually give the cream 24 hours before using.


Notes
- Vitamin E for healing.
- Extract like calendula or seaweed can take the cream to the next level.
- Use a hydrosol (flower water) rather plain distilled water.
New to DIY skincare?
If you’re enjoying making your own products, you might like Radiance, my free email course where I teach the foundations of DIY skincare step by step!Hand Lotion Substitutions and Variations
Once you get comfortable, this basic DIY hand cream becomes a template you can reinvent over and over.
So as I said, although we have given specific ingredients you can substitute any of the following, choose your own or pick from the recommendations below. Making substitutes will often change the consistency of the finished product. We usually make a small batch and tweak it, if it’s too thin add a little more wax to thicken, then add a little less.
Carrier oils

you could use any carrier oil you have to hand. The oils i’ve below are great choices due to their absorption and moisturizing benefits for the hands, affordability and easy to obtain.
Choose your Oils you could use one individual oil or a mix of two: Sweet Almond , Apricot kernel, Olive, Sunflower, Jojoba, Grapeseed.
- Sweet Almond Oil – This is a nourishing, vitamin-rich oil that softens rough hands and helps restore moisture.
- Apricot Kernel Oil – A lightweight oil thats easily absorbed, leaving your hands silky without a greasy feel.
- Olive Oil – DA deeply conditioning and protective oil, ideal for soothing dry or chapped skin.
- Sunflower Oil – This is rich in vitamin E and linoleic acid, helping to strengthen the skin barrier and lock in hydration.
- Jojoba Oil – This oil helps balance natural sebum and creates a smooth, protective layer that prevents moisture loss.
- Grapeseed Oil – A light quick-absorbing oil high in antioxidants, helping to tone and soften skin.
Cosmetic Butter

Once again you can choose any butter you have to hand. This may change the texture slightly but the cream should still be good.
Choose your butter: Cocoa, Shea, Mango, Kokum.
- Cocoa Butter – Is rich and protective, it forms a barrier that seals in moisture and smooths rough, dry hands.
- Shea Butter -Is deeply nourishing and restorative, helping to soothe irritation and improve skin elasticity.
- Mango Butter – Is light and non-greasy, providing softness and hydration without heaviness.
- Kokum Butter – Is firm and conditioning, it absorbs well while helping to rejuvenate and protect cracked or overworked skin.
Emulsifying Wax
This can make a difference to the finished product as some are natural and some are not. Some need xanthan gum to thicken or stabilize the finished product and some do not, we found that most of the natural emulsifying waxes often need this. They also add to the feel of the finished cream, each bringing its own quality.
Choose your emulsifying wax: Ritamulse SCG, Olive M1000, NF, Pola Wax, BTMS 25.
Natural emulsifying waxes
- Ritamulse SCG (also known as ECOMulse / Glyceryl Stearate SE + Cetearyl Alcohol + Sodium Stearoyl Lactylate): Creates stable, creamy emulsions with a light, natural feel and good skin compatibility. The xanthan gum, although not completely necessary, adds a little thickening here.
- Olive M1000 (Cetearyl Olivate & Sorbitan Olivate): Gives a rich yet elegant texture that mimics the skin’s natural lipid barrier for long-lasting moisture. Needs xanthan gum for thickening and stability.

Synthetic-derived, though safe and widely used
- Emulsifying Wax NF: A classic, reliable emulsifier producing thick, stable creams with a velvety finish. Easy to get hold of and easy to use. A stand alone emulsifier that doesn’t need a gum to thicken or stabilize.
- Polawax (Cetearyl Alcohol & PEG-20 Stearate): Easy to use and very stable; gives a smooth, consistent texture in rich creams. One of the easiest to use waxes on the market. Suitable to use without the gum.
- BTMS-25 (Behentrimonium Methosulfate & Cetearyl Alcohol): Conditions and softens the skin, leaving a silky, powdery feel (often used in lotions and hair products). A stand alone emulsifying wax, no need for the xanthan gum here. This makes a slightly thicker cream. Suitable for a jar.
Preservatives
This cream contains water wherever there’s water, microbes can grow. Even the cleanest-looking cream can become a perfect breeding ground for bacteria, yeast, and mold within a few days or weeks.
Once again you can choose your own. I’ve given a few easy to use ones here. A couple of natural preservatives and some well known synthetics. We have used Geogard ECT as we are making a natural cream.
Choose your preservative: Geogard ECT, Saliguard BDHA, Liquid Germall Plus, Euxyl PE 9010
Natural preservatives
Geogard ECT (also sold as Preservative Eco) we have used this one
- INCI: Benzyl Alcohol, Salicylic Acid, Glycerin, Sorbic Acid.
- Use 1.0 % in this cream.
- Broad-spectrum and plant-derived; mild almond-like scent; very popular in natural creams and lotions.
Saliguard BDHA
- INCI: Benzyl Alcohol, Dehydroacetic Acid.
- Use 1 % in this recipe.
- It’s a reliable, simple broad-spectrum system.
Synthetic preservatives
Liquid Germall Plus
- NCI: Diazolidinyl Urea, Iodopropynyl Butylcarbamate.
- Use 0.5 % in this recipe.
- Very effective at tiny percentages; stable across formulas; excellent for beginners.
Euxyl PE 9010
- INCI: Phenoxyethanol, Ethylhexylglycerin.
- Use 1% in this recipe.
- No pH fuss, broad-spectrum, clear liquid, minimal odour, just stir it in at the end.
Essential oil or fragrance
We will be sticking with natural so essential oils are our go to. You can use any fragrance oil you wish as long as you are happy with it not being a natural product.
You can use any but it needs to be kept within its dermal limits all of the essential oils we have suggested can be used up to 1 % in a hand cream recipe. you can use less or none at all if you prefer something less aromatic.
Choose your essential oil: Lavender, Sweet Orange, Rose Geranium, Roman Chamomile.
- Lavender Essential Oil – Calming and soothing, it helps relax the senses while gently supporting skin healing and repair.
- Sweet Orange Essential Oil – Bright and uplifting, it adds a cheerful scent and helps refresh dull, tired skin.
- Rose Geranium Essential Oil – Balancing and floral, it helps regulate oil production and promotes soft, smooth hands.
- Roman Chamomile Essential Oil – Gentle and comforting, it’s ideal for sensitive or irritated skin, easing redness and dryness.
Troubleshooting
Every now and then, something goes a little sideways. (Ask me about the time my cream turned into a slippery soup because I got impatient and poured the phases together too soon. It happens.)
- If your mixture separates, reheat gently and whisk until smooth.
- If it’s too thick, reduce your butter or wax slightly next time.
- If it’s too thin, a touch more emulsifier or a pinch of xanthan gum helps stabilize it.
The beauty of DIY is that it’s forgiving and you can tweak and learn as you go.
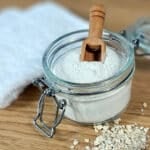
Storage and Shelf Life
Because this homemade hand cream contains water you need to store it in a clean jar or a pump bottle. And use it within three months. Keeping it in a cool, dry place also helps extend its freshness.
If you notice any changes in its smell, color, or texture, throw it and make a new batch. But honestly, mine never lasts that long because I go through it fast!
How to Use It
Scoop or pump a small amount and massage it into your hands after washing or whenever they feel dry. I like to keep a jar by the kitchen sink and another on my nightstand.
It’s rich enough for winter, yet light enough to use year-round. And because it’s natural, it won’t leave that heavy film some store-bought creams do.
Scaling and Cost Notes
Once you understand the percentages behind the formula (check the recipe for details), scaling up or down is simple. That’s the joy of working by weight.
A small batch costs just a few pounds or dollars, depending on the oils and butters you choose. And because most ingredients come in bulk, you’ll have enough for many future batches, or thoughtful homemade gifts.
Final Thoughts
Making your own DIY hand cream is one of those truly satisfying projects that feels both creative and practical. You end up with something luxurious that’s tailored to your skin and free from unwanted chemicals.
If this hand cream recipe sparks your curiosity, then you will also love experimenting with other emulsion recipes such as face creams and lotions. That’s actually what led me to create my first full course on natural skincare, where we dive deep into formulating your own recipes at home, from scratch.
But for now, grab your heat proof beakers and choose your favorite essential oil. Before long, you’ll have your own jar of silky goodness that your hands will thank you for.

Lovely Recipe, thanks 😉
Hi Angela!
Is there anything I can substitute for the Allentoin Powder or just leave it out since I don’t have it?
Thank you, Lynn
Hello Lynn,
I would just leave the allantoin out.
Best wishes,
Angela x
Hi Angela,
Thanks for your generosity and helping me to understand my products better.
Quick question can Candelilla wax be substituted for the Calendula wax.
It can be, but you’ll need to experiment to get the right texture. Try a small batch, swapping the waxes like for like. If you find it too stiff, lower the percentage of wax by 1-2%. Then make another small batch to see. You can do the reverse if the mixture is too lose once it sets in the pot.
I was reading about Allantoin and in a lab it’s made from animal urine. Do you use the synthetic or natural kind of product? Thank you…
Hi, we don’t use anything that would contain animal urine. The allantoin I use is synthetic, however, it is a naturally occurring compound and there is virtually no difference between the two besides how they came into being.
I’m looking forward to making this. Thank you for sharing 🙂 I would like to be able to add some Urea for extra skin moisturising/healing as I have very dry cracked skin that flared up with all the extra handwashing and sanitising of late. Would I just add say 10% to the cooldown phase, and use less hydrosol? Thanks in advance for your advice 🙂
Hi Pat,
You could add it at cooldown, however with as much as 10% you might find it easier to put it into the water part and allow it to dillute into the hydrosol. While there is some discussion going on about it’s heat sensitivity, there’s been no clear cut research yet.
Othewise, if you try to add it at cooldown, there’s a good chance you’ll have problems with seperation (unless you’re happy to take it down to about 5%). And yes, swap out some hydrosol for this. Or you could lower both the glycerine and hydrosol to compensate. You’ll find this sort of thing can be a bit trial and error. Hope this helps.
Angela thank you so much! I really appreciate your help. I’m going to make this today I can’t wait! 💖💖
Amazing hand cream! I’ve made salves and balms aplenty but this was my first go at a proper cream with the aqueous phase. It came out so well I immediately made a second batch! My kids, my lumberjack husband and my medical chums are all delighted with the improvements in their sore chapped hands. I’ll be trying the eczema cream next! Thank you so much for sharing this.
Hi Alison,
That’s amazing! I’m so glad it worked out. Emulsions can sometimes be tricky, but looks like you’re off to wonderful start! Let me know how you get on with the eczema formula, you’ll have a great time I’m sure!
I just tried this recipe and absolutely love it. Thank you so much for sharing!!! Love your site!
Best Wishes for a Happy Easter.
Rhonda
Hi Angela, firstly thank you so much for sharing all your experience and recipes. I’m just starting in this world having been making candles, wax melts and air fresheners for years. I am so looking forward to trying this hand cream recipe as I too am a nurse struggling with sore, cracked hands. I’m also wanting to make some for colleagues/friends but I know a few of them don’t like Lavender can I substitute this for any other hydrasol and essential oil. Thanks in advance for your help
Absolutely!
I’d try substituting it for chamomile hydrosol and essential oil. It doesn’t have quite a strong scent like Lavender, but would be wonderful for soothing sore and cracked dry skin.
Thanks so much for your reply. Can’t wait to get going with this. Loving reading your recipes and exploring the website.
Hi Angela! I am new to making lotions and was excited to try your hand cream. I followed you instructions and used a digital scale for precise measurements. My substitutions were: I used distilled water instead of hydrosol, olive oil instead of wheat germ oil, mango butter instead of cocoa butter and left out the Allantoin powder. But my cream is very runny. Is there something I need to use to make it thicker? I noticed some recipes call for whipping the ingredients with a stick blender – would that make a difference? Thanks for the great recipes!
Hi Kritis,
In this instance, I doubt whipping will help. The thickness comes from the amount of e-wax. So, I would try adding a little more. Perhaps a gram or so more and see if the consistency changes. Sometimes this can happen when you substitute things. But it’s a good skill to have, so I applaud you for your efforts. Let me know how you get on here in the comments.
Thanks Angela, Actually I meant to let you know that I tried it again this weekend. I figured I must have SOMETHING wrong. I also wanted to add a preservative since I was giving as gifts. And it worked fine this time! Its good to know that the e-wax is what the thickness comes from though. I made a batch of 8 hand creams and I am anxious to give them at Christmas.
I also wanted to mention that I love the feature you have when you choose to ‘print’ the recipe, where you can select the yield, and the site automatically adjusts the quantity of all products used, accordingly. Love that!
Thanks so much for the site!
Kristi
Hi Angela,
Thank you for this recipe – I’m a healthcare worker and I so need this in my life right now. could you please suggest the type of preservatives I should use with this recipe?
Thank you.
Hi Tyna,
I’m sure you could! I know I have been washing mine like crazy, so I can’t imagine what your poor hands are going through. Take a look at my guide to preservatives, it should help you out. Although, for quick reference, I like to use Preservative Eco (Geogard ECT) as it’s accepted in natural skincare. However, if that doesn’t bother you too much the most popular preservative for emulsions is likely to be Germaben. It’s totally up to you though.
Hi, Angela
Can I use mango butter instead of shea and cocoa butter? The quantity will still remain 12 g?
Hi there,
Yes, you absolutely can and 12g should be fine. Mango butter is actually quite amazing and you should have some lovely hand cream. Have fun!
Thank you for the answer! 😘