If you’ve been hunting for a simple DIY cuticle oil that actually helps your nails look healthy, you’re in the right place. I’ve made this exact blend more times than I can count, and every single time I’m reminded how fast and satisfying it is.
It smells bright and cheerful, sinks in quickly, and makes my battered cuticles look like I take far better care of them than I sometimes do. We’ll talk ingredients, how to put it together, smart swaps, and everything else you need so you can mix your own at home and smile at your hands again.
And yes, we’ll keep it real about the basics too. A pared-back homemade cuticle oil recipe with one or two pantry oils still beats nothing. But if you want something that feels store worthy and giftable, this recipe hits the sweet spot.
At a glance
- What you’ll make: a water-free nail and cuticle oil that absorbs quickly and leaves a soft sheen, not a greasy mess.
- Difficulty: beginner friendly, truly.
- Hands-on time: just a few minutes from measuring to bottling.
- Who it suits: dry, cracked, over-washed hands; anyone whose nails peel, split, or grow slowly.
- Quick safety nudge: this is an anhydrous blend, so no preservative is required; I still include an antioxidant and recommend a quick patch test, especially with citrus essential oils.
- Ready when: immediately, no cure or set time needed.
- Recipe card: scroll to the card below for exact quantities and the step-by-step.
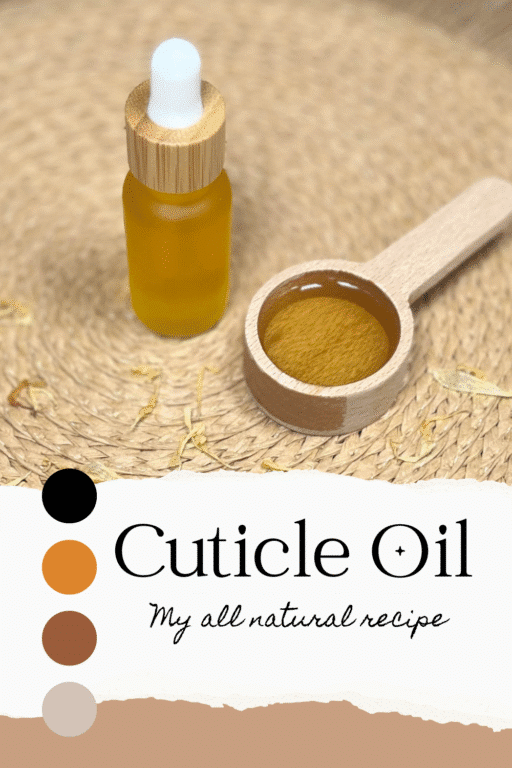
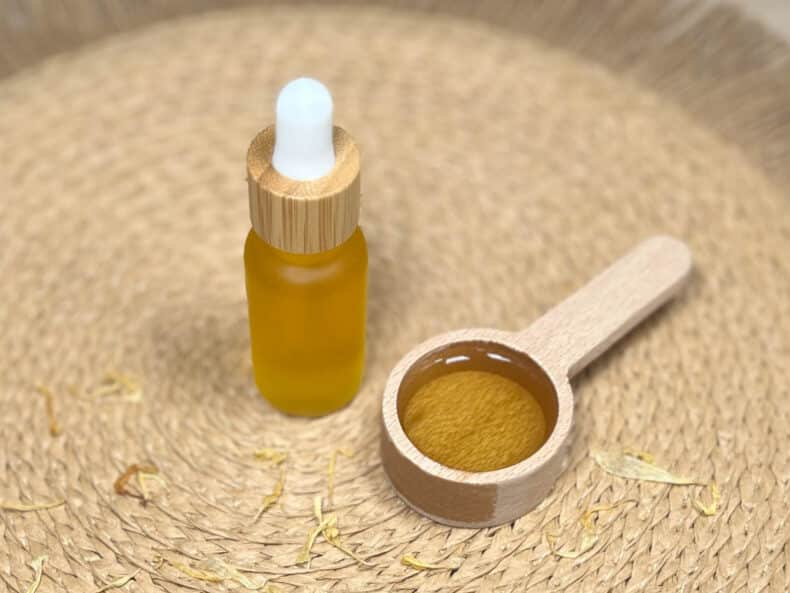
I mixed this DIY cuticle oil recipe with a precision scale, a little beaker, and a tiny funnel. It filled a couple of small dropper bottles, which means one lives by my sink and the other gets tossed in my bag. Perfect.
Ingredient spotlight

You don’t need a dozen fancy oils to make a fabulous DIY cuticle oil, though I do like a well-rounded blend. Here are the heroes I reach for, plus easy substitutions if your cupboard looks different today.
Jojoba oil
Jojoba is technically a liquid wax ester, which is one reason it feels so close to our skin’s natural sebum. That skin-affinity is magic for cuticles, helping soften hangnails and reduce that rough, snaggy edge that catches on sweaters. It also slows moisture loss without feeling heavy.
Swap: if you’re out, use olive or sunflower oil and keep going. Your cuticles will still say thank you.
Grapeseed oil
Lightweight and quick to absorb, grapeseed disappears fast, which is exactly what I want in a daytime nail oil. It brings antioxidant content and a silky slip that makes massage around the nail bed a breeze.
Swap: safflower or rice bran oil are similar in feel. If you tend to be sensitive, patch test as always.
Argan oil
The “conditioning” pick. Argan gives the blend a plush feel and helps with brittle nails that like to peel in layers. I especially notice fewer splits after a week of nightly use.
Swap: try sweet almond for another softening, well-tolerated option.
Vitamin E (tocopherol)
I always include an antioxidant in oil-only formulas. Vitamin E helps slow rancidity, and it pulls double duty as a nail conditioner. It’s a tiny addition with a big payoff for shelf life.
Swap: if you’re truly out, store your oil cool and dark and make smaller batches more often.
Calendula CO2 extract
This is my soothing secret. Calendula is famous for calming skin that is inflamed, chapped, or just cranky. A whisper of the CO2 extract adds comfort and a touch of protection without changing the texture.
Swap: an infused oil made with dried calendula petals is lovely, or skip it and lean on your carriers; the blend still works.
A quick word on scent, because our noses matter. I use a bright citrus-meets-lemongrass profile that smells clean and happy. It’s the thing that makes people ask what I’m wearing when I hand them a bottle as a gift. If you prefer unscented, that’s fine too. Your nails won’t mind.
Why make your own cuticle oil?
Nails and cuticles take more abuse than we realize. Winter air, summer sun, detergent, sanitizer, gardening, rock climbing, dishwashing marathons, even just typing all day and then hopping in a scalding shower. The result can be dry, cracked cuticles and nails that feel fragile or slow to grow.
A good nail and cuticle oil does three helpful things at once. It moisturizes the cuticle area, softening that tough ring of skin so it can flex instead of split. It forms a breathable barrier that buffers daily wear and tear. And, when you massage it in, you encourage circulation around the nail matrix, which supports healthy growth. It’s the manicure world’s equivalent of daily face moisturizer, not a once-in-a-while treat.
Could you just rub on coconut oil or your homemade hand cream and call it a day? Sure, if the goal is quick softening. A dedicated DIY cuticle oil is designed to penetrate more effectively than many thick creams, and the particular oils in this blend help toughen weak nails over time while keeping the skin around them supple. That combo is what turns my scruffy hands into “I actually care” hands.
Watch The Video

As an Amazon Associate, I earn from qualifying purchases. If you buy via the links here I may earn a small affiliate commission at no cost to you, please read my affiliate disclosure.
Ingredients
Equipment
Method
- Place a clean, sterilized beaker onto the digital scale and press the tare button.

- 15 grams Jojoba Oil, 12 grams Sweet Almond Oil, 12 grams Grapeseed Oil, 9.5 grams Argan Oil, 0.5 grams Vitamin E OilIn order of appearance (in our video), pour in the carrier oils, pressing the tare button after each oil, to include Jojoba Oil, sweet almond, grapeseed oil, argon oil, and vitamin E. Then give them a quick stir
- 0.5 grams Calendula co2 Extract, 0.25 grams May Chang Essential Oil, 0.25 grams Grapefruit Essential OilNext, add the calendula extract and the essential oils. Stir again, ensuring that all the oils have been fully dispersed within each other.
- 2oz Dropper BottleUsing a small funnel, transfer the oils to a clean, sterile bottle.


New to DIY skincare?
If you’re enjoying making your own products, you might like Radiance, my free email course where I teach the foundations of DIY skincare step by step!Method overview
There’s no heating here. I like to place a clean, dry beaker on my scale, tare to zero, and measure each carrier oil directly into the beaker. Give the blend a slow stir until it looks uniform and glassy. Add your tiny amounts of vitamin E and any soothing extract, stir again, then finish with your chosen essential oils if you’re scenting. Decant into small, sterile dropper bottles using a funnel. Tap the bottles gently on a towel to pop any trapped air bubbles. Cap, label, done.
The first time I made this, I skipped the funnel and tried to “carefully pour.” I decorated my counter instead. Learn from me.
Tips and mistakes to avoid
- Patch test first. Citrus and spice-leaning essential oils can be intense on some skin. Dab a tiny amount along the side of one nail, wait a day, then go all in.
- Keep it water-free. This is an anhydrous formula, so no preservative is needed. Just avoid dripping water into the bottle, especially if you keep one by the sink.
- Less scent than you think. It’s tempting to keep adding drops until you really smell it. Don’t. A modest scent is elegant, and it plays better with nail polish or hand cream.
- Label the bottle. Future-you will forget what’s in the unmarked clear vial. A bit of washi tape and a date does the trick.
- Mind the sun. Some expressed citrus oils can make skin more sun sensitive. If you notice any skin sensitivity, use the oil at night or swap to non-phototoxic aromatics.
- Use a tiny funnel. Or the steady hands of a surgeon. Either works, the funnel is easier.
Substitutions and variations
You can keep this DIY cuticle oil luxurious, or you can shrink it to a minimalist, budget-friendly duo. Both are valid.
- Save-the-day simple: Mix a neutral oil like sunflower or olive with a few drops of your favorite essential oil, and you’ve got a basic cuticle oil that is worlds better than nothing. It won’t feel fancy, it will still help.
- Unscented sensitive blend: Skip essential oils entirely and lean into the carriers. Jojoba plus grapeseed makes a fast-absorbing, office-friendly option.
- Cozy nighttime version: Swap the bright citrus for calming lavender with a whisper of vanilla oleoresin if you have it. I like this before bed, especially when winter radiators are roaring.
- Extra-nourishing winter mix: Tilt the ratio toward richer oils like argan and sweet almond, then keep a lighter oil for slip. It hugs cracked skin a little longer.
- Polish-prep tweak: If you apply right before polishing, scent very lightly or not at all. Wipe nails with a bit of alcohol before lacquer so adhesion stays strong.
If you change carrier oils, try to keep a balance of one quick-absorbing oil for glide and one cushioning oil for staying power. That structure is the secret to a cuticle oil that feels nice now and keeps working as you get on with your day.
Troubleshooting
My oil looks cloudy in the bottle.
Some oils naturally turn a bit hazy in cool weather. Warm the bottle between your hands for a minute and it should clear. If not, it’s still fine to use.
There’s sediment at the bottom.
Highly concentrated extracts can settle if not fully dispersed. Shake well before each use. If it bothers you, premix the extract into a small portion of carrier oil, then blend that into the main batch next time.
The scent is too strong.
You can dilute by combining part of the scented oil with an equal amount of unscented carrier oil in a clean bottle. For future batches, go lighter on the fragrance.
My skin tingles or turns pink.
Wash hands, stop using, and patch test another day with an unscented version. Consider avoiding citrus if you’re particularly reactive.
The dropper cap leaks in my bag.
Make sure the insert is seated properly and don’t overfill. I leave a small headspace so the cap seats tightly.
Storage and shelf life
Because this is a water-free DIY cuticle oil, a preservative isn’t required. That said, oils can oxidize over time. Store your bottles out of direct light and away from heat. Including a touch of vitamin E is helpful, and smaller bottles stay fresher since they’re exposed to less air day after day. If the scent turns “paint-like” or the color shifts noticeably, it’s time to mix a fresh batch.
I keep one bottle by the sink for daily use and tuck the backup in a cool drawer. That routine stretches freshness without me having to think about it.
How to use
- Daily habit: Massage a tiny drop around each nail after washing hands or at bedtime. The massaging part matters because it boosts circulation around the nail bed, supporting growth.
- Before polish: Apply, wait a few minutes, then wipe the nail plate with alcohol so your polish adheres. Oil belongs on the skin surrounding the nail, not the plate right before lacquer.
- On the go: Brush a whisper of oil on the cuticle, rub it in, then tap any extra across knuckles. It leaves a soft sheen that looks healthy, not shiny.
- For very dry hands: Pair with a plain hand cream. Oil first for slip and nourishment, cream second to lock it in.
- Skin types: Most people do well with this blend. If you’re very sensitive, start unscented and introduce aroma later if you want it.
You’ll notice the nicest results when you use it consistently. A week of nightly application transformed my worst winter hangnails into tidy, flexible cuticles. You know what’s funny? I didn’t love the bright scent the first day, then it grew on me and now it reminds me to breathe for a second and slow down.
Scaling and cost notes
One of the perks of a simple oil blend is how easily you can scale it up or down. Percent-style thinking keeps the texture consistent whether you are making a single travel bottle or enough for a small gift stash. If you’re increasing batch size, use a beaker with room to stir, measure carefully on a scale, and bottle promptly so less air sits in the mix.
Cost wise, the carriers do the heavy lifting, and they’re kind to the budget. Splurge on a small bottle of argan if you can, or make a more economical version with olive and sunflower to start. Both give great results, and you can always upgrade ingredients later. Packaging matters here too. A tidy little dropper bottle and a hand-written label make the whole thing feel store worthy, which is half the joy when you’re gifting.
A few real-life notes from my bench
The batch in the photos came together in about five minutes. I stirred to a clear blend, added my extract and antioxidant, finished with the citrus-bright essential oils, and funneled into dropper bottles. I tapped each bottle lightly to release bubbles, then capped and called it a day. I put one bottle by the soap dispenser to remind me that after all that handwashing, I owe my cuticles a little kindness. On day three, I caught myself gesturing in the grocery line and actually admiring my nails. Small victory.
While we’re on the topic, I wish I had known earlier that even the simplest two-oil mix is worth doing. If your week is hectic, mix olive oil with a dash of essential oil and start there. Progress beats perfection.
Ready to mix your own DIY cuticle oil?
If you want the exact proportions and the short step-by-step, jump to the recipe card below and print it or save it for later. Make one bottle for the sink, one for your bag, and gift another to the person who always compliments your manicure. Your hands are about to look very loved.