If your hands look like they’ve been moonlighting as sandpaper testers, welcome! You’re in good company. I make and test DIY beauty products for a living, and the thing that finally solved my “dry by dinner” problem wasn’t a cream at all. It was a butter balm recipe.
Not a classic emulsion with water and emulsifier, and not a hard waxy salve either. This sits right between those ideas, soft and scoopable, then quietly protective.
I use it at night, and I wake up with calm, comfortable skin that doesn’t snag on the duvet. Honestly, the first time I tried this exact formula I thought, hmm, this is almost too simple. Then I slept on it. Literally. The next morning, I was a convert.
About My Overnight Butter Balm

This post walks you through the why and how of my Overnight Butter Balm, the one I keep by the bed year round. I’ll explain what makes it different from a DIY hand cream, why it’s built to absorb faster than typical waterless moisturizers, and how to tweak it for your skin and climate.
No rigid lab talk, just what works. If you want the precise formula and the step-by-step method, head to the recipe card below when you’re done reading.
And yes, it smells absolutely beautiful, thanks to the addition of lavender essential oil (my go to). Lavender is the obvious choice here, though I’ll share other scent ideas too.
At a Glance
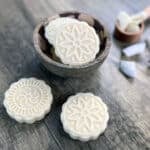
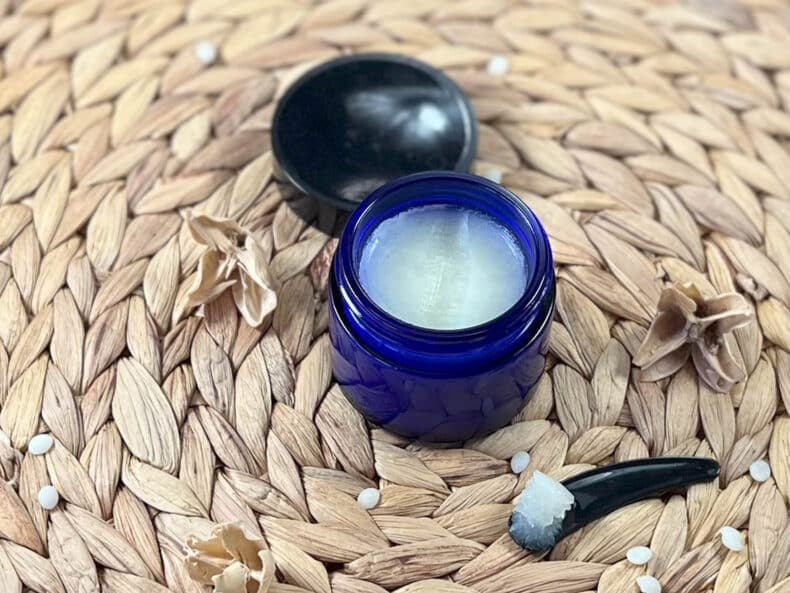
- What you’ll make: A small jar of soft, scoopable Butter Balm for overnight hand care. Not greasy bricks, not DIY body lotion, something in between.
- Who it suits: Dry, over-sanitized hands; frequent hand washers; anyone who hates greasy palms. Sensitive noses can go unscented or pick gentle oils.
- Hands-on time: About the length of a podcast episode, then hands off while it sets overnight.
- Difficulty: Beginner friendly. If you can melt chocolate without burning it, you can do this.
- Quick safety nudge: This is anhydrous, so it doesn’t need a water-based preservative. Do add an antioxidant, and keep water out of your jar. If using essential oils, check limits for hand products and potential allergens.
- Where to find details: The full formula and step sequence live in the recipe card. Use this post for context, technique, and troubleshooting.
Why a Butter Balm and not a Cream?
Let’s clear up a common confusion. A cream is an emulsion. That means water plus oil brought together with an emulsifier, stabilized, and usually preserved. Lovely for daytime, light and quick to sink in, but what I wanted here was a night treatment that stays put long enough to do the heavy lifting.
A butter is usually soft and scoopy, mostly butters and oils with little to no wax. A balm leans more protective, with some wax structure like a lip or cuticle balm. This Overnight Butter Balm lands right in the middle.
Soft from the butter and dry oil, a touch of wax for occlusivity, just enough to keep it from melting on contact or turning into a slippery mess. That combo is the sweet spot for hands in bed. You get cushion without a film that clings to your pillowcase.
Also, waterless moisturizers can be rich to the point of greasy. That’s not ideal for a hand product you actually want to use every night. The trick is to build it with fast-absorbing butters and “dry” oils. So yes, no shea or cocoa here. I love both in body bars, but on the hands, under covers, they can get a bit messy. Mango butter or kokum butter is a better option; it softens and then quickly sinks in.
Ingredient Spotlight
Let’s talk through the brains of this Butter Balm. I’ll keep it practical, then I’ll give you real-world swaps.
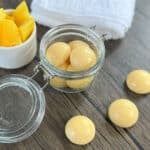
Mango Butter (or Kokum Butter)
The heart of this butter balm. Mango butter is smooth and quick to sink in compared with the usual suspects. Kokum behaves similarly, firm in the jar, light on skin, so your hands don’t feel sticky or greasy. Either one supports that soft set you can scoop with a fingertip.
Swap ideas: If you must deviate, try a blend that still skews fast absorbing. Avoid heavy shea or cocoa for this exact use; they’re amazing, just not when you want grease-free hands by lights out. Honestly mango or kokum are definitely your best options, though.
Camellia Seed Oil
This is the balancer. It’s a classic dry oil, thin in feel, loved by people who want slip without residue. In this formula it spreads nutrients across the skin and quickly disappears as you drift off. It also helps counter any wax drag, keeping the finish elegant.
Swap ideas: Fractionated coconut oil, specifically caprylic/capric triglyceride (the liquid kind), is an excellent alternate. It’s light, stable, and plays well with butters. Skip solid coconut if greasiness bothers you.
Berry Wax
Structure without stick. Berry wax is vegan and less occlusive than beeswax, which means you keep glide and skip the heavy grip. I like it in hand products because it sets a smooth top and resists dents in the jar, but doesn’t make the balm stubborn to spread.
Swap ideas: Candelilla wax can work, but take it easy since it’s stiffer and can add drag. A tiny amount goes a long way here.
Vitamin E (Tocopherol)
This isn’t a preservative for microbes, it’s an antioxidant that helps delay rancidity in oils. It stretches the practical life of your Butter Balm and gives a nice feel. Toss it in once things cool down a bit so you don’t cook it.
Swap ideas: If you’re out, you can make a batch without it and just use it faster, but I recommend keeping vitamin E around if you make any oil-based products.
Lavender Essential Oil (optional, but lovely)
A familiar bedtime choice that leans floral and clean. It does more than scent your Butter Balm, it creates a tiny ritual. I find that matters at night when you want your brain to shift gears. Lavender is used in aromatherapy to help induce a state of tranquil calm, ideal for use right before bed!
Swap ideas: Roman chamomile is a close second for sleep, but also skin soothing goodness. If fragrance oils are your preference, choose one safe for hand products and check usage limits. Sensitive skin? Go unscented and enjoy the natural buttery aroma.
(Allergens note: essential oils may contain allergens. Always check supplier documentation and keep an eye on how your skin responds.)
Watch The Video

As an Amazon Associate, I earn from qualifying purchases. If you buy via the links here I may earn a small affiliate commission at no cost to you, please read my affiliate disclosure.
Ingredients
Equipment
Method
- 2.5 grams Berry Wax, 22 grams Mango ButterWeigh the wax and butter, then place them into a heatproof beaker.

- Prepare a water bath by filling a shallow saucepan with a couple of inches of water. Place the breaker into the saucepan and bring the water to a gentle simmer until the wax and butter have melted.
- 24.5 grams Camellia Seed OilOnce the butter has fully melted, remove the container from the heat and allow it to cool slightly before adding the Camellia seed oil.
- 0.5 grams Vitamin E Oil, 0.5 grams Lavender Essential OilAfter the Camellia oil has been added, the mixture should have cold to around 104°F (40°C),At this point, it is safe to add heat-sensitive ingredients. In this case, vitamin E and essential oil.
- Stir the mixture continuously until it thickens into a creamy consistency. This can take some time, so alternate between stirring for a minute and resting for a minute.
- To speed up thickening, you can place the container into an ice bath for a few minutes. Make an ice bath by adding cold water and ice cubes to a bowl large enough to hold your container. This process works quickly, so keep stirring, and if the mixture becomes too cold, lift it out of the bath and return as needed.
- For a smooth finish, transfer the butter/balm into its container once it reaches the point where a drizzle across the surface leaves a faint trace. For a lighter whipped finish, use a hand whisk to fluff it up. Stored in a cool, dry place, this butter/balmshould last for at least one year.


New to DIY skincare?
If you’re enjoying making your own products, you might like Radiance, my free email course where I teach the foundations of DIY skincare step by step!Tips and Mistakes to Avoid
Let me save you a little trial and error.
- Don’t over-wax it. More wax seems safer, but your Butter Balm will drag and feel too occlusive. If you sub for candelilla, keep it low in the formula, as it’s stiffening power is much stronger than berry wax.
- Temperature really matters. Add vitamin E and scent when the mixture is warm, not hot, so they don’t flash off or degrade. If you can comfortably touch the side of the beaker for a couple seconds, you’re in the right ballpark. It should still be free flowing enough to pour into your chosen container.
- Use an ice bath strategically. If you chill too aggressively without stirring, you can get uneven set or gritty crystals from the butter. Dip in, stir, rest, repeat.
- Avoid water in the jar. This product doesn’t have water, so it doesn’t need a preservative. But any droplets introduced by wet fingers can invite trouble. Dry hands, dry spatula, clean container. This goes for after you’ve made it, too. Avoid dipping wet fingers into the jar when using the product.
- Be conscious of your climate and environment. Hot room? Your balm may set softer. Cold room? It might seem firmer. This is normal, and there are easy fixes in the troubleshooting section.
And one more from my own mildly chaotic kitchen: I once poured too soon because I was impatient to get to bed. The top sank in the center as it cooled, like a little crater. Still totally usable, just aesthetically unappealing. Waiting for that faint trace makes a difference.
Troubleshooting
Things happen. Here’s how to get back on track.
- Balm set too soft, almost lotion-like in the jar: Your room was warm or your wax level was on the lower end. Remelt gently, add a touch more structuring wax, stir, and pour again. You can also park the jar in a cool room to firm it up, but the re-melt gives you a surer fix.
- Balm set too hard, feels draggy: You’ve got a bit too much structure or too cool a pour. Remelt the jar, add a little more liquid oil to loosen the glide, then repour when you see light trace.
- Gritty or grainy feel: This is usually butter crystals forming from temperature swings. Remelt fully until clear, then cool more evenly while stirring. An ice bath can help if you alternate short dips with steady stirring.
- Sinkhole or dip in the center after cooling: You poured too hot or too fast. Next time, wait for that faint surface trace. For now, press a clean spoon to soften the top, or remelt and try again.
- Scent faded: Added too hot. Add fragrance or essential oils around warm-to-cool temperatures. For a faint aroma, that might be fine, but if you wanted more, remelt gently and re-scent within safe use limits.
- Oily puddle on top after a day: The pour happened before the mixture began to thicken, so components separated a touch. Remelt completely, stir as it cools until the texture thickens slightly, then pour again.
If you ever wonder whether your jar smells off or looks strange, trust your nose and eyes. Fresh oils smell pleasant or neutral. If it smells sharp or like crayons, it’s time for a new batch.
Storage and Shelf Life
Because this Butter Balm is water-free, you don’t need a broad-spectrum preservative. That’s a relief. You do want an antioxidant such as vitamin E to slow oxidation. Keep the jar cool, dry, and away from direct sunlight. I label mine with the month I made it, nothing fancy, just a reminder.
But generally, shelf life depends on your oils and how you treat them. With fresh ingredients and clean habits, a jar like this typically lasts about a year. If your home runs warm, store a backup jar in a cooler cupboard. If it melts and resets during a heatwave, no panic, just re-melt and cool more evenly to avoid graininess.
Also, water is the enemy here. Wet fingers introduce moisture and can shorten the life or cause surface blemishes. Use dry hands or a small spatula. It’s a tiny ritual that pays you back in product longevity.
If you’re planning to sell your products, I recommend using a good quality, oil soluble, broad spectrum preservative. Why? Because you have no idea how your customer might use this product. If they dip wet fingers into the jar when using the product, this is rapidly reduce its shelf life. Better safe than sorry when you’re taking your products to market.
How to Use
At night, after your last hand wash, dry well. Scoop a pea to almond sized amount, depending on how dry you are. Warm it between your palms for a second so it thins, then massage into hands, cuticles, and the backs of your hands where dryness really shows. I take the extra few seconds to work it into knuckles and around nails. You can put on thin cotton gloves if you like that spa feeling, but you don’t need to.
Frequency is up to you. Nightly in the depths of winter, every other night in milder weather, and after any chore session that leaves your hands squeaky. If you’re prone to sensitivity, choose unscented or stick with a gentle essential oil you know you tolerate, and do a small patch test first.
One note that surprised me: using a dry oil in the formula means you can also apply a tiny amount in the daytime if you’re staying home and typing. It won’t slime your keyboard if you go light and give it a minute to settle.
Why Overnight Works So Well
Quick detour into skin behavior. Your skin barrier does its repair work while you sleep, and transepidermal water loss tends to rise at night. That’s a fancy way of saying your hands are thirstier and more receptive. A Butter Balm, with its soft occlusion and lightweight glide, gives the skin a steady drip of comfort while you’re not washing dishes, sanitizing, or typing. Instead of vanishing the way a daytime lotion can, it lingers just enough to matter.
I didn’t buy into the overnight thing at first. I tried slathering heavy balms and woke up annoyed with greasy fingers and a disgruntled cat. Switching to fast-absorbing butter plus dry oil made all the difference. Now it’s a tiny ritual next to my book. Two seconds, then lights out.
Ready to Make Your Own Butter Balm?
If your hands have been begging for a reset, this overnight butter balm recipe is the kind thing to do. It’s quick to make, easy to customize, and quietly elegant in the jar. Keep one by your bed, another in the bathroom for post-shower, and if you’re like me, a third tiny pot on the desk for cuticles that keep catching on sweaters.
When you’re ready for exact quantities, temperatures, and the step-by-step, open the recipe card and follow along. Print it if you’re a paper person. Then report back in the comments with your scent choice or any tweaks you fell in love with. I’m always curious which version becomes your nightly ritual.