
There are no rules when making a bootlace necklace, it’s really all about trial and error. However, if you are not sure where to start, let me show you how I make mine.
First think about the length you would like the necklace to be and how you would like it to fasten it (see notes on finishing your homemade necklace).
A favorite bootlace style is to hang a large bead or pendant as the centerpiece, but as I said before there are no rules and I’ve seen some wonderful necklaces that have been almost entirely covered with beads leaving very little of the leather bootlace on view.

Try experimenting with different sized beads or think about using spacer beads between bigger beads. You may want to knot the bootlace in between each and every bead or knot groups of beads along the bootlace.
You can also try experimenting with different thicknesses and textures, cotton, wax and leather all make good necklaces, and they come in an array of different colors.
Another interesting look is to use more than one lace, or why not try using two different colors.
The bootlace necklaces I have created bellow have no permanent fixings or finishing’s so they can be taken apart rearranged and remade at the drop of a hat.
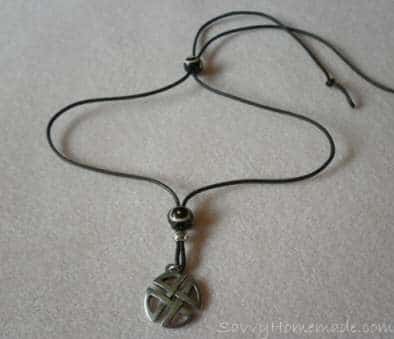
A Double Lace Necklace

What you will need:
- Jewelry Pendant
- A Jump ring
- Jewelry Beads – Wide holed (I’ve used metal barrel spacer beads)
- Leather or Cotton Thong 68 inch (5 1/2 foot) Length and (1.5mm thick)
How To Make It:
The pendant I am using for this bootlace necklace has a small hole running from front to back, I will need to use a jump ring so that the bootlace can go through this and leave the pendant hanging correctly, it rests flat upon the chest/neck. For other ways of hanging your pendant see basic notes on hanging a pendant.
Step1 Open the jump ring with 2 pairs of pliers, one on each side of the split, and twist the pliers slightly in opposite directions. slip the jump ring through the hole of the pendant then close it by repeating the twisting motion in reverse to get the ends back together again.

Step2 Fold the bootlace in half and thread it through the jump ring on the pendant, and then cut the boot lace in half leavening two separate lengths of bootlace threaded through the pendant.
Step3 Thread three or four spacer beads on to each side of the pendant.

Step4 Overlap the ends of the bootlace and then tie a slipknot at each end; this will allow the length of necklace to alter to its desired length just by sliding the slip knots back and forth.

A Bone Bead Necklace
What you will need:
- A Jump ring
- Jewelry Beads – 2 wide holed bone beads and 1 spacer bead
- Leather or Cotton Thong 34 inch (5 1/2 foot) Length and (1.5mm – 2.0mm thick)
How To Make It:
As with the bootlace necklace above the pendant I am using has a small hole running from front to back, so I will need to use a jump ring so that the bootlace can pass through this easily.
- Open the jump ring using 2 pairs of pliers, one on each side of the split and twist the pliers slightly in opposite directions. slip the jump ring through the hole of the pendant then close by repeating the twisting motion in reverse to get the ends back together again.
- Thread the bootlace through the jump ring on the pendant.
- Thread both ends of the bootlace through the spacer bead followed by one wide holed bead, if the beads are a nice snug fit you should be able to suspend the beads in any position you want, if not pull the beads down the boot lace so they rest neatly at the top of the pendant.
- Place the last wide holed bead on to the bootlace and the tie a not in each end of the bootlace. Once again this last bead should be a nice snug fit but still slide up and down the bootlace with ease allowing the size of the necklace to be altered to any length.
- If the last bead is too loose you may prefer to omit it and finish the bootlace necklace with a couple of slip knots. To do this, overlap the ends of the bootlace and then tie a slipknot at each end; this method also allows the length of necklace to be altered.
For more information on finishing your necklace take a look though our basic necklace making guide.
